Table of Contents
Advertisement
Quick Links
Advertisement
Table of Contents

Subscribe to Our Youtube Channel
Related Manuals for Daewoo SKANDIK SDA1698


Summary of Contents for Daewoo SKANDIK SDA1698
-
Page 2: Important Safeguards
Important Safeguards When using electrical appliances, basic safety precautions should always be followed. These instructions should be saved for future reference: • Read and familiarise yourself with all operating instructions before using this microwave oven. • Before plugging your unit into the mains, visually check that the unit is intact and has not suffered any transit damage. - Page 3 separate remote-control system or any other device that switches the appliance on automatically. • It is imperative to unplug the power cord after the appliance has been used, before it is cleaned and whilst being repaired. • Repairs to electrical appliances should only be performed by a qualified electrician.
- Page 4 • Metallic containers for food and beverages are not allowed during microwave cooking. • When heating food in plastic containers or paper containers, keep and eye on the oven due to the possibility of ignition. • The contents of feeding bottles and baby food jars shall be stirred or shaken and the temperature checked before consumption, in order to avoid burns.
-
Page 5: Installation
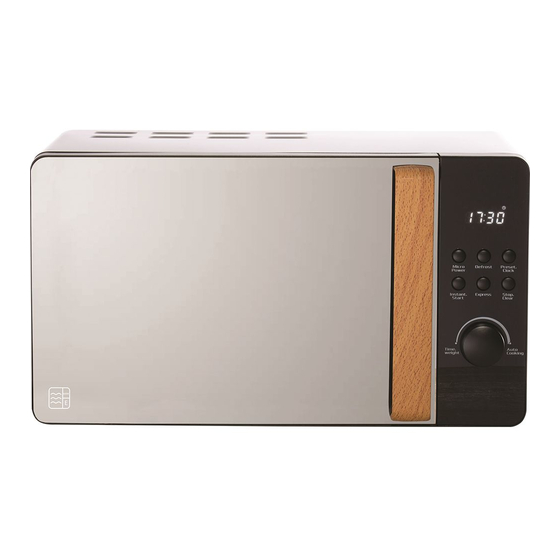
after the microwave heating has ended. • Only use utensils suitable for use in a microwave oven. • Do not store food or other items in the oven. • Do not operate the oven without any food or liquid inside, this may damage the oven. - Page 6 Features 1. Mirror window 2. Glass turntable 3. Waveguide cover Waveguide 4. Door lock cover 5. Turntable support 6. Turntable ring 7. Control panel The door of the microwave oven must be fully closed in order for it to operate, this is due to a safety interlock between the locking mechanism and the control panel.
-
Page 7: Control Panel
Control panel Initial set up The LED display flashes 3 times when plugged into the power supply. The display will then show “:”, prompting you to input a cooking menu and the time Time.Weight/Auto Cooking Increase or decrease cooking time or weight. Turn to choose from the Auto cooking menu Stop.Clear... -
Page 8: Instant.start
Setting the clock For example to set the clock for 12:30 1. After the microwave oven is plugged into the power supply the display will show “:”. 2. Press the Preset.Clock, the display will show 0:00. 3. To set the hour, turn the Time.Weight/Auto Cooking knob to 12:00. - Page 9 The maximum time which can be set is 60 minutes. Never operate the microwave oven when empty. Caution • If you want turn the food during cooking, open the door, turn the food and press the Instant.Start button once and the cooking time will continue.
- Page 10 Using the Auto menu 1. Turn the Time.Weight/Auto Cooking knob, the LED display will show A.1, A.2 and so on up to A.8. 2. After setting the Auto menu, press the Instant.Start button, the timer will now start to count down. Display Food Weight...
- Page 11 Auto Start with timer delay function You can pre-set a cooking time for later in the day, this consists of 2 steps: Step 1 - Setting the clock Step 2 - Setting the cooking menu and time For example if the time is now 12:30 and you want the cooking time to start at 14:30 with 100P microwave power for 9 minutes and 30 seconds.
-
Page 12: Express Cooking
20P. 4. Turn the Auto Cooking/Time.Weight knob to set the cooking time, the display will show 9:00. 5. Press the Instant.Start button to start cooking. When the microwave has finished cooking at 100P it will automatically start to cook at 20P. A maximum of 4 cooking sequences can be set. -
Page 13: Utensils Guideline
Utensils guideline It is recommended that only utensils and containers marked safe for microwave use should be used in this microwave oven. As a general rule containers made from heat resistant ceramic, glass or plastic are suitable for microwave cooking. Never use metal containers for microwave cooking as sparks are likely to occur. - Page 14 Cleaning Remove the power cord from the wall outlet before cleaning. Don’t immerse the appliance in water or other Warning fluids when cleaning. • Wipe the exterior with soft damp cloth and dry thoroughly. • Using a soft damp cloth, wipe clean the interior of the door and door seals, interior cavity to remove any spill or spatter and dry thoroughly.
-
Page 15: Cooking Tips
Method 3 - Bicarbonate of soda 1. Add 1 cup of water and 2 tbsp bicarbonate soda to a microwave-proof bowl or plastic container and place in the centre of the oven. 2. Heat on high for 2 minutes 30 seconds or until the solution boils or gives off steam. - Page 16 Electrical Connections This appliance is fitted with a fused three-pin plug to BS 1363. If the plug has to be removed, it should be cut off and carefully disposed of immediately. To avoid a possible shock hazard, do not insert the discarded plug into a mains socket. Fitting a new plug If for any reason you need to fit a new plug, the flexible mains lead must be connected as shown below.
- Page 17 Servicing Servicing and repairs should only be carried out by Warning qualified service persons. Some components still retain a high voltage charge even when the microwave oven is disconnected from the mains supply, never remove covers or guards. If any part of the oven or cord become damaged stop using it immediately and seek advice from a qualified service person.
- Page 18 GUARANTEE This product is guaranteed for 2 years from the date of original purchase. If any defect should occur due to faulty materials or workmanship, please return it to the store it was purchase from. You will need to have your receipt of purchase to hand. The guarantee is subject to the following provisions: •...
Need help?
Do you have a question about the SKANDIK SDA1698 and is the answer not in the manual?
Questions and answers