
Related Manuals for KVM-TEC 6851

Summary of Contents for KVM-TEC 6851
- Page 1 The kvm-tec connection to virtual machines MANUAL Gateway Part Nr 6851 www.kvm-tec.com...
-
Page 2: Table Of Contents
MX Local Extender is the ideal combination 1.4 About the product - Gateway with virtual machines in the switching system. With the kvm-tec gateway it is possible to connect to virtual machines or remote PCs outside the switching network. -
Page 3: Introduction
5. Warranty shock! 5.1. Standard warranty 5.2 Extended warranty 6. Cable requirements 6.1 Requirements for CAT5e/6/7 cables 7. Requirements network-switch 7.1 Recommended switches 8. Contacts & phone / emails 9. Notes 4 | kvm-tec 5 | kvm-tec kvm-tec | 5... -
Page 4: Safety Instructions
• Prior to connecting to the mains, make sure your local mains voltage matches the rating indicated on the product. • The product must be connected to a permanent and earthed AC wall socket. 6 | kvm-tec kvm-tec | 7... -
Page 5: Technical Spezifications
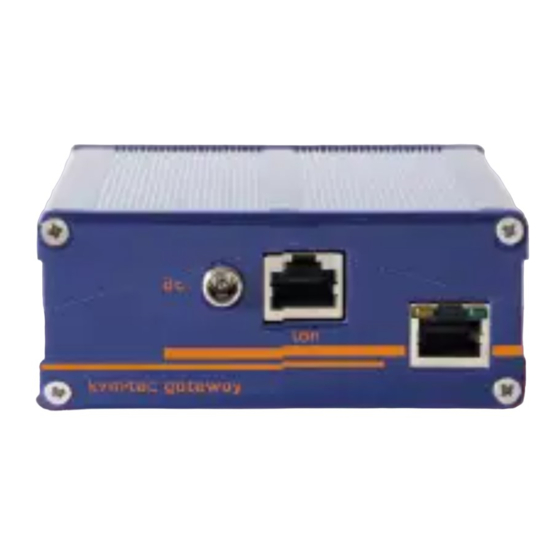
12V/2A power supply MTBF 82 820 calculated hours / 10 years connection to LAN reset button for reset kvm-link connection for CAT X cable to KVM network power/status LED display the extender status 8 | kvm-tec kvm-tec | 9... -
Page 6: About The Status Led
To attach the mounting pads or rubber feet: 1. Remove the protection layer from the mounting pads or rubber feet (G). Meaning of LED indicators 2. Attach the mounting pads or rubber feet (G) to the bottom the units. 10 | kvm-tec kvm-tec | 11... -
Page 7: Installation Of The Extender
5. then connect Remote audio/out to speakers or headphones using the audio cable. 6. connect the gateway to the Internet with a network cable via the Lan port. HAVE FUN - your kvm-tec Gateway is now ready for all virtual machines ! 12 | kvm-tec... -
Page 8: Operation, Adding General
(RDP/VNC). This button takes you to the Add window. Once all the parameters are in place, you can press the „Finish Adding“ button to save the RDP connection. 14 | kvm-tec kvm-tec | 15... -
Page 9: Operation For Vnc
Now you reach the edit window. The data, which were already stored, are taken over, except for the password! Once all the parameters are in place, you can press the „Finish Adding“ button to save the VNC connection. 16 | kvm-tec kvm-tec | 17... -
Page 10: Sorting The Saved Connections
In order to be able to sort now, press on the desired head of a column (except Delete), after which should be sorted. If you want to sort e.g. by favorites, click once on „Favorites“. Now the entries are sorted in ascending order. 18 | kvm-tec kvm-tec | 19... -
Page 11: Deleting A Saved Connection
To do this, press the star icon of the desired list item and the star will turn yellow or gray. yellow - Favorited gray - not favorited To do this, simply press the “trash can” button on the main page, which you will find in the Delete column. 20 | kvm-tec kvm-tec | 21... -
Page 12: Connect
If the KVM client is closed for any reason, you can restart the „KVM Client“ input software. If you are satisfied with your selection in the list and the settings, press the „Connect“ button, the virtual connection will start.. 22 | kvm-tec kvm-tec | 23... -
Page 13: Update
USB save feature on the connected remote unit is deactivated (USB Mass Storage enable). Before the update is carried out, the entry must be confirmed as follows: 24 | kvm-tec kvm-tec | 25... -
Page 14: Settings
Thus, future extensions can be installed without problems. 3.5 EXIT Reboot: With the selection „Reboot“ the operating system of the gateway is restarted. With a left mouse click on „Exit viewer“ the existing session is closed. 26 | kvm-tec kvm-tec | 27... -
Page 15: Using The Osd For Gateway Connections
The Credentials should never include the following characters: ‘,’ ‘;’ ‘ ‘ • For VNC leave Username, Password and Domain empty (as shown in the picture) Server is for the IP-Adress so replace the x. 28 | kvm-tec kvm-tec | 29... -
Page 16: Maintance & Care
By disposing of the packaging and packaging waste in the proper manner, you help to avoid possible hazards for the environment and public health. Art Nr 9003 warranty extension to 5 years per Set Art Nr 9002 warranty extension to 5 years per Unit 30 | kvm-tec kvm-tec | 31... -
Page 17: Cable Requirements
• Erroneous assignments cannot be found with a simple cable tester. The following switches have all been tested and verified to work with all kvm-tec extenders. • The pins for the green pair of wires are not adjacent to one other. -
Page 18: Contacts & Phone / Emails
9. NOTES 8. CONTACTS & PHONE / EMAILS 8. ADDRESS & PHONE/EMAIL If you have any questions about our products, please contact kvm-tec or your dealer. kvm-tec electronic gmbh Gewerbepark Mitterfeld 1A 2523 Tattendorf Austria Phone: 0043 (0) 2253 81 912 Fax: 0043 (0) 2253 81 912 99 Email: support@kvm-tec.com...
Need help?
Do you have a question about the 6851 and is the answer not in the manual?
Questions and answers