Table of Contents
Advertisement
Advertisement
Table of Contents

Subscribe to Our Youtube Channel
Related Manuals for Akaso FOCUS


Summary of Contents for Akaso FOCUS
- Page 1 Quick Start Guide AKASO FOCUS Mini Video Projector V1.3...
- Page 2 CONTENTS English 01 - 13 Español 14 - 26 日本語 27 - 39...
-
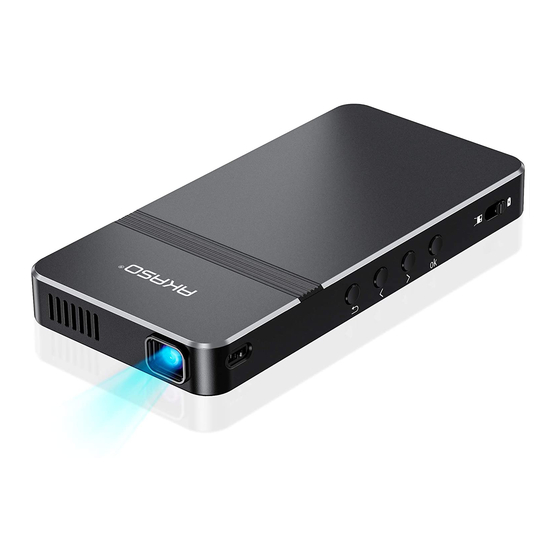
Page 3: Projector Buttons & Functions
English PROJECTOR BUTTONS & FUNCTIONS Focusing Wheel Power Bank Mode Return Forward Backward HDMI Earphone Projection Mode Memory Card Port Power Button Note: When in the EZWire/EZCast/HDMI interface, the button function is changed. Forward: Change to volume + Backward: Change to volume -... -
Page 4: Infrared Remote Control
INFRARED REMOTE CONTROL On/Off Mute EZCast Operation No Function HDMI Operation Directions Menu Return Home Vol +/- Note: When using the IR remote control, you should aim at the projector rather than screen. POWER ON/OFF 1. Pull the power button to the left and hold it for about four seconds until the green indicator on the projector bottom is lit up, then the projector starts to work. -
Page 5: Power Bank Mode And Charging Method
POWER BANK MODE AND CHARGING METHOD 1. When the projector is in power bank mode/ projection mode, the projector can charge other devices via USB port. 2. In order to improve charging efficiency, please charge the projector with the original power adapter in power bank mode. - Page 6 Trust This Computer? Your settings and data will be accossible from this computer when connected Trust Don’t Trust Step 3 Android Device: 1. Select and click EZWire icon in the main projector interface. 2. Download “EZCast” app by scanning the below QR code/scanning the QR code on the EZWire interface/searching for “EZCast”...
- Page 7 Android Android No device Option 1: Turn on USB Debugging mode to mirror usb debugging mode need to turn on only one tinme Developer options Debugging USB debugging Allow USB debugging? USB debugging is intended for developement purposes only, Use it to copy doto oetween your computer and your device, install opps on your device...
-
Page 8: Ezcast: Screen-Sharing Via Wireless Connection
EZCAST: SCREEN-SHARING VIA WIRELESS CONNECTION Air Play Wireless Connection: 1. Select and click EZCast icon in the main projector interface. 2. Connect iOS device with the Wifi hotspot “AKASO_FOCUS_ ******” provided by EZCast interface, the password is “87654321”. 3. Open Air Play (Screen Mirroing) in the settings of the iOS device, select projector ID “AKASO_FOCUS_ ******”... - Page 9 Other devices EZCast connection: 1. Select and click EZCast icon in the main projector interface. 2. Download “EZCast” app by scanning the below QR code/scanning the QR code on the EZWire interface/searching for “EZCast” in App Store/Google Play/official website www.ezcast.com, etc. 3.
-
Page 10: Hdmi Input
EZChannel Sign in Photo AKASO_FOCUS-781C0181 Camera Music DLNA Mirror Off Help Settings Video THEME Settings(App) Cloud Storage Step 5 HDMI INPUT 1. Connect the projector and your device with HDMI cable. 2. Select and click HDMI icon in the main projector interface. Then wait a moment, the screen content on your device will be displayed on the projector screen. -
Page 11: Media Library
MEDIA LIBRARY Support Memory Card & U-disk 1. Select and click Media icon in the main projector interface. 2. Select and click memory/USB icon in the main projector interface. 3. Then you can choose to read the contents of memory card or U-disk on the projection like photos, videos or music. -
Page 12: Settings Description
SETTINGS DESCRIPTION 1. Select and click Settings icon in the main projector interface. 2. Select and click Management/Image/Network icon in the Settings interface to enter the Management/Image/Network interface. Media Management Image Network 3. In the Management/Image interface, press the button to cycle through Function options and press the OK Button to select desired Function option. -
Page 13: Settings Function
Settings Function Specifications English/Deutsch/Español/Français/Italiano/ Language , etc. 简体中文/日本語 Date: YY / MM / DD; Time: HH, MM (Use the the Set time and OK buttons for Date Time Selection) Volume Use the buttons to adjust the volume Firmware Version HT********V1 Management USB/OTA Firmware Upgrade... -
Page 14: Network Interface
4. In the Network interface, press the button to choose the Wifi you want to connect to, then press the OK button to confirm and enter the password interface. Use the the and OK buttons to enter the password. Then select on the interface, press the OK button to confirm and complete the password input. - Page 15 English CONTACT US For any inquiries about AKASO products, please feel free to contact us. We will respond within 24 hours. Tel: (888) 466-9222 (US) Email: cs@akasotech.com Web: www.akasotech.com...
- Page 16 Español BOTONES DE PROYECTOR & FUNCIONES Rueda de Enfoque Modo de Cargador Portátil Regreso Adelante Atrás HDMI Auricular Modo de Proyección Puerto de Tarjeta de Memoria Botón de Encendido Nota: En la interfaz EZWire/EZCast/HDMI, se cambia la función del botón. Adelante: Cambiar a volumen + Atrás: Cambiar a volumen -...
- Page 17 CONTROL REMOTO INFRARROJO Encendido/Apagado Desactiva Sonido EZCast Operación No Función HDMI Operación Direcciones Menú Regreso Home Vol +/- Nota: Cuando utilice el control remoto infrarrojo, debe apuntar al proyector en lugar de la pantalla. ENCENDIDO/APAGADO 1. Tire el botón de encendido hacia el izquierdo y lo presione alrededor de 4 segundos hasta que el indicador verde brilla del bajo del proyector.
- Page 18 MODO DE CARGADOR PORTÁTIL Y MANERA DE CARGA 1. Cuando el proyector está en el modo de cargador portátil/modo de proyección, el proyector puede cargar a otros dispositivos por el puerto de USB. 2. Para mejorar la eficiencia de carga, cargue el proyector con el cargador de corriente original en el modo de cargador portátil.
- Page 19 Trust This Computer? Your settings and data will be accossible from this computer when connected Trust Don’t Trust Paso 3 Android Dispositivo: 1. Seleccione y haga clic en el icono ZEWire en la interfaz principal del proyector. 2. Descargue la aplicación “EZCast” a través de escanear el siguiente código QR/ escanear el código QR en la interfaz EZWire/buscando “EZCast”...
- Page 20 Android Android No device Option 1: Turn on USB Debugging mode to mirror usb debugging mode need to turn on only one tinme Developer options Debugging USB debugging Allow USB debugging? USB debugging is intended for developement purposes only, Use it to copy doto oetween your computer and your device, install opps on your device...
- Page 21 EZCAST: PANTALLA COMPARTIDA POR CONEXIÓN INALÁMBRICA Air Play Conexión Inalámbrica: 1. Seleccione y haga clic en el icono ZECast en la interfaz principal del proyector. 2. Conecte su iOS dispositivo con el puento de acceso Wifi hotspot “AKASO_FOCUS_ ******” proporcionado por la interfaz EZCast, la contraseña es "87654321".
- Page 22 Conexión de EZCast de Otros Dispositivos: 1. Seleccione y haga clic en el icono ZECast en la interfaz principal del proyector. 2. Descargue la aplicación “EZCast” a través de escanear el siguiente código QR/ escanear el código QR en la interfaz EZWire/buscar “EZCast” en la App Store/ Google Play/sitio web oficial www.ezcast.com, etc.
- Page 23 EZCanal Sign in Foto AKASO_FOCUS-781C0181 Camera Música DLNA Mirror Off Help Settings Video THEME Settings(App) Almacenamiento en la nube Paso 5 HDMI ENTRADA 1. Conecte el proyector con su dispositivo por HDMI cable. 2. Seleccione y haga clic en el icono HDMI en la interfaz principal del proyector. Luego, espere un momento, el contenido de la pantalla del dispositivo se mostrará...
- Page 24 MEDIATECA Soporta Tarjeta de Memoria & U-Disco 1. Seleccione y haga clic en el icono Media en la interfaz principal del proyector. 2. Seleccione y haga clic en el icono tarjeta de memoria/USB en la interfaz principal del proyector. 3. Luego, puede elegir leer el contenido de tarjeta de memoria o U-Disco en la proyección como fotos, videos o músicas.
- Page 25 DESCRIPCIÓN DE CONFIGURACIÓN 1. Seleccione y haga clic en el icono Configuración en la interfaz principal del proyector. 2. Seleccione y haga clic en el icono Administración/Imagen/Red en la interfaz de Configuración para ingresar a la interfaz Administración/Imagen/Red. Medios Administración Imagen Network 3.
- Page 26 Configuración Función Especificación English/Deutsch/Español/Français/Italiano/ 简体中文/日本語, etc. Idioma Fecha: AA/MM/DD; Hora: HH, MM (Utilice el botón Configuración de tiempo el botón OK para la selección de fecha y hora) Volumen Utilice el botón Para ajustar el volumen Versión de HT********V1 Firmware Administr- ación Actualización de...
- Page 27 4. En la interfaz de red, presione el botón para conectar con el Wifi que desea, luego presione el botón OK para confirmar e ingresar a la interfaz de contraseña. Utilice el botón y el botón OK para entrar las contraseñas. Luego seleccione en la interfaz, presione el botón OK para confirmar y completar la entrada de la contraseña.
- Page 28 Español CONTÁCTENOS Cualquier problema con los productos AKASO, por favor sin duda en contactarnos, le responderemos dentro de las 24 horas. E-mail:: cs@akasotech.com Sitio web oficial: www.akasotech.com...
- Page 29 日本語 プロジェクタのボタンと機能 フォーカシングホイール パワーバンクモード 戻す 早送り 巻き戻し HDMI イヤホン 投影モード メモリカードスロット 電源ボタン 注意 : EZWire/EZCast/HDMIインターフェースでは、ボタンの機能が変更されます。 早送り:ボリューム+に変更 巻き戻し:ボリューム-に変更...
- Page 30 赤外線リモコン オン/オフ ミュート 機能なし EZCast操作 HDMI操作 方向 メニュー 巻き戻し ホーム ボリューム+/- 注意 : 赤外線リモコンを使用する場合は、スクリーンではなくプロジェクタを狙っ てください。 電源オン/オフ 1. 電源ボタンを左に引いて、 プロジェクタの底面にある緑色のインジケータが点灯 するまで約4秒間押し続けると、プロジェクタが動作し始めます。 2. 電源ボタンをもう一度左に回し、約2秒間押し続けると、プロジェクタがシャッ トダウンします。 3. 電源ボタンを右に回してボタンをロックすると、プロジェクターをパワーバンク として使用できます。...
- Page 31 パワーバンクモード及び充電方法 1. プロジェクターがパワーバンクモード/プロジェク ションモードの場合、 USBポートを介して他のデバ イスを充電することができます。 充電効率を向上させるために、 パワーバンクモー ドで純正の電源アダプターを使用してプロジェクタ ーを充電してください。 インジケーターの数は、 バッテリーの残り容量を表 します。 4つのインジケーターがすべて点灯して点滅して いない場合、 バッテリーが満充電になりました。 1つのみのインジケーターが点灯する場合、 プロ ジェクターは低電力状態にあり、 緊急用のパワー バンクをとして使用できます。 1つのみのインジケーターが点滅する場合、 プロジェクターのすべての電力が消費 されており、 充電する必要があります。 EZWIRE : ワイヤー接続による画面共有 iOSデバイス : 1. プロジェクターのメイン画面のEZWireアイコンを選択してクリックします。 2. プロジェクターとiOSデバイスをUSBケーブルで接続します。 3. iOSデバイスは、 下の図の 「ステップ3」 に示すように、 プロンプトをポップアップしま す。 「 信頼する」 を選択し、 しばらく待つと、 iOSデバイスの画面コンテンツがプロジェ クター画面に表示されます。...
- Page 32 Trust Don’t Trust ステップ 3 Androidデバイス : 1. プロジェクターのメイン画面のEZWireアイコンを選択してクリックします。 2. 以下のQRコードをスキャンする/EZWireインターフェースでQRコードをスキャンす る/App Stop/GooglePlay /公式ウェブサイトwww.ezcast.comなどで 「EZCast」 を検 索して、 ダウンロードします。 3. プロジェクターとiOSデバイスをUSBケーブルで接続します。 4. 「EZCast」 アプリで を選択し、 プロンプトに従って、 Androidデバイスの設定でUSB デバッグモードとUSBテザリングをオンにします。 5. 「EZCast」 アプリの左上隅に を選択し、 プロジェクターID 「AKASO̲FOCUS̲ ******」 を選択して、 Androidデバイスをプロジェクターに接続します。 EZCast Google Play EZWire ステップ 1 ステップ 2...
- Page 33 Android Android No device Option 1: Turn on USB Debugging mode to mirror usb debugging mode need to turn on only one tinme Developer options Debugging USB debugging Allow USB debugging? USB debugging is intended for developement purposes only, Use it to copy doto oetween your computer and your device, install opps on your device...
- Page 34 EZCAST : ワイヤレス接続による画面共有 Air Playワイヤレス接続 : 1. プロジェクターのメイン画面でEZCastアイコンを選択してクリックします。 2. iOSデバイスをEZCastインターフェースによって提供されるWifiホッ トスポッ ト 「AKASO_FOCUS_ ******」 に接続します。 パスワードは 「87654321」 です。 3. iOSデバイスの設定でAir Play ( スクリーンミラーリング) を開き、 Air Playリストでプロ ジェクターID 「AKASO_FOCUS_ ******」 を選択します。 しばらくすると、 iPhoneの画 面コンテンツがプロジェクター画面に表示されます。 (iOSデバイスとプロジェクターがすでに同じWi-Fiで接続されている場合、 EZCastイ ンターフェースによって提供されるホッ トスポッ トに接続する必要はありません。 ) Settings Wi-Fi Wi-Fi...
- Page 35 その他のデバイスのEZCast接続 : 1. プロジェクターのメイン画面でEZCastアイコンを選択してクリックします。 2. 以下のQRコードをスキャンする/EZWireインターフェースでQRコードをスキャンす る/App Stop/GooglePlay /公式ウェブサイトwww.ezcast.comなどで 「EZCast」 を検 索して、 ダウンロードします。 3. EZCastインターフェースによって提供されるWifiホッ トスポッ ト 「AKASO_FOCUS_ ******」 にデバイスを接続します。 パスワードは 「87654321」 です。 4. 「EZCast」 アプリの左上隅に を選択し、 プロジェクターID 「AKASO_FOCUS_ ******」 を選択して、 Androidデバイスをプロジェクターに接続します。 5. 「EZCast」 アプリの左上隅に を選択し、 「 ミラーオフ」 を選択してミラー機能をオン にします。 しばらくすると、 iPhoneの画面コンテンツがプロジェクターの画面に表示 されます。...
- Page 36 EZChannel Sign in Photo AKASO_FOCUS-781C0181 Camera Music DLNA Mirror Off Help Settings Video THEME Settings(App) Cloud Storage ステップ 5 入力 HDMI 1. プロジェクターとデバイスをHDMIケーブルで接続します。 2. プロジェクターhのメイン画面のHDMIアイコンを選択してクリックします。 しばらく 待つと、 デバイスの画面コンテンツがプロジェクターの画面に表示されます。 ステップ 2 ステップ 1...
- Page 37 メディアライブラリー microSDカードとUディスクをサポート 1. メインプロジェクターインターフ ェイスで 「メディア」 アイコンを選択してクリック します。 2. メインプロジェクターインターフェイスのメモリカード/USBアイコンを選択してクリッ クします。 3. 次に、 プロジェクション上のmicroSDカードまたはUディスクの内容 (例え写真、 ビデ オ、 音楽など) を読み取ることができます。 • 対応するビデオフォーマッ ト : H.263, H.264, VC-1, RV8/9/10, VC-1 MPEG-1, MPEG-2, MPEG-4, MKV,RM,RMVB etc. Superior hasta 1920*1080。 • 対応する音楽フォーマッ ト : MP1/MP2/MP3/WMA/AAC/FLAC/APE/AMR-NB/WAV /PCM/ADPCM。...
- Page 38 設定の説明 1. プロジェクターのメイン画面で 「設定」 アイコンを選択してクリック します。 2. 設定画面の 「管理/イメージ/ネッ トワーク」 アイコンを選択してクリック し、 次の画面に 入ります。 Media Management Image Network 3. 管理/イメージ画面で、 ボタンを押して機能オプシ ョンを循環チェック します。 OKボタンを押して、 目的の機能オプションを選択します。 次に、 ボタンを押して、 仕様オプションを選択します。 ボタンを押して、 管理/イメージ画面に戻ります。 (リモコンを使用する場合は、 ボタンを押すだけで、 機能オプションを循環に ブラウズすることができます。 ボタンを押して仕様オプションを選択します。 ) Management Image Language English Brightness Set time Enter...
- Page 39 設定 ファンクション 仕様 English/Deutsch/Español/Français/Italiano/ 言語 简体中文/日本語, etc. 日付 : 時間 : と タンで AA/MM/DD; HH, MM ( OKボ 時間設定 日時を選択) 音量 ボタンで音量調整 ファームウェア HT********V1 バージョン 管理 ファームウェアの USB/OTA アップグレード プロジェクターとコンピューターをオス-オスのUSBケー ブルで接続すると、 プロジェクターに挿入されたマイク USB接続 ロメモリカード/ Uディスクのコンテンツをアクセスできます。 すべてリセッ ト 輝度 1/2/3/4/5/6/7 投影モード フロント/リア 投影場所...
- Page 40 4. ネッ トワーク画面で、 ボタンを押して接続するWifiを選択してから、 ボタンを押し て確認し、 パスワードインターフ ェイスに入ります。 とOKボタンを使用してパス ワードを入力します。 次に、 画面の を選択して、 ボタンを押してパスワードを入 力します。 成功に接続すると、 システムは自動的に設定画面に戻ります。 Wifi Wifi SSID: Springfield PWD: 00000001 Springfield **** Boutique **** TS-W **** ‘ U10C022DA **** Shift C&S Home **** Forget Network Interface Password Interface セキュリティ...
- Page 41 日本語 お問い合わせ 当社製品に関するご質問 ・ ご意見 ・ ご感想などは下記ア ドレス、 サイトまたはLINEまでお問い合わせください。 できるだけ早く対応致します。 E-メール: cs@akasotech.com 公式サイ ト: www.akasotech.com akaso̲jp...
Need help?
Do you have a question about the FOCUS and is the answer not in the manual?
Questions and answers