Table of Contents
Advertisement
Advertisement
Table of Contents

Related Manuals for Akaso WT50


Summary of Contents for Akaso WT50
- Page 1 USER MANUAL WT50 Smart Mini Projector...
-
Page 2: Table Of Contents
CONTENTS Safety Instructions Setup Charging Battery Cleaning Repairs Caution What’s Included Overview Getting Started Setting Enjoy Specifications Troubleshooting Notice Contact US... -
Page 3: Safety Instructions
SAFETY INSTRUCTIONS CHARGING Read all instructions before you use this projector. Do not make any changes or create The output voltage/current of the adapter is DC 5V 3A and the input voltage/frequency • settings that are not described in this manual. If physical injury, loss of data or damage is is AC100-240V, 50/60Hz. -
Page 4: What's Included
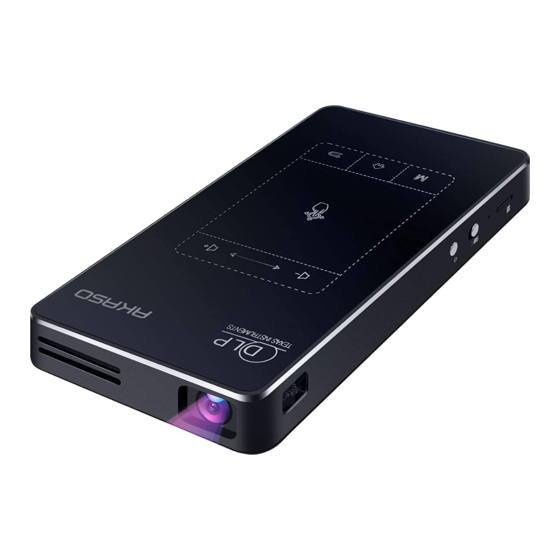
Lens protective cover WT50 Smart Remote Control Power Adapter Mini Projector Tripod socket QUICK REFERENCE GUIDE WT50 Smart Mini Projector Camera HDMI Cable Mini Tripod Quick User Manual OVERVIEW 1. Front View 3. Left View TEXAS INSTRUMENTS Volume adjustment Touch area... -
Page 5: Getting Started
4. Right View Mouse Key Mode Press to enter/exit mouse key mode. Press to confirm a selection or entry. Pause/resume play. Home Open the home menu. USB: Support USB flash drive data read. Note: When using the IR remote control, you should aim at the red light on the projector DC: Connect to power supply. -
Page 6: Setting
④ Rotate the focus adjusting wheel to get the best focus. Wi-Fi Convenient hot spot Ethernet Bluetooth ⑤ For first time use, follow the on-screen instructions to complete the basic settings. Note: Please use the supplied charger to charge AKASO mini projector. - Page 7 Easy Wi-Fi hotspot projection screen to turn on the Wi-Fi. After turning on the Wi-Fi, please select wireless network and type the password to Network SSID AKASO start to connect.(Follow the on-screen instructions to complete the network connection). password Wi-Fi...
- Page 8 Ethernet Bluetooth ② You will see the details about your network indicating the connection is successful. ② Click “AKASO” and press OK on the remote(or click on the touch area of the device) Ethemet to rename the Bluetooth. Select “Available equipment” and choose available device to connect.
-
Page 9: Enjoy
2. Projection related Settings 3. Other Settings Select [Settings] and enter into Network settings page, select[Projection mode] / Select [Settings] find more settings. [Keystone correction] to adjust the projection screen. [General] [Auto-rotate screen on]: The device is in an Increase/reduce the sound. Sound upside down or gravity change status, the image will be automatically corrected. - Page 10 In the same network(iOS device and projector should be connected to the same network) or hot spot(provided by the projector) status, enable Airplay on your iOS device to AKASO wirelessly cast the content of your smart device onto the projection surface.
- Page 11 Do not download the latest EShare version on Google play if you use Android device-the Mirroring latest version may not be compatible with AKASO. Please follow the screen prompts to TV Mirror-You can transmit pictures from projector to smart device in real-time.
-
Page 12: Specifications
4. USB and Micro SD card System Parameters With these ports, you can enjoy musics, videos, and pictures. Screen Mirror Airplay/WifiDisplay/Eshare ① Press to access the home menu. ② Select and click [APP] icon. Android 7.1.2 ③ Then find and click [Gallery]/[MX Player Pro]/[Music] icon. Bluetooth 2.4G/5G Wi-Fi Built-in Battery... -
Page 13: Troubleshooting
TROUBLESHOOTING CONTACT US For any inquires, issue or comments concerning our products, please send E-mail to the 1. Fail to power on? Slide to the left, and then press on the projector to power on. address below, and we will respond as soon as possible. Email: cs@akasotech.com 2.
Need help?
Do you have a question about the WT50 and is the answer not in the manual?
Questions and answers