Table of Contents
Advertisement
Quick Links
Advertisement
Table of Contents

Related Manuals for Parklio Smart Parking Barrier


Summary of Contents for Parklio Smart Parking Barrier
- Page 1 Smart Parking Barrier User manual Automatic barrier with smartphone control feature Automatic closing feature Operating autonomy up to 1 year (rechargeable li-ion batteries) Solar panel for extended autonomy Manual control possibility Constant power supply option (optional backup battery)
- Page 2 Thank you for the confidence you have shown us by purchasing our parking barrier. We hope that all your expectations of this product will be fulfilled. Parklio Smart Parking Barrier is manufactured using the latest technologies and has undergone rigorous quality control procedures.
-
Page 3: Table Of Contents
Parking barrier components Barrier components overview Barrier base Control unit Battery pack Safety pin Power supply (constant power supply option) Parking Barrier features Vehicle detection Vehicle detection Auto-close Technical characteristics Safety warnings Installation Packaging contents Unpacking the barrier Positioning the barrier for installation Mounting the base Inserting the safety pin Installing the power supply (only for constant power supply option) - Page 4 Controlling the barrier Installing the application Register and login Adding the barrier to your account Connecting to the barrier Opening and closing the barrier Barrier settings and information Keyfob Barrier key reset Manual barrier control Cleaning and maintenance Cleaning the laser sensor Cleaning the inside of the barrier cover Cleaning the barrier exterior Replacing the safety pin...
-
Page 5: Parking Barrier Components
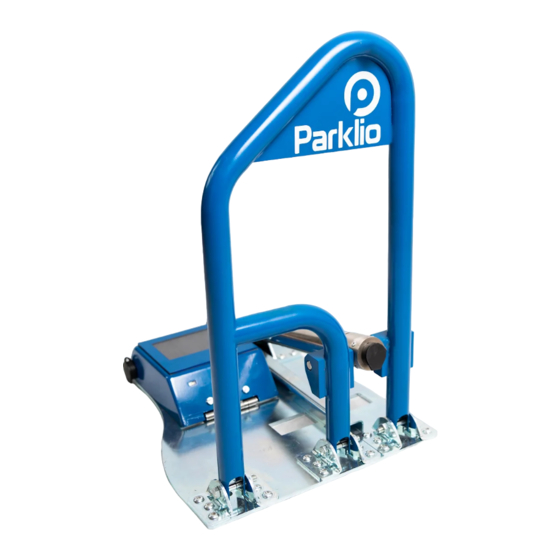
Parking barrier components This Section will describe all the components a barrier is made of. 1.1. Barrier components overview Parking barrier parts 1. Arm 2. Actuator assembly 3. Safety pin lock 4. Base 5. Cover 6. Cover lock 7. Solar panel 8. -
Page 6: Barrier Base
1.2. Barrier base Battery powered barrier back view Constant supply model 1. Control Unit Electronics 2. Battery Pack 3. Laser Sensor Assembly 4. Mounting Holes 5. Cable Hole... -
Page 7: Control Unit
1.2.2. Battery pack Parklio Battery Pack is a portable power supply for use with the Parklio Smart Parking Barrier. Parklio barriers support the use of Parklio Battery Packs and Parklio Double Battery Packs. - Page 8 LED State Description The battery pack is charged or the battery pack is not connected to a charger. The battery pack is connected to a charger and charging. Blinking There is an error during charging. Stop charging immediately. Please refer to the Battery Pack complete technical sheet for additional information. To charge the battery pack first remove the plug from the charging input port and connect the provided charger to the battery pack charger input.
-
Page 9: Safety Pin
After charging please make sure to close the charger input plug. 1.3. Safety pin The barrier uses a safety pin to connect the actuator to the barrier arm. The pin allows manual operation, by removing the pin and lowering the barrier, and acts as a safety device to protect the barrier from excessive force. -
Page 10: Power Supply (Constant Power Supply Option)
1.4. Power supply (constant power supply option) The constant power supply option barrier comes with an external AC/DC power supply. The supply is powered from the electric line and its output is fed to the barrier. The provided supply is adjustable from 10.2 V to 13.4 V, it comes preset to 10.2V. The voltage to the barrier should never exceed 11V. -
Page 12: Parking Barrier Features
This section will provide a description of the parking barrier features. 2.1. Vehicle detection The Parklio Smart Parking Barrier is equipped with a small size, high efficiency, solar panel. The solar panel enables extended autonomy of the barrier by gradually charging the barrier's battery when there is enough sunlight. -
Page 13: Technical Characteristics
Over-The-Air upgrades: Antenna interface: Internal 2.4 GHz antenna Sensors: One magnetic sensor and one Class 1 laser sensor for detecting vehicle presence Protection and coatings: Cold dip galvanized and lacquered, powder coated Stainless steel Parklio Smart Parking Barrier technical data... - Page 14 Barrier Raised - Top View Barrier Raised - Side View Barrier Lowered - Top View Barrier Lowered - Side View Overall barrier dimensions...
-
Page 15: Safety Warnings
● The battery pack is fragile, please handle it with care. Do not expose the battery to direct heat. ● The battery pack is intended to be used only with Parklio products, use with other products is not recommended. Parklio is not responsible for any damage caused to the equipment or the battery pack when used incorrectly. - Page 16 PARKLIO (AMPLIFICO D.O.O.) HAS THE RIGHT TO MODIFY THE DEVICE WITHOUT PREVIOUS NOTICE. PARKLIO (AMPLIFICO D.O.O.) DECLINES ANY RESPONSIBILITY FOR DAMAGE OR INJURY TO PEOPLE OR THINGS CAUSED BY IMPROPER USE OR WRONG INSTALLATION. THE APPLIANCE HAS BEEN ESTABLISHED ACCORDING TO ALL VALUENT SAFETY CRITERIA AND STANDARDS.
-
Page 17: Installation
The packaging should contain the following: 1. 1 x Parklio barrier 2. 1 x Parklio battery pack (BATTERY POWERED OPTION) 3. 1 x Power adapter for charging the battery (BATTERY POWERED OPTION) 4. 1 x AC/DC Power supply (CONSTANT SUPPLY OPTION) 5. -
Page 18: Positioning The Barrier For Installation
5.3. Positioning the barrier for installation The illustration below is only a proposal for setting the barrier and does not condition users setup, but is required for full functionality of the barrier. It is recommended to position the barrier so that it covers the whole vehicle when the barrier is in the open position. - Page 19 STEP 1. Position the barrier in accordance with the above instructions. STEP 2. Mark the four mounting holes. STEP 3. Drill the holes for the anchor screws. Clear the holes of any dust. Tip: You can skip marking the holes and use the barrier base as the template. Be sure that the barrier does not move and not to damage the barrier.
- Page 20 STEP 4. Place the barrier and align the mounting holes with the drilled spots. Insert the anchor screws by tapping them with a mallet. STEP 5. Tighten the anchor screws with a socket wrench.
-
Page 21: Inserting The Safety Pin
5.5. Inserting the safety pin After mounting the barrier, the safety pin should be installed to connect the barrier arm with the actuator. STEP 1. Unlock the safety pin lock by inserting the key and rotating it. The lock should pop out. STEP 2. -
Page 22: Installing The Power Supply (Only For Constant Power Supply Option)
5.6. Installing the power supply (only for constant power supply option) Parklio constant power supply uses a AC/DC low output voltage supply to power the barrier. The power supply is powered from the electric line and the supply output is fed to the barrier. - Page 23 The power supply must be fed by a 230 V / 50 Hz or 120 V / 60 Hz electric line, protected by a differential magnetothermal switch complying with the law provisions in force. Connect the electric line wires to terminals L and N on the power supply. Connect the power supply + and - terminals to the cable leading to the barriers.
- Page 24 STEP 4. Assemble the connector. STEP 5. Connect the power supply to the cable running to the barrier. STEP 5. Connect the power supply to the electric line. Disconnect all power while installing the barrier power supply. Make sure the electric installation is adequately protected and installed according to the laws in force.
-
Page 25: Inserting The Battery
5.7. Inserting the battery To install the battery pack align the Parklio Battery Pack with the Control Unit and attach to the barrier base using the velcro joint on the bottom of the battery pack and on the barrier. Take caution to plug the charging port input to prevent water ingress. -
Page 26: Controlling The Barrier
Controlling the barrier This section will provide detailed instructions on how to connect the mobile application with the barrier barrier and how to control the barrier using the free Parklio connect mobile application. 6.1. Installing the application The application can be downloaded by scanning the following QR codes:... -
Page 27: Register And Login
6.2. Register and login To use Parklio Connect the user needs to be logged in. An user may login with an existing Google account, an Apple account, or the user may create and use a Parklio account with their email. -
Page 28: Adding The Barrier To Your Account
Add parking product screen opens and the smartphone starts scanning for nearby Parklio devices. This step should be done in close proximity to the Parklio device you are adding. Grayed out devices represent Parklio devices that are already set up. -
Page 29: Connecting To The Barrier
● PARKLIO LOWERED - Indicates the barrier is down (open) ● PARKLIO EXTENDED - Indicates the barrier is up (closed) ● PARKLIO EXTENDING - Indicates the barrier is moving up (closing) ● PARKLIO LOWERING - Indicates the barrier is moving down (opening) ●... -
Page 30: Opening And Closing The Barrier
6.5. Opening and closing the barrier Opening and closing of the barrier is possible only when the user is connected to the barrier and while the barrier is in the EXTENDED or LOWERED state. By clicking the button in the center of the main screen the barrier will lower or extend. If the barrier detects a CAR ON TOP it is possible to extend the barrier by clicking the car icon and clicking FORCE OPERATE in the dialog. -
Page 31: Barrier Settings And Information
The barrier will ignore all obstacles, make sure the barrier path is clean before clicking FORCE OPERATE. It is also possible to use Force Lower and Force Extend from the Device Settings menu. 6.6. Barrier settings and information Clicking the gear icon in the top right of the barrier screen will bring up the barrier settings. In the settings screen it is possible to view battery status, device information like the firmware version and ID, set the auto/close option and use the force extend and lower options. - Page 32 Change the device name Parklio devices allow the user to change their name, so they can be more easily identified. To thenge the device name click on the DEVICE TITLE in the settings. Change the name of the device and click SAVE. The new name will now be displayed.
- Page 33 Key sharing An important feature of all Parklio products is the option for key sharing. The application allows the owner of the device to share the digital key of his device. To use this feature an internet connection is required. It is not required to be connected to a barrier via bluetooth.
- Page 34 If it is necessary to remove access from a user to whom a key was shared it is possible to do this from the Parklio Connect application. To use this feature an internet connection is required. It is not required to be connected to a barrier via bluetooth.
- Page 35 Updating the barrier Parklio Smart Parking Barriers get feature improvements by using OTA (Over-The-Air) updates. These updates are carried out manually by the user. An orange icon near the update button in the barrier settings is shown if an update is available.
- Page 36 Barrier information Barrier information such as the Barrier ID and Firmware version is displayed at the bottom of the settings screen. Removing the barrier In order to remove the barrier from your account or to delete a key which was shared to you enter the Device Settings screen and press the garbage can icon.
-
Page 37: Keyfob
- Parklio Keyfob. The keyfob can be attached to the car interior or to a key chain. This way you can open the Parklio Barrier with a single press. The use of the Keyfob still requires initial barrier setup via the Parklio Connect application. - Page 38 The keyfob can store only one device in its memory and it is controlled by pressing the keyfob button.
-
Page 39: Barrier Key Reset
The reset is done by pressing and holding the Reset button for 3 seconds, until the green LED lights up. When the barrier is in the reset state it can be added again to a user account via the Parklio Connect application. -
Page 40: Manual Barrier Control
Manual barrier control To manually open the barrier, unlock the safety pin lock using the provided key, after that remove the safety pin while holding the barrier arm and actuator in place. Gently lower the actuator and the barrier arm. To restore normal functionality just install the safety pin back. -
Page 41: Cleaning And Maintenance
Cleaning and maintenance Before taking any steps in cleaning and maintaining the device please disconnect the power supply. Children should not clean nor maintain the barrier without proper supervision. 8.1. Cleaning the laser sensor Continued usage may cause dirt particles, mud, water stains and similar impurities to block the view of the laser sensor. -
Page 42: Cleaning The Barrier Exterior
8.4. Replacing the safety pin In case of excess force the Parklio Smart Parking Barrier has a safety pin to prevent damage to any other parts. The pin is designed to break into three parts. -
Page 43: Disposal Of The Device
Disposal of the device We use environmentally friendly materials for packaging that can be recycled, deposited or destroyed without any hazard to the environment. For this purpose, the packaging materials are appropriately labeled. The symbol on the product or on its packaging signifies that this device should not be handled like ordinary household waste. -
Page 44: Faq
If the error reoccurs, open the lid and reset the barrier via the „RESET“ button on the electronics box. Do Parklio barriers have sensors? Our barriers have a built-in set of sensors that detects if the car is parked above the barrier. In this way, it is impossible that the barrier closes if it senses an obstacle above. - Page 45 What do I do when the barrier is stuck? If the application is telling you that a certain barrier is jammed you must remove all mechanical obstructions that are preventing regular function of the barrier. If you are sure that there are no obstructions check the battery.
- Page 46 +385977247276...
Need help?
Do you have a question about the Smart Parking Barrier and is the answer not in the manual?
Questions and answers