Advertisement
Table of Contents
Franklin Electric Co., Inc.
P. O. Box 12010
Oklahoma City, OK 73157-2010
405.947.2511 • Fax: 405.947.8720
www.LittleGiantPump.com
CustomerService-WTS@fele.com
INTRODUCTION
EN
This instruction sheet provides you with the information required to
safely own and operate your product. Retain these instructions for
future reference.
The product you have purchased is of the highest quality workmanship
and material, and has been engineered to give you long and reliable
service. This product has been carefully tested, inspected, and
packaged to ensure safe delivery and operation. Please examine
your item(s) carefully to ensure that no damage occurred during
shipment. If damage has occurred, please contact the place of
purchase. They will assist you in replacement or repair, if required.
READ
THESE
INSTRUCTIONS
ATTEMPTING
TO
INSTALL,
YOUR PRODUCT. KNOW THE PRODUCT'S APPLICATION,
LIMITATIONS,
AND
POTENTIAL
YOURSELF AND OTHERS BY OBSERVING ALL SAFETY
INFORMATION.
FAILURE
INSTRUCTIONS COULD RESULT IN PERSONAL INJURY AND/
OR PROPERTY DAMAGE!
INSTALLATION
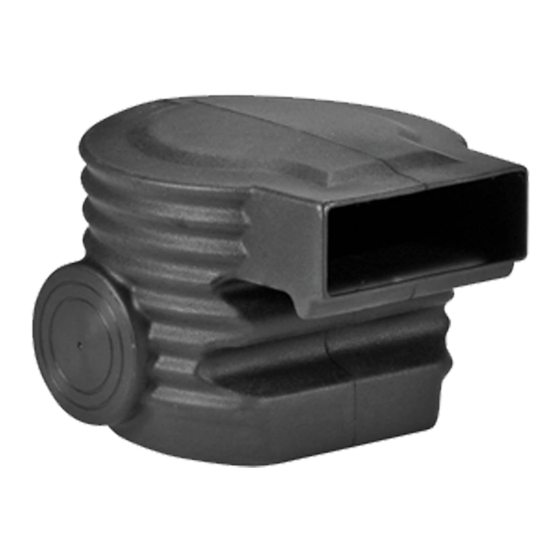
1. Determine the best location for the weir along the perimeter of
the water feature.
2. Determine the pipe size needed to deliver the desired flow.
NOTE: The weir can accommodate either 2" or 3" pipe, but
includes only parts for the 2" installation.
3. Determine which weir inlet location - rear, left, or right - works
best for the piping layout.
Figure 1
Figure 2
WATERFALL WEIR
MODEL WFW
CAREFULLY
BEFORE
OPERATE,
OR
SERVICE
HAZARDS.
PROTECT
TO
COMPLY
WITH
THESE
4. NOTE: Each inlet location has a molded-in template that
represents the 3" and 4" hole saw diameters, as well as a center
point for the piloting bit of the saw. This helps ensure accurate
placement of the drilled hole.
Using a 3" hole saw (for 2" pipe) or 4" hole saw (for 3" pipe), drill
through the weir at the desired inlet location (Figure 1).
5. Insert the pipe grommet into the drilled hole (Figure 2). NOTE:
The grommet for 3" pipe must be purchased separately.
6. Apply lubricant (included) to the outside of the pipe (Figure 3).
This allows easier insertion of the pipe into the grommet.
7. Insert the pipe into the grommet. To help ensure a water-tight
seal, the fit between pipe and grommet should be snug.
8. If the water feature includes a pond liner (or equivalent):
a. Fold up the liner in front of the weir (Figure 4). Place the liner
along the contour of the lower notch; this provides slack in the
liner to accommodate settling of the weir or liner over time.
b. Secure the liner by placing the rubber band (included) into
the upper notch of the weir (Figure 4).
c. Carefully cut the excess liner above the rubber band and
discard it.
9. Place a rock or rocks over the top of the weir to help secure it
and hide it from view (Figure 5, typical installation).
Figure 3
Lubricate
pipe first
Figure 4
Rubber band
Figure 5
Upper notch
Lower notch
Rocks
Advertisement
Table of Contents

Related Manuals for Little Giant WFW


Summary of Contents for Little Giant WFW
- Page 1 This helps ensure accurate Franklin Electric Co., Inc. placement of the drilled hole. MODEL WFW P. O. Box 12010 Oklahoma City, OK 73157-2010 Using a 3” hole saw (for 2” pipe) or 4” hole saw (for 3” pipe), drill 405.947.2511 •...
- Page 2 ..... . .1-888-572-9933 Para la ayuda técnica, por favor póngase en contacto ..1-888-956-0000 www.LittleGiantPump.com CustomerService-WTS@fele.com Form 998667 - 06/4/2009 © 2009 Franklin Electric Co., Inc. Little Giant® is a registered trademark of Franklin Electric Co., Inc.
Need help?
Do you have a question about the WFW and is the answer not in the manual?
Questions and answers