Table of Contents
Advertisement
Available languages
Available languages
Quick Links
D
WALT Industrial Tool Co., 701 East Joppa Road, Baltimore, MD 21286
E
(JUL04-CD-1) Form No. 158878-02
The following are trademarks for one or more D
"D" shaped air intake grill; the array of pyramids on the handgrip; the kit box configuration; and the array of
lozenge-shaped humps on the surface of the tool.
IF YOU HAVE ANY QUESTIONS OR COMMENTS ABOUT THIS OR ANY D
CALL US TOLL FREE AT 1-800-4-D
E
Important Safety Instructions
WARNING: When using electric tools, basic safety precautions should always be followed to
reduce risk of fire, electric shock, and personal injury, including the following.
Double Insulation
Double insulated tools are constructed throughout with two separate layers of electrical
insulation or one double thickness of insulation between you and the tool's electrical system.
Tools built with this insulation system are not intended to be grounded. As a result, your tool is
equipped with a two prong plug which permits you to use extension cords without concern for
maintaining a ground connection.
NOTE: Double insulation does not take the place of normal safety precautions when operating
this tool. The insulation system is for added protection against injury resulting from a possible
electrical insulation failure within the tool.
CAUTION: WHEN SERVICING USE ONLY IDENTICAL REPLACEMENT PARTS. Repair or
replace damaged cords.
Polarized Plugs
Polarized plugs (one blade is wider than the other) are used on equipment to reduce the risk of
electric shock. When provided, this plug will fit in the polarized outlet only one way. If the plug
does not fit fully into the outlet, reverse the plug. If it still does not fit, contact a qualified
electrician to install the proper outlet. Do not change the plug in any way.
Safety Instructions For All Tools
• KEEP WORK AREA CLEAN. Cluttered areas and benches invite injuries.
• CONSIDER WORK AREA ENVIRONMENT. Don't expose power tools to rain. Don't use
power tools in damp or wet locations. Keep work area well lit. Do not use tool in presence of
flammable liquids or gases.
• GUARD AGAINST ELECTRIC SHOCK. Prevent body contact with grounded surfaces. For
example; pipes, radiators, ranges, and refrigerator enclosures.
• KEEP CHILDREN AWAY. Do not let visitors contact tool or extension cord. All visitors should
be kept away from work area.
• STORE IDLE TOOLS. When not in use, tools should be stored in dry, and high or locked-up
place — out of reach of children.
• DON'T FORCE TOOL. It will do the job better and safer at the rate for which it was intended.
• USE RIGHT TOOL. Don't force small tool or attachment to do the job of a heavy-duty tool.
Don't use tool for purpose not intended.
• DRESS PROPERLY. Do not wear loose clothing or jewelry. They can be caught in moving
parts. Rubber gloves and non-skid footwear are recommended when working outdoors. Wear
protective hair covering to contain long hair.
be avoided.
• USE SAFETY GLASSES. Also use face or dust mask if operation is dusty.
• DON'T ABUSE CORD. Never carry tool by cord or yank it to disconnect from receptacle.
Keep cord from heat, oil, and sharp edges.
• SECURE WORK. Use clamps or a vise to hold work. It's safer than using your hand and it
frees both hands to operate tool.
• DON'T OVERREACH. Keep proper footing and balance at all times.
• MAINTAIN TOOLS WITH CARE. Keep tools sharp and clean for better and safer
performance. Follow instructions for lubricating and changing accessories. Inspect tool cords
periodically and if damaged, have repaired by authorized service facility. Inspect extension
cords periodically and replace if damaged. Keep handles dry, clean, and free from oil and
grease.
• DISCONNECT OR LOCK OFF TOOLS when not in use, before servicing, and when
changing accessories, such as blades, bits, cutters.
• REMOVE ADJUSTING KEYS AND WRENCHES. Form habit of checking to see that keys
and adjusting wrenches are removed from tool before turning it on.
DW140,DW142
Copyright © 2000, 2004 D
WALT power tools: the yellow and black color scheme; the
E
WALT (1-800-433-9258).
Air vents often cover moving parts and should also
• AVOID UNINTENTIONAL STARTING. Don't carry tool with finger on switch. Be sure switch
is off when plugging in.
• EXTENSION CORDS. Make sure your extension cord is in good condition. When using an
extension cord, be sure to use one heavy enough to carry the current your product will draw.
An undersized cord will cause a drop in line voltage resulting in loss of power and overheating.
The following table shows the correct size to use depending on cord length and nameplate
ampere rating. If in doubt, use the next heavier gage. The smaller the gage number, the
heavier the cord.
Total Length of Cord
25 ft.
50 ft.
7.6 m
15.2 m
Wire Size
18 AWG
18 AWG
• OUTDOOR USE EXTENSION CORDS. When tool is used outdoors, use only extension
cords intended for use outdoors and so marked.
• STAY ALERT. Watch what you are doing. Use common sense. Do not operate tool when you
are tired.
• CHECK DAMAGED PARTS. Before further use of the tool, a guard or other part that is
damaged should be carefully checked to determine that it will operate properly and perform its
intended function. Check for alignment of moving parts, binding of moving parts, breakage of
parts, mounting, and any other conditions that may affect its operation. A guard or other part
that is damaged should be properly repaired or replaced by an authorized service center
unless otherwise indicated elsewhere in this instruction manual. Have defective switches
replaced by authorized service center. Do not use tool if switch does not turn it on and off.
•
CAUTION: When drilling or driving into walls, floors or wherever live electrical wires may
be encountered, DO NOT TOUCH ANY METAL PARTS OF THE TOOL! Hold the tool only by
insulated grasping surfaces to prevent electric shock if you drill or drive into a live wire.
WARNING: Some dust created by power sanding, sawing, grinding, drilling, and other con-
struction activities contains chemicals known to cause cancer, birth defects or other reproduc-
tive harm. Some examples of these chemicals are:
• lead from lead-based paints,
• crystalline silica from bricks and cement and other masonry products, and
• arsenic and chromium from chemically-treated lumber (CCA).
Your risk from these exposures varies, depending on how often you do this type of work. To
reduce your exposure to these chemicals: work in a well ventilated area, and work with
approved safety equipment, such as those dust masks that are specially designed to filter out
microscopic particles.
• Avoid prolonged contact with dust from power sanding, sawing, grinding, drilling,
and other construction activities. Wear protective clothing and wash exposed areas
with soap and water. Allowing dust to get into your mouth, eyes, or lay on the skin may
promote absorption of harmful chemicals.
CAUTION: Wear appropriate hearing protection during use. Under some conditions
and duration of use, noise from this product may contribute to hearing loss.
Motor Brushes
Be sure tool is unplugged before inspecting brushes. Carbon brushes should be regularly
inspected for wear. To inspect brushes, unscrew the plastic brush inspection caps (located in
the sides of the motor housing) and withdraw the spring and brush assemblies from the tool.
Keep brushes clean and sliding freely in their guides. Carbon brushes have varying symbols
stamped into them, and if the brush is worn down to the line closest to the spring, it must be
replaced. New brush assemblies are available at D
TOOLS, ELECTRIC in the Yellow Pages.
Motor
Your D
WALT tool is powered by a D
E
with the nameplate marking.
WALT
E
Volts 50/60 Hz or "AC only" means your tool must be operated on alternating current and
never with direct current.
Voltage decrease of more than 10% will cause loss of power and overheating. D
are factory tested; if this tool does not operate, check power supply.
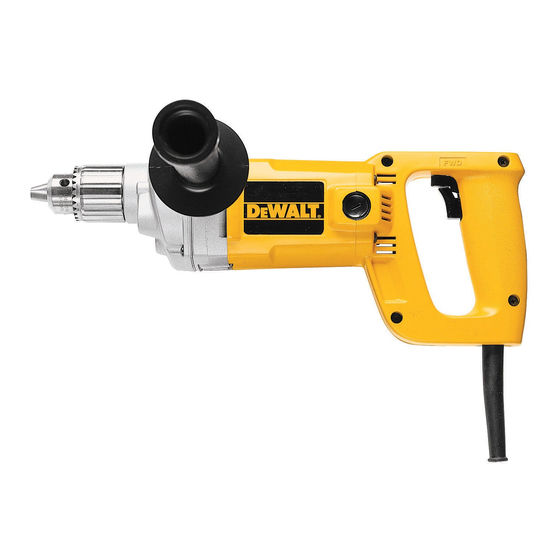
Switches Fig. 1
WALT TOOL,
E
Pulling the trigger switch (A) turns the tool "ON"; releasing the trigger switch turns the tool
"OFF". For controlling the rotational direction of the spindle, there is a lever (B), integral to and
on top of the trigger switch. For drilling (forward position) this lever should be slanted to the
left side of the tool (viewing from behind the handle); for easing drill bits out of tight holes
(reverse position) it should be slanted to the right side of the tool. A built-in mechanical inter-
lock prevents changing the direction of the tool unless the trigger switch is released. After any
reversing, return lever to forward position.
Side Handles Fig. 2
TURN OFF AND UNPLUG DRILL.
NEVER ATTEMPT TO USE THIS TOOL WITHOUT A SIDE HANDLE FIRMLY ATTACHED.
The side handle (A) must be attached to the gear case. Because of the extremely high torque
of this drill, a side handle extension (B) must be used to lengthen the side handle. The plas-
tic bag that contains the hex wrench and the chuck key also contains the handle extension.
Screw the extension firmly into the hole in the gear case of your drill and screw the side han-
dle into the extension. DO NOT USE WITHOUT EXTENSION.
Operation
CAUTION: Always unplug the tool when attaching or changing bits or accessories.
1. Open the chuck jaws by turning collar with fingers and insert bit fully into the chuck. Tighten
chuck collar by hand. Place chuck key in each of the three holes, and tighten in clockwise
direction. It's important to tighten chuck with all three holes to prevent slippage. To release
bit, turn chuck key counter clockwise in just one hole, then loosen chuck by hand.
2. Use sharp drill bits only. For WOOD, use twist drill bits, spade bits, power auger bits, or
hole saws. For METAL, use high-speed steel twist drill bits or hole saws. For MASONRY,
such as brick, cement, cinder block etc., use carbide-tipped bits.
3. Be sure the material to be drilled is anchored or clamped firmly. If drilling thin material, use
a wood "back-up" block to prevent damage to the material.
4. Always apply pressure in a straight line with the bit. Use enough pressure to keep drill bit-
ing, but do not push hard enough to stall the motor or deflect the bit.
5. Hold drill firmly to control the twisting action of the drill. Use side handle.
CAUTION: Drill may stall if overloaded causing a sudden twist. Always expect the stall.
Grip the drill firmly to control the twisting action and avoid injury.
6. IF DRILL STALLS, it is usually because it is being overloaded or improperly used.
RELEASE TRIGGER IMMEDIATELY, remove drill bit from work, and determine cause of
stalling. DO NOT CLICK TRIGGER OFF AND ON IN AN ATTEMPT TO START A STALLED
DRILL—THIS CAN DAMAGE THE DRILL.
7. To minimize stalling on breaking through the material, reduce pressure on drill and ease
the bit through the last fractional part of the hole.
8. Keep the motor running when pulling the bit back out of a drilled hole. This will help pre-
vent jamming.
DRILLING IN METAL
Use a cutting lubricant when drilling metals. The exceptions are cast iron and brass which
should be drilled dry. The cutting lubricants that work best are sulphurized cutting oil or lard
oil; bacon grease will also serve the purpose.
DRILLING IN WOOD
Holes in wood can be made with the same twist drills used for metal. These bits may overheat
unless pulled out frequently to clear chips from the flutes. For larger holes, use Power Drill Wood
Bits. Work that is apt to splinter should be backed up with a block of wood.
Chuck
1. Always completely insert the shank of the drill bit or accessory in the chuck. This permits
full gripping power and prevents cocking the chuck jaws. When using drill bits or acces-
sories with 3 "flats" on the shank, the chuck jaws should be located on the center of these
flats.
2. Use all three holes in the chuck body to tighten the jaws. Insert the chuck key into each
hole and tighten as much as possible. To release the drill bit, use the chuck key in only one
hole.
3. Use only a chuck key to tighten or loosen the chuck jaws.
Recommended Minimum Wire Size for Extension Cords
75 ft.
100 ft.
125 ft.
150 ft.
22.9 m
30.5 m
38.1 m
45.7 m
16 AWG 16 AWG 14 AWG 14 AWG 12 AWG
SAVE THESE INSTRUCTIONS
E
WALT built motor. Be sure your power supply agrees
E
175 ft.
53.3 m
WALT certified service centers: see
WALT tools
E
Advertisement
Table of Contents

Related Manuals for DeWalt DW140


Summary of Contents for DeWalt DW140
-
Page 1: Important Safety Instructions
DRILLING IN WOOD Holes in wood can be made with the same twist drills used for metal. These bits may overheat unless pulled out frequently to clear chips from the flutes. For larger holes, use Power Drill Wood Bits. - Page 2 Nailer for any reason, you can return it within 90 days from the date of purchase with a receipt for a full refund – no questions asked. FREE WARNING LABEL REPLACEMENT: If your warning labels become illegible or are miss- ing, call 1-800-4-DEWALT for a free replacement. FIG. 1 FIG. 2 FIG.
- Page 3 Changement de vitesse par inversion du mandrin à angle droit La perceuse à angle droit DW140 sort de l’usine avec le mandrin réglé à faible vitesse (400 tr/min). On peut augmenter la vitesse de l’outil à 900 tr/min en enlevant et en inversant le mandrin tel que décrit ci-après.
- Page 4 CAMBIO DE VELOCIDADES INVIRTIENDO LA CABEZA DE ÁNGULO RECTO Su taladro de ángulo recto DW140 viene de fábrica con la cabeza instalada en la posición de velocidad baja (400 RPM). Se puede aumentar la velocidad de la herramienta a 900 RPM reti- rando la cabeza de ángulo recto e invirtiéndola como se describe a continuación.
Need help?
Do you have a question about the DW140 and is the answer not in the manual?
Questions and answers