Table of Contents
Advertisement
Advertisement
Table of Contents

Related Manuals for MIR MiRCharge 48V


Summary of Contents for MIR MiRCharge 48V
- Page 1 Operating Guide (en) Date: 03/2021 Revision: v.1.5...
- Page 2 Copyright © 2018-2021 by Mobile Industrial Robots A/S. Contact the manufacturer: Mobile Industrial Robots A/S Emil Neckelmanns Vej 15F DK-5220 Odense SØ www.mobile-industrial-robots.com Phone: +45 20 377 577 Email: support@mir-robots.com CVR: 35251235 MiR Charge 48V Operating Guide (en) 03/2021 - v.1.5 ©Copyright 2018-2021: Mobile Industrial Robots A/S.
-
Page 3: Table Of Contents
6.1 Setting charging station markers on the map 6.2 Creating the Charge at station mission 6.3 Creating the Recharge loop mission 6.4 Testing a mission 6.5 Charging action parameters explained 7. Specifications MiR Charge 48V Operating Guide (en) 03/2021 - v.1.5 ©Copyright 2018-2021: Mobile Industrial Robots A/S. -
Page 4: About This Document
1. About this document 1. About this document This operating guide explains how to install and take precautions for safe use of your MiR Charge 48V. This guide also contains information on how to set up MiR250, MiR500 and MiR1000 robots for automatic charging with MiR Charge 48V. - Page 5 Small updates to the document 2019-10-07 Small updates to the document 2019-11-13 Layout changes 2020-06-17 New chapter: Nameplate Small updates to the document 2021-03-09 Specifications added New chapter: Warranty MiR Charge 48V Operating Guide (en) 03/2021 - v.1.5 ©Copyright 2018-2021: Mobile Industrial Robots A/S.
-
Page 6: Safety
Alerts against unsafe practices. Carefully read the message that follows to prevent minor or moderate injury. NOTICE Indicates important information, including situations that can result in damage to equipment or property. MiR Charge 48V Operating Guide (en) 03/2021 - v.1.5 ©Copyright 2018-2021: Mobile Industrial Robots A/S. -
Page 7: General Safety Precautions
If MiR Charge 48V is used by children, they risk injury and electrical shock. • Children should be supervised to ensure that they do not play with the appliance. MiR Charge 48V Operating Guide (en) 03/2021 - v.1.5 ©Copyright 2018-2021: Mobile Industrial Robots A/S. - Page 8 • Do not operate the charger in a closed-in area, restrict ventilation or cover or block the vents in any way. MiR Charge 48V Operating Guide (en) 03/2021 - v.1.5 ©Copyright 2018-2021: Mobile Industrial Robots A/S.
- Page 9 2. Safety CAUTION The only intended use of MiR Charge 48V is to charge the internal battery of MiR250,MiR500, and MiR1000 robots. Using it to charge other robot types or external batteries can damage MiR Charge 48V. • Only use MiR Charge 48V to charge MiR250, MiR500, and MiR1000 robots.
-
Page 10: Product Presentation
MiR Fleet Getting Started Guide. 3.1 How charging works To connect to MiR Charge 48V, the robot moves to a position in front of the charging station to locate the VL-marker (1). It then moves onto the charging plate (2), and the charging begins. -
Page 11: Nameplate
To connect to MiR Charge 48V, the robot moves to the entry position in front of the charging station to locate the VL-marker (1). It then moves onto the charging plate (2) and establishes a communication to the charger through (4) and (5). When a communication has been successfully done, the charging will begin from (3) and (4). - Page 12 3. Product presentation Figure 3.2. Example of the MiR Charge 48V nameplates. MiR Charge 48V Operating Guide (en) 03/2021 - v.1.5 ©Copyright 2018-2021: Mobile Industrial Robots A/S.
-
Page 13: Warranty
Robots cannot be held responsible for any damages caused to MiR Charge 48V, accessories, or any other equipment due to programming errors or malfunctioning of MiR Charge 48V. MiR Charge 48V Operating Guide (en) 03/2021 - v.1.5 ©Copyright 2018-2021: Mobile Industrial Robots A/S. -
Page 14: Getting Started
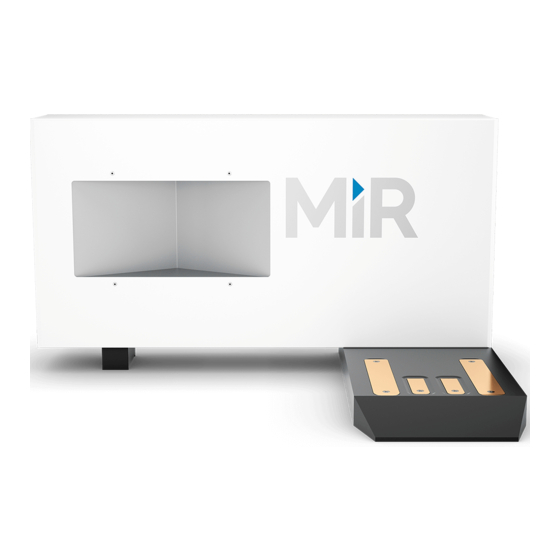
MiR Charge 48V. 5.1 In the box This section describes the content of the MiR Charge 48V box. Figure 5.1. The content of the MiR Charge 48V box. MiR Charge 48V Operating Guide (en) 03/2021 - v.1.5 ©Copyright 2018-2021: Mobile Industrial Robots A/S. - Page 15 A MiR Charge 48V document folder containing a USB flash drive and the following printed documents: • EC Declaration of Conformity The USB flash drive in the document folder has the following content: • MiR Charge 48V Operating Guide MiR Charge 48V Operating Guide (en) 03/2021 - v.1.5 ©Copyright 2018-2021: Mobile Industrial Robots A/S.
-
Page 16: Installing And Powering Up
We therefore recommend fixing it to a solid structure. Figure 5.2 shows the parts of MiR Charge 48V relevant for the installation and powering up. MiR Charge 48V Operating Guide (en) 03/2021 - v.1.5 ©Copyright 2018-2021: Mobile Industrial Robots A/S. - Page 17 Figure 5.2. Rear view of MiR Charge 48V. Pos. Description Pos. Description Four M8 mounting holes for Mounting brackets fixation to wall (all four corners) Air vents Power inlet Power button MiR Charge 48V Operating Guide (en) 03/2021 - v.1.5 ©Copyright 2018-2021: Mobile Industrial Robots A/S.
-
Page 18: Mark Potentially Hazardous Floor Areas
Press the power button to turn on MiR Charge 48V. 5.3 Mark potentially hazardous floor areas Before taking your MiR Charge 48V into use, it is necessary to mark up the floor in the area where the robot docks to MiR Charge 48V. - Page 19 5. Getting started To avoid potentially hazardous situations as a consequence of the muted personnel detection means, you must mark the physical area around MiR Charge 48V with tape or similar marking material. For more information on personnel detection means, see the user guide for your robot.
- Page 20 5. Getting started Figure 5.3 illustrates where the floor markings should be for a single charging station. Figure 5.3. The floor around MiR Charge 48V must be marked to indicate an operating hazard zone, illustrated by the striped yellow and black line.
-
Page 21: Usage
The main way to use MiR Charge 48V is through missions that you create. The main way to use MiR Charge 48V is to set up a mission for the robot to dock to the charger and recharge its battery when it is low on power. - Page 22 Once the robot is localized, it is possible to insert a charging station marker correctly on the map using the following steps: Manually drive the robot so its front is facing the MiR Charge 48V and is within one meter from it.
- Page 23 6. Usage In the Create marker window, enter a name for the marker and select Type > MiRCharge 500/1000. MiR Charge 48V Operating Guide (en) 03/2021 - v.1.5 ©Copyright 2018-2021: Mobile Industrial Robots A/S.
- Page 24 The Detect-marker function tracks the position of the charging station using the VL-marker and automatically sets the X, Y and Orientation values in the robot, enabling it to dock to the charging station. MiR Charge 48V Operating Guide (en) 03/2021 - v.1.5 ©Copyright 2018-2021: Mobile Industrial Robots A/S.
- Page 25 Try to move the robot closer to the charging station, and ensure that the front safety laser scanner is positioned in front of the VL-marker of the charging station. MiR Charge 48V Operating Guide (en) 03/2021 - v.1.5 ©Copyright 2018-2021: Mobile Industrial Robots A/S.
-
Page 26: Creating The Charge At Station Mission
Setting charging station markers on the map on page 21. The goal of the mission is to make the robot dock to MiR Charge 48V and recharge its battery up to 40%. To create a new mission, go to Setup > Missions... - Page 27 Validate and close. For the Dock to action, under Marker, select Charger. This is the marker you created on the map in front of the charging station. MiR Charge 48V Operating Guide (en) 03/2021 - v.1.5 ©Copyright 2018-2021: Mobile Industrial Robots A/S.
- Page 28 In our example, there is no minimum time. When the battery reaches 40%, the charging is completed. To read more about the different Charging action combinations, see Charging action parameters explained on page 35. MiR Charge 48V Operating Guide (en) 03/2021 - v.1.5 ©Copyright 2018-2021: Mobile Industrial Robots A/S.
-
Page 29: Creating The Recharge Loop Mission
Created a MiRCharge marker titled Charger, as described in Setting charging station markers on the map on page 21. • Created three robot positions titled Position Position 2 Position MiR Charge 48V Operating Guide (en) 03/2021 - v.1.5 ©Copyright 2018-2021: Mobile Industrial Robots A/S. - Page 30 6. Usage The goal of the mission is to make the robot drive between the three robot positions until it reaches a battery percentage below 20%, where it then docks to MiR Charge 48V and charges its battery up to 50%.
- Page 31 When you have set the parameters, select Validate and close. For the Loop action, select Endless. MiR Charge 48V Operating Guide (en) 03/2021 - v.1.5 ©Copyright 2018-2021: Mobile Industrial Robots A/S.
- Page 32 (greater than or equal to). • Value: Type 20. For the three Move actions, under Position, select one of the robot positions for each of the actions. MiR Charge 48V Operating Guide (en) 03/2021 - v.1.5 ©Copyright 2018-2021: Mobile Industrial Robots A/S.
- Page 33 To read more about the different Charging action combinations, see Charging action parameters explained on page 35. The mission is now ready. Select Save to save your mission. MiR Charge 48V Operating Guide (en) 03/2021 - v.1.5 ©Copyright 2018-2021: Mobile Industrial Robots A/S.
-
Page 34: Testing A Mission
If something interrupts the mission, use a Try/Catch action in that step of the mission and decide what the robot has to do if a mission action fails. MiR Charge 48V Operating Guide (en) 03/2021 - v.1.5 ©Copyright 2018-2021: Mobile Industrial Robots A/S. -
Page 35: Charging Action Parameters Explained
MiR Charge 48V Operating Guide (en) 03/2021 - v.1.5 ©Copyright 2018-2021: Mobile Industrial Robots A/S. - Page 36 This may mean that even if the robot has been in the charging station overnight, you might find it with a battery level just above 90% the next morning depending on where it is in the topping up cycle. MiR Charge 48V Operating Guide (en) 03/2021 - v.1.5 ©Copyright 2018-2021: Mobile Industrial Robots A/S.
-
Page 37: Specifications
Ambient temperature range +5°C to 40°C Power Output 48 V/40 A at 240 V, 48 V/20 A at 120 V Input 100 V-240 V, 50-60 Hz MiR Charge 48V Operating Guide (en) 03/2021 - v.1.5 ©Copyright 2018-2021: Mobile Industrial Robots A/S. - Page 38 7. Specifications Power Consumption Compliance Standard EN60335-2-29 MiR Charge 48V Operating Guide (en) 03/2021 - v.1.5 ©Copyright 2018-2021: Mobile Industrial Robots A/S.
Need help?
Do you have a question about the MiRCharge 48V and is the answer not in the manual?
Questions and answers