Table of Contents
Advertisement
Available languages
Available languages
Advertisement
Chapters
Table of Contents

Subscribe to Our Youtube Channel
Related Manuals for Kaiser Baas PhotoMaker


Summary of Contents for Kaiser Baas PhotoMaker
- Page 1 PhotoMaker User Guide...
-
Page 2: Table Of Contents
CONTENTS Precautions What’s in the box Product diagram Installing software (PC) Installing software (MAC) Placing film / slide in the holder Connecting the PhotoMaker Capturing photos (PC) Capturing photos (MAC) Editing photos - Adjust - Retouch Specifications System requirements Trouble shooting... -
Page 3: Precautions
1 x Blow air brush 1 x Negative holder 1. Do not try to open the case of the PhotoMaker or attempt to modify if in any way. Maintenance and repairs should be performed only by Kaiser Baas. 1 x Quick start guide 2. -
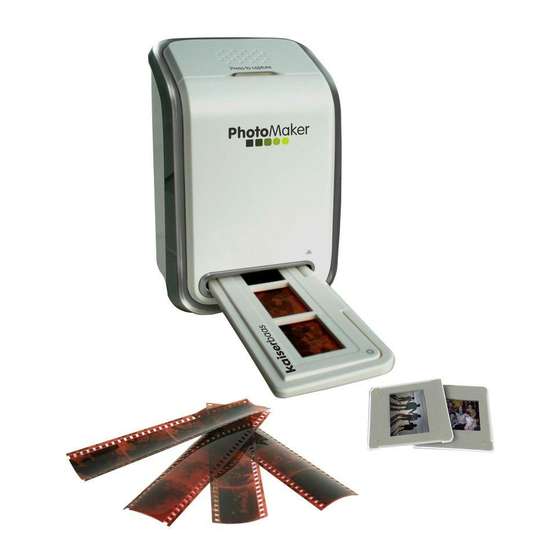
Page 4: Product Diagram
PhotoMaker slot to clean the glass surface. Click ‘Next‘. Please make sure your film negatives / mounted slides and cover trays are clean before inserting into the PhotoMaker. Dust or dirt from the negatives and cover trays will effect the quality of your scanned images. -
Page 5: Installing Software (Mac)
INSTALLING THE SOFTWARE (PC) INSTALLING THE SOFTWARE (PC) 4. The next screen shows the 6. The next screen lets you software licence agreement. choose where you would If you agree to the terms and like the program shortcut conditions and would like to to appear in the Windows keep installing the program menu. - Page 6 INSTALLING THE SOFTWARE (PC) INSTALLING THE SOFTWARE (MAC) 8. The software installation is 1. Insert the installation CD into your now complete. computer’s CD-ROM drive and click the CD icon. Click ‘Finish‘ and restart your 2. Click ‘MediaImpression Installer’. computer to finalise the installation.
-
Page 7: Placing Film / Slide In The Holder
PLACING FILM / SLIDE INTO THE HOLDER CONNECTING THE PHOTOMAKER 1. Place the negative film or slide holder in front of you with the Kaiser Baas logo 1. Plug the USB cable of the PhotoMaker into an available USB 2.0 port your facing upward. - Page 8 CAPTURING PHOTOS (PC) CAPTURING PHOTOS (PC) 1. Click on the MediaImpression icon on the desktop to start the application. 3. a) Define your save settings: Select between JPG or TIF image file formats. 2. Click ‘Acquire‘ and select ‘Aquire from film scanner‘. b) Choose from four quality levels: Highest / High / Normal / Low (for JPG format only).
-
Page 9: Capturing Photos (Pc)
Move the holder so that the image is correctly positioned and to avoid any dark edges caused by the edges of the holder. If darker edges appear on the top or bottom of the image tilt the PhotoMaker left or right to help position the slide correctly. - Page 10 CAPTURING PHOTOS (MAC) CAPTURING PHOTOS (MAC) 1. Click on the MediaImpression icon on the desktop 3. a) Define your save settings: Select between JPG or TIF image file formats. 2. Click ‘Acquire‘ then select ‘Acquire From Film Scanner‘. b) Choose from four quality levels: Highest / High / Normal / Low (for JPG format only).
-
Page 11: Capturing Photos (Mac)
Move the holder so that the image is correctly positioned and to avoid any dark edges caused by the edges of the holder. If darker edges appear on the top or bottom of the image tilt the PhotoMaker left or right to help position the slide correctly. -
Page 12: Adjust
EDITING PICTURES - ADJUST EDITING PICTURES - ADJUST Photo Editing Tools Colour The Photo Editing Tools module is Arcsoft MediaImpression includes a complete set of This feature is designed to fix photos that have unnatural colour of appear too dark. photo enhancement, editing and retouching controls. - Page 13 EDITING PICTURES - ADJUST EDITING PICTURES - ADJUST Manual Fix 4. Move the crop rectangle into position by clicking and dragging inside the red box. 1. Use the zoom slider on the toolbar to zoom in on the photo. 5. Click ‘Crop‘. The area inside the rectangle will be kept, the area outside will be trimmed away.
-
Page 14: Retouch
EDITING PICTURES - ADJUST EDITING PICTURES - RETOUCH Blur Background Healing Brush This feature can be used in a subtle way to tone down un-important background The Healing Brush is good for fixing dust, scratches and removing skin blemishes. details, or for dramatic effect by making the main subject of a photo ‘pop out‘ of the How to use the Healing Brush to fix a skin blemish: picture. - Page 15 EDITING PICTURES - RETOUCH EDITING PICTURES - RETOUCH Clone Paint Brush Allows you to ‘paint’ on your image when you click and drag the mouse. Click and drag The clone tool is good for removing unwanted elements from a photo. It can also be used for a fun effect, like moving a nose from one person to another.
-
Page 16: Specifications
SPECIFICATIONS SYSTEM REQUIREMENTS PC System Requirements Image Sensor 1/2.5” inch 5 mega CMOS sensor, 5.17 megapixels • Pentium® P4 1.6GHz or equivalent AMD Athlon Lens Specification F=6.4, F=12.36mm 2G2P • Free USB2.0 port Colour balance Automatic • 1 GB RAM Exposure control Automatic • 500MB free hard disk space Support film size 135 film (36mm x 24mm) -
Page 17: Trouble Shooting
CD. manually. expire in XX from ArcSoft website. Time for auto The PhotoMaker self adjusts to your slide/ days PhotoMaker exposure varies negative exposure. Wait for the live view My Mac Your Mac OS is Some older Mac OS10.4 versions do not... - Page 18 Contenido de la caja Diagrama de Producto Instalación del programa (PC) Instalación del programa (MAC) Colocación de la película / diapositiva en el soporte Conexión del PhotoMaker Captura de fotos (PC) Captura de fotos (MAC) Edición de fotos - Ajuste...
-
Page 19: Precauciones
Kaiser Baas debe realizar el mantenimiento y las reparaciones. 1 x Guía de inicio rápido 2. Mantenga el PhotoMaker lejos del agua y otros líquidos. No lo manipule con las manos mojadas. La humedad genera peligro de incendio y descarga eléctrica. -
Page 20: Instalación Del Programa (Pc)
Por favor, asegúrese que los negativos/las diapositivas montadas y las bandejas de protección estén limpias antes de insertarlas en el PhotoMaker. El polvo o la suciedad Haga clic en “Siguiente”. de los negativos y las bandejas de protección afectarán la calidad de las imágenes... - Page 21 INSTALACIÓN DEL PROGRAMA (PC) INSTALACIÓN DEL PROGRAMA (PC) 4. La siguiente pantalla muestra el 6. La siguiente pantalla le permitirá contrato de licencia del programa. elegir en qué sitio le gustaría que Si está de acuerdo con los términos aparezca el acceso en el menú de y las condiciones y quiere seguir Windows.
-
Page 22: Instalación Del Programa (Mac)
INSTALACIÓN DEL PROGRAMA (PC) INSTALACIÓN DEL PROGRAMA (MAC) 8. La instalación del programa se ha 1. Inserte el CD de instalación en completado. el lector de CD-ROM y seleccione el ícono de CD. Haga clic en “Finalizar” y reinicie su 2. -
Page 23: Colocación De La Película / Diapositiva En El Soporte
CONEXIÓN DEL PHOTOMAKER EN EL SOPORTE 1. Conecte el cable USB del PhotoMaker en un puerto USB 2.0 disponible en su computadora. Una vez conectado, se encenderá la luz LED en el PhotoMaker. 1. Coloque el soporte del negativo o diapositiva frente a usted con el logo de Kaiser Baas apuntando hacia arriba. - Page 24 CAPTURA DE fOTOS (PC) CAPTURA DE fOTOS (PC) 1. Haga clic en el ícono de MediaImpression en el escritorio para comenzar la aplicación. 3. a) Defina los ajustes de almacenamiento: Elija entre los formatos de imagen JPG o TIF. 2. Haga clic en “Adquirir” y elija “Adquirir desde escáner de película”. b) Elija entre los niveles de calidad: Máxima / Alta / Normal / Baja (sólo para formato JPG).
-
Page 25: Captura De Fotos (Pc)
Si aparecen bordes oscuros en la parte superior o inferior de la imagen, incline el Photomaker hacia la derecha o la izquierda para ayudar a que la diapositiva se ubique adecuadamente. - Page 26 CAPTURA DE fOTOS (MAC) CAPTURA DE fOTOS (MAC) 1. Haga clic en el ícono de MediaImpression en el escritorio. 3. a) Defina sus ajustes de guardado: Elija entre los formatos de imagen JPG o TIF. 2. Haga clic en “Adquirir” y luego elija “Adquirir desde escáner de película”. b) Elija entre los niveles de calidad: Máxima / Alta / Normal / Baja (sólo para formato JPG).
- Page 27 Si aparecen bordes oscuros en la parte superior o inferior de la imagen, incline el Photomaker hacia la derecha o la izquierda para ayudar a que la diapositiva se ubique adecuadamente.
-
Page 28: Edición De Fotos
EDICIÓN DE FOTOS - AJUSTE EDICIÓN DE FOTOS - AJUSTE Herramientas de edición de fotos 2. Utilice el regulador de zoom para obtener una vista más precisa sobre cómo el retoque afecta la foto. El módulo de Herramientas de edición de fotos en Arcsoft MediaImpression incluye una serie completa de controles de mejora de edición y retoque. - Page 29 EDICIÓN DE FOTOS - AJUSTE EDICIÓN DE FOTOS - AJUSTE Ojos rojos Recortar Esta función le facilita corregir los ojos rojos, un problema común en la fotografía con Esta función le permite recortar las fotos para un efecto dramático o cortar las partes flash.
-
Page 30: Ajuste
EDICIÓN DE FOTOS - AJUSTE 3. Deslice el segundo regulador para aumentar o disminuir la cantidad de difumado. 4. Haga clic en “Aplicar” si está conforme con el resultado, de lo contrario haga clic Enderezar en “Cancelar”. Esta función le permite corregir fotos que aparezcan inclinadas. EDICIÓN DE FOTOS - RETOQUE Cómo utilizar Enderezar: Pincel corrector... - Page 31 EDICIÓN DE FOTOS - RETOQUE EDICIÓN DE FOTOS - RETOQUE Manchas Perfilado Mejore zonas borrosas. Haga clic y deslice los reguladores para cambiar el tamaño del Simule la caída de pintura fresca. Seleccione y deslice los reguladores para cambiar el pincel y la transparencia.
-
Page 32: Especificaciones
ESPECIFICACIONES REQUERIMIENTOS DEL SISTEMA Requerimientos del sistema en PC Sensor de imagen Sensor CMOS de 1/2,5” pulgadas 5 mega; 5,17 Mega-píxeles • Pentium® P4 l.6GHz o AMD Athlon equivalente Especificaciones de la lente F=6,4; f=12,36mm 2G2P • Puerto USB2.0 libre Balance de color Automático • 1 GB RAM Control de Exposición Automático... -
Page 33: Resolución De Problemas
10.4 o anterior. compatibles con el PhotoMaker. Por favor, Mi PhotoMaker El tiempo de la auto- La PhotoMaker se auto ajusta a la exposición de Mac no actualice a la última versión 10.4.11 o superior. funciona bien, exposición varía según la diapositiva/negativo.
Need help?
Do you have a question about the PhotoMaker and is the answer not in the manual?
Questions and answers