Table of Contents
Advertisement
Available languages
Available languages
Quick Links
Mod.: SVE 235
MANUALE D'ISTRUZIONI
SVEGLIA LED DIGITALE CON DOPPIO ALLARME
Importato da:
New Majestic S.p.A.
Via Rossi Martini, 41
26013 Crema (CR) – Italia
www.newmajestic.com
MADE IN CHINA
Si raccomanda di leggere attentamente il seguente manuale d'istruzioni
prima di utilizzare l'apparecchio e di conservarlo per un eventuale
utilizzo futuro.
Advertisement
Table of Contents

Related Manuals for Majestic SVE 235


Summary of Contents for Majestic SVE 235
- Page 1 Mod.: SVE 235 MANUALE D’ISTRUZIONI SVEGLIA LED DIGITALE CON DOPPIO ALLARME Importato da: New Majestic S.p.A. Via Rossi Martini, 41 26013 Crema (CR) – Italia www.newmajestic.com MADE IN CHINA Si raccomanda di leggere attentamente il seguente manuale d’istruzioni prima di utilizzare l’apparecchio e di conservarlo per un eventuale...
- Page 2 INFORMAZIONI IMPORTANTI INTRODUZIONE • Si raccomanda di leggere attentamente il seguente manuale d’istruzioni al fine di poter utilizzare l’apparecchio in modo corretto. AVVERTENZE * Evitare di installare l’apparecchio nei luoghi descritti di seguito: 1. Luoghi esposti alla luce diretta del sole o vicino a dispositivi che irradiano calore come stufe elettriche o altre apparecchiature che irradiano troppo calore. 2. Luoghi sottoposti a vibrazioni costanti. 3. Luoghi non ventilati o polverosi. 4. Luoghi umidi * Azionare pulsanti e interruttori come indicato nel manuale. * Prima di accendere l’apparecchio per la prima volta, assicurarsi che il cavo di alimentazione sia installato correttamente. ATTENZIONE: PER RIDURRE IL RISCHIO DI CAUTION SCOSSE ELETTRICHE NON RIMUOVERE IL COPERCHIO (O IL RETRO...
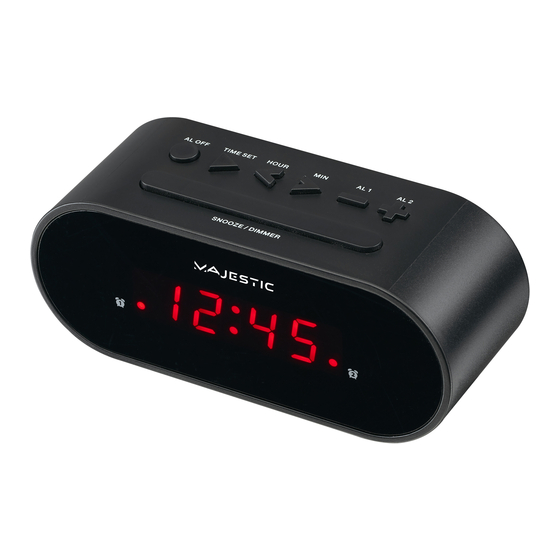
- Page 3 HO UR 1. Tasto spegnimento allarme 2. Tasto impostazione ora 3. Tasto ORA 4. Tasto MIN 5. Tasto ALLARME 1 6. Tasto ALLARME 2 7. Tasto SNOOZE/DIMMER 8. Display 9. Indicatore Allarme 1 10. Indicatore Allarme 2 11. Vano batteria di back up 12. Cavo alimentazione INSTALLAZIONE Inserire il cavo alimentazione AC nella presa di corrente domestica AC 230V –...
-
Page 4: Impostazione Ora
interruzione improvvisa di erogazione della corrente. Inserire una batteria al litio CR2032 nell’apposito vano rispettando le corrette polarità (+/-). • Se l’alimentazione AC dovesse interrompersi, il display LED si spegnerà e l’allarme non funzionerà. La batteria di backup manterrà attiva l’ora e tutte le impostazioni dell’apparecchio. • Per aprire il vano batterie usare un cacciavite per rimuovere la vite. • Quando si sostituisce la batteria non scollegare il cavo alimentazione altrimenti tutte le impostazioni andranno perse. IMPOSTAZIONE ORA Tenere premuto il tasto TIME SET per entrare nella modalità impostazione dell’ora. -
Page 5: Funzione Snooze
FUNZIONE SNOOZE • Per silenziare temporaneamente l’allarme, premere il tasto SNOOZE. L’allarme suonerà di nuovo quando il tempo di snooze (9 minuti) sarà trascorso. • Per cancellare il periodo di snooze e l’allarme, premere il tasto ALARM OFF. LUMINOSITA’ DEL DISPLAY Premere il tasto DIMMER per cambiare il livello di luminosità del display (livello alto o basso). AVVERTENZA DI SICUREZZA DELLE BATTERIE 1. Pericolo di esplosione se la batteria viene sostituita in modo errato. 2. Sostituire solo con lo stesso tipo o equivalente. 3. La batteria non deve essere esposta a calore eccessivo come la luce solare, il fuoco o simili. - Page 6 CURA DEL VOSTRO PRODOTTO 1. Posizionare la sveglia su una superficie piana, lontano da fonti di calore eccessive e dalla luce diretta del sole. 2. Pulire l’apparecchio con un panno morbido inumidito con acqua e sapone leggero. Non usare sostanze pulenti aggressive, come il benzene o materiali simili che possono danneggiare la superficie dell’apparecchio stesso. Accertarsi che il cavo alimentazione sia sempre scollegato prima di pulire l’apparecchio. 3. Se l’apparecchio non viene utilizzato per lungo tempo, come per un mese o più, rimuovere la batteria al fine di prevenire qualsiasi corrosione. Nel caso il vano batterie fosse sporco di sostanza corrosiva, pulirlo completamente e sostituire la batteria.
- Page 7 New MAJESTIC S.p.A. Gentile Cliente, La ringraziamo per il Suo acquisto e Le ricordiamo che il prodotto risponde alle normative vigenti in fatto di costruzione e di sicurezza. Nel caso si dovessero riscontrare anomalie o difetti del prodotto, la New Majestic S.p.A. offre una Garanzia convenzionale soggetta alle condizioni qui riportate (precisando che la Garanzia convenzionale lascia impregiudicati i diritti del consumatore di cui al D.Lgs.
- Page 8 INFORMAZIONE AGLI UTENTI DI APPARECCHIATURE DOMESTICHE Ai sensi dell’art. 25 Comma 1 del Decreto Legislativo 14 Marzo 2014, n. 49 “Attuazione delle Direttive 2011/65/UE e 2012/19/UE relative alla riduzione dell’uso di sostanze pericolose nelle apparecchiature elettriche ed elettroniche, nonché allo smaltimento dei rifiuti”. Il simbolo del cassonetto barrato riportato sull’apparecchiatura o sulla sua confezione indica che il prodotto alla fine della propria vita utile deve essere raccolto separatamente dagli altri rifiuti. L’utente dovrà, pertanto, conferire...
-
Page 9: Dichiarazione Di Conformita' Ue
DICHIARAZIONE DI CONFORMITA’ UE La sottoscritta Società: NEW MAJESTIC S.P.A. Via Rossi Martini 41 26013 CREMA (CR) dichiara sotto la propria responsabilità che il prodotto: TIPO: SVEGLIA DIGITALE MARCA: MAJESTIC MODELLO: SVE 235 è costruito in conformità alle seguenti normative: EN 55014-1:2017 EN 55014-2:2015 EN 61000-3-2:2014 EN 61000-3-2:2013 EN 50564:2011 EN 60065:2014+A11:2017 e soddisfa i requisiti essenziali richiesti dalla direttiva 2014/30/ EU, dalla direttiva 2011/65/EU e dal Regolamento Reach (EC) 1907/2006. - Page 10 Mod.: SVE 235 User manual DIGITAL ALARM CLOCK WITH DUAL ALARM Imported by: New Majestic S.p.A. Via Rossi Martini, 41 26013 Crema (CR) – Italy www.newmajestic.com MADE IN CHINA Please read the following instruction manual carefully before using the appliance and keep it for future use.
- Page 11 IMPORTANT INFORMATION INTRODUCTION • Please read the following instruction manual carefully in order to be able to use the appliance correctly. WARNINGS * Avoid installing the appliance in the places described below: 1. Places exposed to direct sunlight or near devices that radiate heat such as electric heaters or other equipment that radiate too much heat. 2. Places subject to constant vibrations. 3. Unventilated or dusty places. 4. Wet places * Operate buttons and switches as indicated in the manual. * Before switching on the appliance for the first time, make sure the power cord is properly installed. WARNING: TO REDUCE THE RISK OF CAUTION ELECTRIC SHOCK DO NOT REMOVE THE COVER (OR BACK OF THE APPLIANCE).
-
Page 12: Getting Started
HO UR 1. ALARM OFF button 2. TIME SET button 3. HOUR button 4. MIN button 5. ALARM 1 button 6. ALARM 2 button 7. SNOOZE button / DIMMER button 8. Display 9. Alarm 1 indicator 10. Alarm 2 indicator 11. Back up battery compartment 12. Power cord Getting started Connect the power cord to a wall socket (AC 230V ~ 50Hz). Backup system • The alarm clock is equipped with a backup system. It requires a 3V lithium battery (type: CR2032, not included). Insert the battery into the battery compartment and make sure the positive and... -
Page 13: Setting Alarms
negative (+ or -) sides of the battery are in contact with the corresponding terminals in the battery compartment. • If a power cut occurs, the alarm clock automatically switches to the battery power supply and keeps the clock and timer settings. • To open the battery compartment, use a screwdriver to detach the screw on the compartment door. • When replacing the battery, do not disconnect the power adapter. Otherwise, all clock and alarm settings will be lost. Setting the clock Press and hold the TIME SET button to enter the clock setting mode. Press HOUR button to set the hour and MIN button to set the minute. (Press and hold for faster adjustment), press TIME SET button to confirm your time setting. Setting alarms The alarm clock lets you have 2 alarm settings. To set the alarms: Press and hold the ALARM 1 or ALARM 2 button to enter the alarm time setting mode. Press HOUR button to set the hour and MIN button to set the minute. (Press and hold for faster adjustment), press ALARM button to confirm your alarm setting. Turning the alarms on or off When the clock time is displayed, press the ALARM 1 or ALARM 2 button to enable or disable the respective alarm. The corresponding Alarm 1 or Alarm 2 indicator will switch on when the alarm is enabled. Deactivating a sounding alarm Press ALARM OFF button to switch off a sounding alarm. -
Page 14: Display Brightness
Display brightness Press the DIMMER button to change the brightness level of the display (low or high level). BATTERY SAFETY NOTICE 1. Danger of explosion if battery is incorrectly replaced. 2. Replace only with the same or equivalent type. 3. The battery should not be exposed to excessive heat such as sunshine, fire or the like. 4. Do not swallow the battery, risk of chemical burns. 5. This product may contain a button / cell battery. If the battery is swallowed, it can cause severe internal burns in just 2 hours and can lead to death. 6. Keep new and used batteries away from children. 7. If the battery compartment does not close securely, stop using the product and keep it away from children. 8. If you think that the batteries may have been swallowed or placed inside any part of your body, consult a doctor immediately. Specifications Power supply: AC 230V ~ 50Hz, 5W Battery back up for clock : 1x3V CR2032 (not included) 24Hr format = Class II, double insulation = WEEE Logo (Waste electrical and electronic equipment) - Page 15 TO USERS OF DOMESTIC EQUIPMENTS Pursuant to Art. 25, Paragraph 1 of the Legislative Act N. 49 14th March 2014, “Implement of the Directives 2011/65 / EU and 2012/19 / EU concerning the reduction of the use of hazardous substances in electrical and electronic equipment, as well as waste disposal”.
Need help?
Do you have a question about the SVE 235 and is the answer not in the manual?
Questions and answers