Table of Contents
Advertisement
Quick Links
Congratulations on your purchase of Camden EC1 and thank you for
selecting Cranborne Audio to be a part of your music creation process.
Cranborne Audio, for us, means so much more than metal boxes with
components in them. These are our labours of love that embody and
demonstrate our demand for excellence. By distilling what matters and
putting our soul into these tools, we hope to help other people make magic
and express themselves, and in some way, become part of our Cranborne
Audio family.
So welcome to our family. We care for our family. And we care about making
your tracks, albums, scores sound as good as they should.
Advertisement
Table of Contents

Subscribe to Our Youtube Channel
Related Manuals for Cranborne Audio Camden EC1


Summary of Contents for Cranborne Audio Camden EC1
- Page 1 Congratulations on your purchase of Camden EC1 and thank you for selecting Cranborne Audio to be a part of your music creation process. Cranborne Audio, for us, means so much more than metal boxes with ...
-
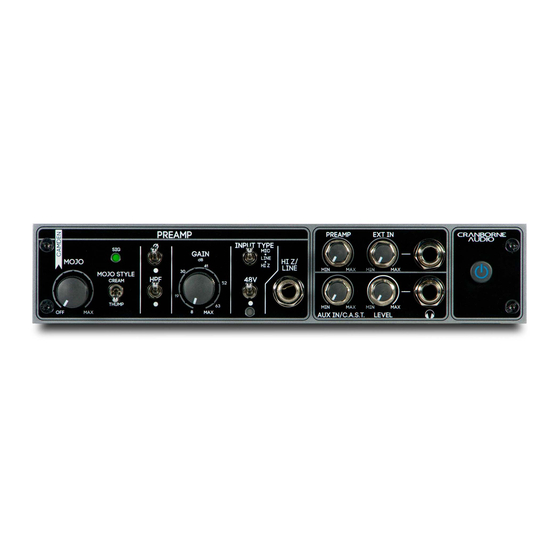
Page 2: Controls And Connectors
Controls and Connectors Page 2 ©2020 Cranborne Audio Ltd ... - Page 3 [8] 48v Switch: E ngages 48v phantom [17] Power Switch: S afely powers on power for the rear XLR input and off Camden EC1. Tap to power on, connector. press and hold to power off. (Switch Down = ON) ...
- Page 4 Inputs are summed with the C.A.S.T. OUT RR Paths. [4] PAD Switch: Reduces the output [8] Power: P rovides Camden EC1 with level of both Preamp Outputs by power via the provided external 24v 1A 10dB to for use with low-headroom ...
-
Page 5: Package Contents
Package Contents So now your Camden EC1 is out of it’s packaging, you’re probably itching to get it powered on and making music! But before you get started, please read the sections below that will help guide you through the process of getting ... - Page 6 EC1’s Power Inlet [ 8] . Connect the Preamp Output [ 3] of Camden EC1 to an available line input on the Audio Interface. Use either Camden EC1’s balanced ¼” jack or XLR outputs depending on your audio interface’s ...
- Page 7 EC1’s packaging and connect the Power Connector into Camden EC1’s Power Inlet [ 8] . Connect Camden EC1’s C.A.S.T. Output [ 6] t o a C.A.S.T. Input on 500R8/500ADAT using a shielded Cat 5e, Cat 6, or Cat 7 cable. ...
-
Page 8: Safety Information
Do NOT modify this unit, altercations may affect performance, safety and/or international compliance standards. Cranborne Audio does not accept liability for damage caused by maintenance, repair or modification by unauthorized personnel. ... -
Page 9: Installation Notes
ATTENTION: Un-earthed metal parts may be present inside the enclosure. No user serviceable parts inside - to be serviced only by qualified personnel. When servicing, disconnect all power sources before removing any panels. Page 9 ©2020 Cranborne Audio Ltd ... -
Page 10: Fcc Certification
RoHS Notice Cranborne Audio complies with and this product conforms to European Union’s directive 2011/165/EU on Restrictions of Hazardous Substances (RoHS) as well as the following sections of California law which refer to RoHS, namely sections 25214.10, ... -
Page 11: Electromagnetic Compatibility
WARNING: Operation of this equipment in a residential environment could cause radio interference. Environmental Operating Temperature:: +1 to 30 degrees Celsius. Storage: -20 to 50 degrees Celsius. Page 11 ©2020 Cranborne Audio Ltd ... - Page 12 The Cranborne Audio Half Rack Kit (Sold separately) allows you to securely mount Camden EC1 into any 19” rack. The kit includes a long rack ear, two short rack ears, and all required fixings to enable either a single or pair of ...
Need help?
Do you have a question about the Camden EC1 and is the answer not in the manual?
Questions and answers