
Subscribe to Our Youtube Channel
Related Manuals for Clou wash me CL/07.46.537.50


Summary of Contents for Clou wash me CL/07.46.537.50
- Page 1 wash me_high dresser 210 cm CL/07.46.537.50, CL/07.46.537.51, b a t h f i n d i n g s CL/07.46.537.60, CL/07.46.537.61, CL/07.46.537.62 Montage instructies Installation Instructions Notice de montage Montageanweisungen...
- Page 2 All menti- oned dimensions in this manual should be verified before executing the action. - Clou b.v. can not be held responsible for the results of improper use, improper transportation or any damage caused during interim storage.
- Page 3 à toute action. - Clou BV ne peut être tenu responsable pour usage non approprié des articles, trans- port inadéquat ou dommage causés à votre entrepôt en attente de livraison.
- Page 4 Gegenstände auf das Produkt passend ist. Gebruiksvoorschriften: zie ook de onderhoudsvoorschriften op www.clou.nl max. User’s instructions: See also the maintenance guides at www.clou.nl 15 kg Instructions d’utilisation: Voyer aussi les instructions de maintenance sur www.clou.nl Gebrauchsanweisungen: Sehen Sie auch die Wartungsanweisungen am www.clou.nl...
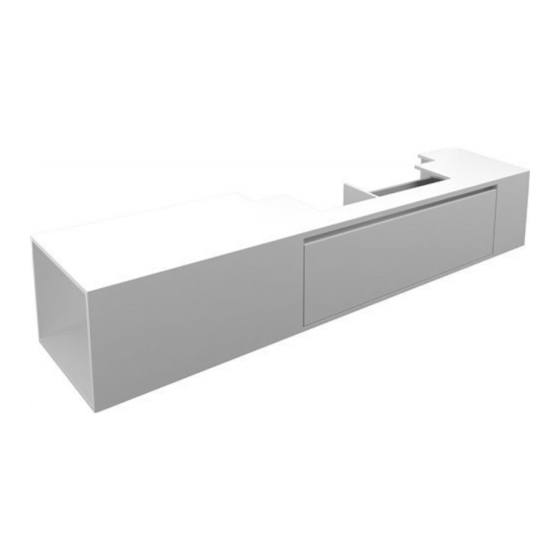
- Page 5 all connections for water supply and waste should be positioned within the grey area...
- Page 6 1300...
- Page 7 1965...
- Page 8 Duidt met potlood en waterpas de middellijn van de wastafel aan. 1300 mm Mark with pencil and level the centreline of the washbasin. Marquer avec un crayon et avec un niveau la ligne de centre du lavabo. Markieren Sie mit einem Blei- stift und mithilfe der Was- serwaage die Mittellinie des Waschtisch.
- Page 9 De watertoevoer en -afvoer- punten dienen in het grijze gebied te vallen. 500 mm 500 mm The water supply and waste pipe should be positioned within the grey area. L’arrivée d’eau et les écoule- ments doivent se trouver dans la zone gris. Die wasserzufuhr und der Ablauf müssen in dem grauen Gebiet liegen.
- Page 10 Boor de gaten voor de beugels (ø 10 mm). Drill the holes for the supports (ø 10 mm). Percer les trous pour les sup- ports (ø 10 mm). Bohren Sie die Löcher für die Bügel (ø 10 mm). ø 10 mm Steek de pluggen in de gaten.
- Page 11 Bevestig de beugels met de sluitringen en bouten. Mount the supports with the washers and bolts. Fixer les supports avec les ron- delles et les boulons. Befestigen Sie die Bügel mit den Unterlegschieben und den Schraubbolzen. Haal de lades uit de ladekast door ze naar voor en omhoog te trekken.
- Page 12 Bevestig de ladekast op de beugels met de schroeven. Mount the dresser to the sup- ports with the screws. Fixer la commode sur les sup- ports avec les vis. Befestigen Sie den Schubla- denschrank an den Bügeln mit die Schrauben. Plaats de wastafel op de la- dekast met een lijn siliconekit ertussen.
- Page 13 Bevestig de kraan (niet inbe- grepen) op de wastafel en sluit deze aan op de waterleiding. Mount the tap (not included) on the washbasin and connect it to the water supply. Fixer le robinet (non inclus) sur le lavabo et le raccorder à la conduite d’eau.
- Page 14 Bevestig de sifon (inbegre- pen) aan de afvoer en aan de afvoerleiding. Attach the trap (included) to the drain and to the waste pipe. Fixer le siphon (inclus) à la bonde et à la décharge d’eau. Befestigen Sie den Siphon (im Lieferumfang enthalten) am Ablauf und an der Abflusslei- tung.
- Page 16 Office Clou bv Stationstraat 143 NL-6361 BH Nuth T +31 (0)45 524 56 56 F +31 (0)45 524 6000 Warehouse Thermiekstraat 1a NL-6361 HB Nuth Showroom Ravenswade 4a...
Need help?
Do you have a question about the wash me CL/07.46.537.50 and is the answer not in the manual?
Questions and answers