Advertisement
Quick Links
Smart
C o n t r o l
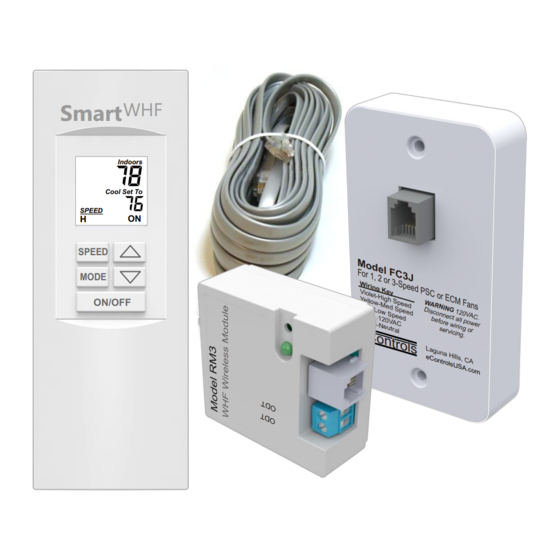
The RT3K kit includes an RT3 Remote control with
two AAA batteries already installed, an RM3 Radio
Module, an FC3J Fan Control and a 7' plug&play
cable.
!
CAUTIONS
Turn off power before installing whole house fan or controls.
Read and follow all instructions carefully, including those
included with the whole house fan. Read entire manual
before installing products.
Follow all local electrical codes during installation. All wiring
must conform to local and national electrical codes.
Installation should be performed by a qualified individual
with sufficient experience and skill.
Use cautions when mounting components to surfaces that
may have concealed wiring beneath the surface.
When servicing WHF controls, turn off all power to these
items.
Step 1. Install FC3J in Junction Box on Fan
Wire the FC3J to the fan using the diagram below as a guide. If
the FC3J fan control is already installed on the fan, go to Step 2.
See FC3J Wiring Diagrams on pages 3-4 for wiring to
fans manufactured by QC Manufacturing.
Low Speed
LS
Medium Speed
MS
High Speed
HS
120VAC Power
120
VAC
NTL
Neutral
Unused wires should be cut at the
!
PCB or capped with wire nuts.
Use the screws included to secure the
FC3J to the junction box on the fan
making sure there are no exposed
wires and the fan control is securely
inside the electrical box. Failure to do
so could result in electrical shock.
WHF
Whole House Fan Remote Control
Connect to FAN Low
Speed Wire
Connect to FAN Medium
Speed Wire
Connect to FAN High
Speed Wire
Connect to POWER
120VAC Wire
Connect to FAN Neutral
Wire and to POWER
120VAC Neutral Wire
INSTALLER MANUAL
WHF
Smart
Indoors
Cool Set To
SPEED
H
ON
SPEED
MODE
ON/OFF
Step 2. Connect RM3 to the FC3J
Connect the FC3J Fan Control installed in the junction box on
the fan to the RM3 Radio Module using the plug&play cable
provided.
Insert cable into
RM3.
Step 3. Power the Fan
If you are installing the optional outdoor temperature
sensor, install the sensor first then power the fan. See
page 2 for sensor installation.
Apply power to the fan.
automatically starts up, remove
Model RM3
WHF Radio Module
power and check the wiring . If the
problem persists, contact us.
Laguna Hills, CA
eControlsUSA.com
The LED on the RM3 Radio Module
blinks yellow until communication
with the RT3 Remote has been
established.
Model RT3K
Insert cable into FC3J
installed on fan.
Use cable
provided.
If the fan
Jan 2020
Advertisement

Related Manuals for eControls Smart WHF Control RT3K


Summary of Contents for eControls Smart WHF Control RT3K
- Page 1 INSTALLER MANUAL Model RT3K Smart Whole House Fan Remote Control C o n t r o l Jan 2020 The RT3K kit includes an RT3 Remote control with two AAA batteries already installed, an RM3 Radio Smart Module, an FC3J Fan Control and a 7’ plug&play cable.
- Page 2 Step 4. Establish Communication Between Step 6. Checking the Installation RT3 Remote and RM3 Module CHECK FAN OPERATION PRESS then PRESS to select TIMER CONTROL. MODE The RT3 Remote and RM3 Module are prelinked and automatically establish PRESS to turn the fan ON. Fan should be running. ON/OFF communication once the units are powered.
- Page 3 FC3J Wiring Diagrams for fans manufactured by QC Manufacturing Use the tables below to determine which wiring diagram to wire the Fan and Power to the FC3J. The wire colors used by the Fan manufacturer for high, medium and low speed vary with fan models. The model number is on a label on the Fan. CLASSIC Series TRIDENT PRO Series Blue Fan...
- Page 4 Power Power eControls eControls Warranty This thermostat is warranted to be free of defects due to workmanship or materials under normal use and service for a period of 5 years from...
Need help?
Do you have a question about the Smart WHF Control RT3K and is the answer not in the manual?
Questions and answers