
Related Manuals for Litchi SM1083

Summary of Contents for Litchi SM1083
- Page 1 Litchi Stand Mixer Instructions SM1083 Register your product and get support at: www.litchilive.com service@litchilive.com 8427 S Old Bingham Hwy, West Jordan, UT, United States, 84088 Made in China Call: 844-246-8462 1 / 16...
-
Page 2: Table Of Contents
Table of Content STAND MIXER SAFETY Important Safeguards & Electrical Requirements.........................3 PARTS AND FEATURES Stand Mixer Parts ......................................4 ASSEMBLYING LITCHI STAND MIXER To Attach/Remove Beaters..................................8 To Attach/Remove Bowl...................................8 To Attach/Remove Pouring Shield................................8 To Raise/Put Down Motor Head................................9 To Operate Speed Dial....................................9 To Attach/Remove Glass Blender Jar..............................9... - Page 3 Call the Litchi Customer Satisfaction Center at 1-844- 246-8462 for more information. 7. The use of attachments not recommended or sold by Litchi may cause fire, electrical shock or injury. 8. Do not use the Stand Mixer outdoors.
-
Page 4: Parts And Features
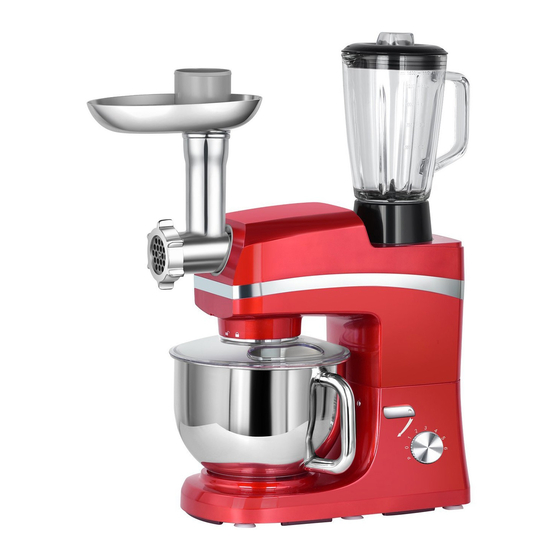
PARTS AND FEATURES STAND MIXER PARTS: ② Meat Grinder Assembly ③ Mixing Bowl ① Hopper ④ Tilt Knob ⑤ Sausage Holder ⑥ Front Cover ⑦ Sausage Tube ⑧ Speed Dial ⑨ Caudal Cover ⑩ Flat Beater ⑪ Mixing Blade ⑫ Wire Whisk ⑬... - Page 5 Glass Blender Jar Parts ② Lid ③ Glass Blender Jar ① Measuring Cup ④ Jar Base ⑤ Sealing Ring ⑥ Blade Base Meat Grinder Assembly Parts A. Meat Grinder Cover B. Mincing Discs C. Mincing Blade D. Roller E. Hopper F.
- Page 6 F. Food Pusher Sausage Stuffer Assembly Parts A. Meat Grinder Cover B. Sausage Tube C. Sausage Holder D. Roller E. Hopper F. Meat Grinder Case G. Food Pusher Assembling Litchi Stand Mixer SM1083 To Install Glass Blender Jar 6 / 16...
- Page 7 To Install Meat Grinder Assembly To Install Pasta Dies To Install Sausage Stuffer Assembly 7 / 16...
-
Page 8: Assemblying Litchi Stand Mixer To Attach/Remove Beaters
ASSEMBLING YOUR TILT-HEAD STAND MIXER To Attach Flat Beater, Wire Whisk, Dough Hook or Mixing Blade 1. Turn speed dial to speed 0. 2. Unplug Stand Mixer or disconnect power. 3. Tilt motor head back by turning the tilt knob. 4. -
Page 9: To Raise/Put Down Motor Head
Turn speed dial to “P” for Pulse function. When the speed dial is turned to “P”, the stand mixer will operate in the highest speed. Use “P” for stirring or creaming. USING YOUR LITCHI ACCESSORIES C-Dough Hook mixes and kneads yeast dough with ease, saving you both the time and effort of hand kneading. -
Page 10: Using Glass Blender Jar
Glass Blender Jar works great for whipping up fruit smoothies, mixing frozen margaritas, blending pureed soups, stirring up zesty salsas, and more. Meat Grinder Assembly comes with 3 different cutting accessories for coarse, medium, fine grinds of meat that making stuffing and filling. Not only can be used for meat, but also fish, pepper, vegetables and etc. -
Page 11: Care And Cleaning
NOTE: Do not scrape the bowl while the Stand Mixer is operating. The bowl and beater are designed to provide thorough mixing without frequent scraping. Scraping the bowl once or twice during mixing is usually sufficient. Turn the Stand Mixer off before scraping. -
Page 12: Troubleshooting & Rfqs
Answer: If you are turning it clockwise, try with more pressure. 6. Where is the meat grinder assembly? Answer: For early batch of product, the meat grinder assembly of model SM1083 is placed underneath the bottom foam. 12 / 16... -
Page 13: Standard Accessories
WARRANTY & RETURNS Litchi Stand Mixers come with 2 Year Seller Warranty for the main machine and motor, 3 Months Warranty for the attachments. To return the product, please contact us directly and get a RMA before returning product. -
Page 14: Recipes
RECIPES COCOA ALMOND BISCOTTI INGREDIENTS 70g caster sugar 2 large eggs 2g salt 25g cocoa powder 150g plain flour, sifted 1/2 tsp. baking powder 50g almond slices METHOD Step 1 Preheat oven to 325° F. Line a large baking paper. Step 2 Place sugar, salt and one egg in a large bowl. - Page 15 *Do not use self-rising flour. METHOD Step 1 Combine dry ingredients in mixer bowl. Step 2 Add butter, milk, lemon and vanilla. Step 3 Attach bowl and flat beater to stand mixer. Step 4 Turn to Speed 5 and beat about 2 minutes. Step 5 Stop and scrape bowl.
- Page 16 METHOD Attach the Flat Beater to the Litchi Stand Mixer. Place flour, salt, eggs and oil into mixing bowl. Turn to Speed 2 and mix until mixture is combined. Remove Flat Beater and attach Dough Hook, then knead for 5 minutes on speed 1, or until dough indents when touched.
Need help?
Do you have a question about the SM1083 and is the answer not in the manual?
Questions and answers