
Related Manuals for Glen Dimplex CI6SE3


Summary of Contents for Glen Dimplex CI6SE3
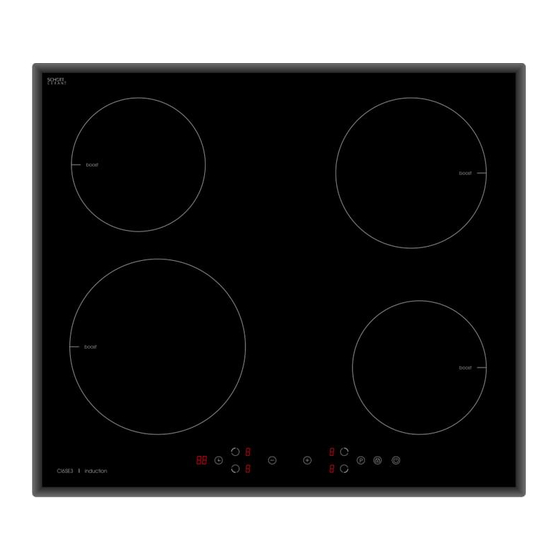
- Page 1 60cm Induction Cooktop Model CI6SE3 boost boost boost boost CI6SE3 | induction INSTRUCTION / INSTALLATION MANUAL PLEASE READ THE USER MANUAL CAREFULLY BEFORE USE www.glendimplex.com.au...
- Page 2 Gas date of installation: _________________________________________________________________________________ Gas installers details: Company / Installers Name: _____________________________________________ Licence Number: ______________________________________________________ Telephone Number: ____________________________________________________ Plumbing date of installation: ___________________________________________________________________________ Plumbers installers details: Company / Installers Name: _____________________________________________ Licence Number: ______________________________________________________ Telephone Number: ____________________________________________________ Page ii CI6SE3 60cm Induction Cooktop...
- Page 3 For further details please contact our Customer Care team on 1800 444 357 or email: customercare@hapl.com.au Thank you Regards, Glen Dimplex Australia CI6SE3 60cm Induction Cooktop Page iii...
-
Page 4: Table Of Contents
Failure Display and Inspection ___________________________________ 20 Technical Specification _________________________________________ 20 Installation - material and dimensions ____________________________ 21 Installation - ventilation and clearances ___________________________ 22 Installation - fixing cooktops to work surface ______________________ 23 Installation - electrcial connection ________________________________ 24 Page 1 CI6SE3 60cm Induction Cooktop... -
Page 5: Safety Warnings - Installation
• In order to avoid a hazard, this appliance must be installed according to these instructions for installation. • This appliance is to be properly installed and earthed only by a suitably qualified person. CI6SE3 60cm Induction Cooktop Page 2... -
Page 6: Safety Warnings - Operation And Maintenance
• Do not let your body, clothing or any item other than suitable cookware contact the ceramic glass until the surface is cool. • Metallic objects such as knives, forks, spoons and lids should not be placed on the hob surface since they can get hot. Page 3 CI6SE3 60cm Induction Cooktop... - Page 7 • Do not store items of interest to children in cabinets above the appliance. Children climbing on the cooktop could be seriously injured. • Do not leave children alone or unattended in the area where the appliance is in use. CI6SE3 60cm Induction Cooktop Page 4...
- Page 8 Commercial use of any kind is not covered under the manufacturer’s warranty! • WARNING: The appliance and its accessible parts become hot during use. • Care should be taken to avoid touching heating elements. Page 5 CI6SE3 60cm Induction Cooktop...
- Page 9 • The appliance is not intended to be operated by means of an external timer or separate remote-control system. • CAUTION: The cooking process has to be supervised. A short term cooking process has to be supervised continuously. • Power cord can’t be accessible after installation. CI6SE3 60cm Induction Cooktop Page 6...
-
Page 10: Product Overview
3. max. 1800/2100 W zone 4. max. 1200/1500 W zone 5. Control panel The Control Panel 1. ON/OFF switch 2. Select power level 3. Setting the timer 4. Child lock 5. Select heating zone 6. Boost control Page 7 CI6SE3 60cm Induction Cooktop... -
Page 11: What Is Induction Cooking
• Make sure the controls are always clean, dry, and that there is no object (e.g. a utensil or a cloth) covering them. Even a thin film of water may make the controls difficult to operate. CI6SE3 60cm Induction Cooktop Page 8... -
Page 12: Choosing The Right Cookware
Ideally cookware should be the same size as the cooking zone. Refer table above. Always centre your pan on the cooking zone. Always lift pans off the cooktop – do not slide, or they may scratch the glass Page 9 CI6SE3 60cm Induction Cooktop... -
Page 13: Using Your Cooktop
1. Touch the desired heating zone selection that you wish to switch off. 2. Turn the cooking zone off by touching “+” or “-” control to “0”. Make sure the display shows “0”. 3. Turn the whole cooktop off by touching the ON/OFF control. CI6SE3 60cm Induction Cooktop Page 10... -
Page 14: Using Boost Function
• NOTE: For technical reasons and protection of the cooktop the Boost function will only last for 5 minutes, after that the zone will go to level 9 automatically. Page 11 CI6SE3 60cm Induction Cooktop... -
Page 15: Locking The Controls
Safety feature of the cooktop is auto shut down. This occurs whenever you forget to switch off a cooking zone. The default shutdown times are shown in the table below: Power level Default shutdown time (hours) CI6SE3 60cm Induction Cooktop Page 12... -
Page 16: Using The Timer
5. Set the time by touching the “+” or “-”, now the timer you set is 95 minutes. 6. When the time is set, it will begin to count down immediately. The display will show the remaining time. Page 13 CI6SE3 60cm Induction Cooktop... - Page 17 6. When the time is set, it will begin to count down immediately. The display will show the remaining time. NOTE: There will be a red dot in the right bottom corner of power level indication which indicating that zone is selected CI6SE3 60cm Induction Cooktop Page 14...
- Page 18 1. Touching the heating zone selection control that you want to cancel the timer. 2. Touching the timer control, the indicator will flash. 3. Touching “+” or “-” control to set the timer to “00”, the timer is cancelled. Page 15 CI6SE3 60cm Induction Cooktop...
-
Page 19: Cooking Guidelines
Press the steak to gauge how cooked it is – the firmer it feels the more ‘well done’ it will be. 5. Leave the steak to rest on a warm plate for a few minutes to allow it to relax and become tender before serving CI6SE3 60cm Induction Cooktop Page 16... -
Page 20: Heat Settings
• reheating • rapid simmering • cooking rice 5 - 6 • pancakes 7 - 8 • sauteing • cooking pasta • stir-frying • searing • bringing soup to the boil • boiling water Page 17 CI6SE3 60cm Induction Cooktop... -
Page 21: Care And Cleaning
5. Switch the power to the cooktop back on. Note: To keep the ceramic glass surface in good condition a cleaner like Hillmark’s Cerapol is recommended. For stubborn stains a scraper should be used to remove excess spills. CI6SE3 60cm Induction Cooktop Page 18... -
Page 22: Troubleshooting Guide - Hints And Tips
(typically alternating with one or two digits in the cooking timer display). Page 19 CI6SE3 60cm Induction Cooktop... -
Page 23: Failure Display And Inspection
Cut out Dimensions - A x B (mm) *60Hz frequency relates to other countries around the world, not Australia. Note: As we continually strive to improve our products we may change specifications and designs without prior notice. CI6SE3 60cm Induction Cooktop Page 20... -
Page 24: Installation - Material And Dimensions
Warning: The work surface material must use the impregnated wood or other insulated material. Model No. L (mm) W (mm) H (mm) D (mm) A - (mm) B (mm) X (mm) CI6SE3 50 Min. Page 21 CI6SE3 60cm Induction Cooktop... -
Page 25: Installation - Ventilation And Clearances
• The power supply cable is not accessible through cupboard doors or drawers. • There is adequate flow of air from outside the cabinetry to the base of the cooktop. • The isolating switch is easily accessible by the customer. CI6SE3 60cm Induction Cooktop Page 22... -
Page 26: Installation - Fixing Cooktops To Work Surface
• Place cooktop into pre-cut housing in work surface. • Fix the cooktop to the work surface by screwing the four brackets on the bottom of cooktop (see picture) after installation. Bracket positions Fixing of brackets for various work surface thicknesses Page 23 CI6SE3 60cm Induction Cooktop... -
Page 27: Installation - Electrcial Connection
Connecting the cooktop to the mains power supply The power supply should be connected in compliance with the relevant local standards to a single-pole circuit breaker. The method of connection is shown below. Power cord is not accessible afetr installation. CI6SE3 60cm Induction Cooktop Page 24... - Page 28 $ % & ' ) * * + & ) , - . & ' + ) / . + . 0 & , - 1 2* + & ) , - . 3& 4 % 56 7 1 * . ) , 0 &...
Need help?
Do you have a question about the CI6SE3 and is the answer not in the manual?
Questions and answers