
Related Manuals for FLAVIA KASKATA Series


Summary of Contents for FLAVIA KASKATA Series
- Page 1 FLAVIA I DISHWASHERS FULLY INTEGRATED DISHWASHER KASKATA BI 60 KASKATA Light S BI 45 KASKATA Light S...
- Page 2 Operation and installation manual Dear customer! Thank you for buying a “FLAVIA” product. We hope, this appliance will meet your expectations and be a reliable assistant of yours in your kitchen. For correct and safe operation of the appliance, please carefully read all the chapters in the present manual. Keep your manual for the entire service life of the product you have purchased.
-
Page 3: Table Of Contents
DISHWASHERS Operation and installation manual CONTENTS Safety hints and statements ..................2 Scope of supply ......................3 Technical data ....................... 4 Control panel ......................... 4 Dishwasher design .......................5 Table of operating modes .....................7 Water softener.......................8 Water hardness table ....................9 Detergent agent ......................9 Rinsing agent ...................... -
Page 4: Safety Hints And Statements
DISHWASHERS Operation and installation manual SAFETY HINTS AND STATEMENTS ATTENTION! Do not break the dishwasher door and dish Attention! grid! Do neither sit down nor stand on it! To avoid failures when connecting the appliance in cold months, keep it un- Do not touch heating elements during heat- packed at a room temperature within ing and right after use. -
Page 5: Scope Of Supply
DISHWASHERS Operation and installation manual When putting dishes: SCOPE OF SUPPLY Be careful with sharp objects – put them Your dishwasher is classified as a built-in avoiding damage to the door seal; appliance. 2) Put sharp knives with the handle upward The scope of supply includes as follows: to avoid cutting yourself. -
Page 6: Technical Data
DISHWASHERS Operation and installation manual TECHNICAL DATA The manufacturer's plate to identify the dishwasher model is at the top of the dishwasher door side. Open the door to see that. Model BI 45 KASKATA Light S BI 60 KASKATA Light S Overall dimensions, mm: Width, mm Length (depth):... -
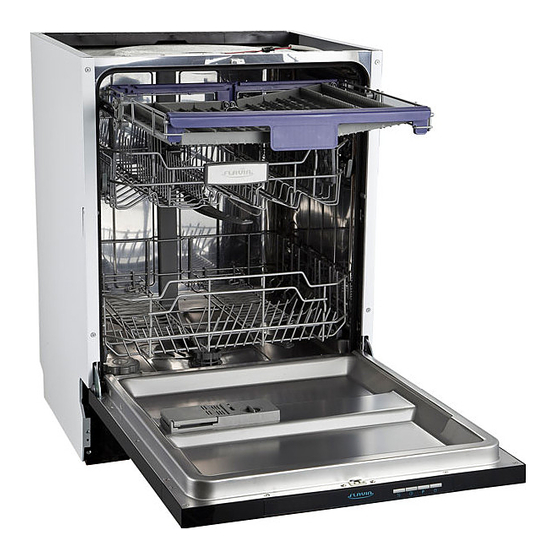
Page 7: Dishwasher Design
DISHWASHERS Operation and installation manual Pic. 2 DISHWASHER DESIGN ATTENTION! IMPORTANT! (Picture 2) During operation, the dishwasher runs 1 Upper nozzle a program selected. The program run 2 Flatware compartment time also includes an inactive period, within which it may seem that the dish- 3 Upper basket washer has completed washing. - Page 8 DISHWASHERS Operation and installation manual The pictogram is on Display 1, Picture 1, and it blinks during the entire washing cycle. A sound signal informs you of the program run completion; the signal is given within ap- proximately 8 seconds. The pictogram of the program selected is off (Display 1, Picture 1).
-
Page 9: Table Of Operating Modes
DISHWASHERS Operation and installation manual... -
Page 10: Water Softener
DISHWASHERS Operation and installation manual WATER SOFTENER NOTE: The salt container should be refilled, when the “S” pictogram (upper left corner of the display) starts to illumi- nate. Even if the container is properly filled, the pictogram may still illumi- nate until salt is dissolved complete- If you have spilled the salt, you can wash it out, using the “Quick”... -
Page 11: Water Hardness Table
DISHWASHERS Operation and installation manual Water hardness Settings Display indication mmol/l 0 – 5 0 – 0.09 6 – 11 1.0 – 2.0 12 – 17 2.1 – 3.0 18 – 22 3.1 – 4.0 23 – 34 4.1 – 6.1 35 –... -
Page 12: Rinsing Agent
DISHWASHERS Operation and installation manual Detergent agent consumption RINSING AGENT This is to be used at the last stage to prevent IF WATER USED IS TOO HARD, YOU drop marks on dishes. This also improves dry- MAY AVOID FORMATION OF SCALES ing, enabling water to “run off”... - Page 13 DISHWASHERS Operation and installation manual Rinsing agent doser control Within the last rinsing cycle, a certain amount of the rinsing agent is used. Similar to use of the detergent agent, the quantity of the rinsing agent depends upon water hard- ness.
-
Page 14: Putting Dishes Into The Dishwasher
DISHWASHERS Operation and installation manual PUTTING IN DISHES It is preferred to place serving dishes and plates on the edges of the basket not to Loading the upper basket cause interference with free rotation of the The upper basket is meant for fragile and upper water sprayer. -
Page 15: Turning On The Appliance
DISHWASHERS Operation and installation manual Hinged cups holders SWITCHING ON THE APPLIANCE To optimally place spots and pans you can fold teeth, as shown in the figure on your Starting a washing cycle right. 1. Make sure the dishwasher is connected to the mains. -
Page 16: Filter System
DISHWASHERS Operation and installation manual Slightly open the door to stop the wash- ATTENTION: ing cycle. After water nozzles have stopped oper- If you open the door of the dishwasher ating, open the door all the way. with a program running, the program Put the forgotten plate. -
Page 17: Dishwasher Care
DISHWASHERS Operation and installation manual The moving nozzles must be cleaned on a regular basis, otherwise scales and hard ATTENTION! water deposits will clog them, as well as Do not turn the fine filter upside down! water channels. For that, unscrew the nut, remove the upper part of the mover. - Page 18 DISHWASHERS Operation and installation manual Use a brush to clean the coarse and fine Dishwasher care filters. Then, assemble the entire system After each washing cycle shut off the water and insert that into the dishwasher, to po- supply cock and leave the door a bit open to sitions corresponding, slightly pushing the remove moisture and odors.
-
Page 19: Installation Preparation
DISHWASHERS Operation and installation manual INSTALLATION PLEASE CAREFULLY READ Note: THE PRESENT MANUAL. check whether all hardware items are THIS CONTAINS INFORMATION THAT available, required for installation of WILL HELP YOU UNDERSTAND IN- a dishwasher (fasteners, screws for a STALLATION PROCEDURES decorative panel). - Page 20 DISHWASHERS Operation and installation manual DECORATIVE PANEL DIMENSIONS AND MOUNTING PROCEDURE Preparation upper fixture 1. The decorative wooden panel to be at- tached to the door of the dishwasher shall be prepared according to drawings as shown in Figures 3a and 3b. 2.
- Page 21 DISHWASHERS Operation and installation manual 416 0.2 390 0.2 287.5 0.2 2 - 2 ( ) 20 MAX 8- 2 4- 2 Figure 3b. BI 45 KASKATA Light S.
-
Page 22: Door Spring Tension Adjustment
DISHWASHERS Operation and installation manual DOOR SPRING TENSION ADJUSTMENT The door spring tension adjustment is Unscrew 4 short screws Screw in 4 long screws factory-made, to parameters required. If you mount the decorative wooden panel, you will have to readjust the spring tension. Rotate the screws to increase the steel ca- ble tension or release it. -
Page 23: Drain Hose Connection
DISHWASHERS Operation and installation manual DRAIN HOSE CONNECTION connect your dishwasher to a power supply source. Use a 15 A fuse. Use copper wires only! It is recommended to use a time-delay Insert the drain hose into a drain open- fuse and circuit breaker. -
Page 24: Water Supply Connection
DISHWASHERS Operation and installation manual Safe inlet hose tight. If water supply pipes are new or have not been used for a long time, let water run- The safe inlet hose has two walls. The off and check whether it is clean and con- hose system activates and shuts off water sup- tains any impurities. - Page 25 DISHWASHERS Operation and installation manual Figure 7. Dishwasher installation sequence...
-
Page 26: Installation Instructions
DISHWASHERS Operation and installation manual Bring the dishwasher into a position de- INSTALLATION INSTRUCTIONS sired. The dishwasher must be level which is to en- Level the dishwasher. Rear feet may be sure its proper functioning. adjusted using screws, located in front (Item 6a, Figure 7). - Page 27 DISHWASHERS Operation and installation manual Problem Possible causes Remedies The drain pump Overfill The system detects overfill. If any, the can’t be switched circulating pump is off, and the drain pump is on. Noise due to crushing of soft food resi- Noise Some natural noise dues, or noise originating from opening...
- Page 28 DISHWASHERS Operation and installation manual Problem Possible causes Remedies Stains on glasses 1. Too hard water To remove stains on glass items do as and flatware follows: 2. Low temperature of 1. Take all metal dishware items out of inlet water the dishwasher.
- Page 29 DISHWASHERS Operation and installation manual Problem Possible causes Remedies The doser cover Position OFF not se- Select OFF position, move the door lock can’t be closed lected to the left. Detergent agent Dishware blocks the Place the dishware in a proper way. residues in the doser doser Small amounts of vapors escape via an...
- Page 30 DISHWASHERS Operation and installation manual Problem Possible causes Remedies Check seals of the dishwasher door. Check if the dishwasher is levelled horizontally. Overfill Check if the rinsing agent is overfilled. Check the quality of the detergent agent used (excessive foam formation must be avoided). Temperature sensor Remove scales and lime deposits inside the improper actuation...
-
Page 31: Codes Of Errors
DISHWASHERS Operation and installation manual STORAGE END OF LIFE DISPOSAL Keep the appliance in a dry place, away from Electrical and electronical appliances of- ten contain components, which are of value sources of high temperatures and sunlight. During storage avoid rapid temperature even upon the end of their service life. -
Page 32: What You May Not Wash Using This Dishwasher
DISHWASHERS Warranty service conditions Operation and installation manual WHAT YOU MAY NOT WASH IN YOUR DISHWASHER – flat- and table-ware made of wood – some kinds of glassware may lose trans- (wholly or partially) because their colors parency upon several washing cycles; may fade, and the dishware may lose its attractive look;... - Page 33 DISHWASHERS Warranty service conditions The products are subject to free repair, if used ing a tear-off card), model and the serial number only for personal, family or other needs, not relat- of the product. ed to business activities, or satisfying household Before you call a Service Center specialist, requirements in an office of a company, institution please carefully read the operation regulations.
- Page 34 DISHWASHERS Warranty service conditions dish-washing machines, accumulators, batter- – mechanical damage to the product (scratches, ies, etc., plastic parts handled manually; cracks, spalls, etc.); – consumables have been used, of improper qual- – loss of the saleable condition due to impact of ity;...
- Page 36 www.flavia-dishwasher.com...
Need help?
Do you have a question about the KASKATA Series and is the answer not in the manual?
Questions and answers