Table of Contents
Advertisement
Quick Links
Advertisement
Table of Contents

Subscribe to Our Youtube Channel
Related Manuals for D-Link DKVM-8E


Summary of Contents for D-Link DKVM-8E
- Page 1 DKVM-8E 8- Port Keyboard, Video, and Mouse Switch User’s Guide Rev. 1.0...
-
Page 2: Table Of Contents
Installation... 5 Usage...11 Daisy Chain Diagram...15 Hot Plug ...16 On Screen Display Operation ...18 Trouble Shooting ...23 General Problems ...23 Monitor/Video Problems...24 Keyboard Problems ...24 PS/2 Mouse Problems...25 Problems with computers using serial mouse output...27 Problems with power supply...27 Specification ...29... -
Page 3: Introduction
Introduction The DKVM-8E gives you the ultimate in control of 8 PCs from one keyboard, mouse and monitor. control ability, the Daisy-Chain allows eight DKVM-8E stack up for control 64 PCs from one keyboard, mouse and monitor. OSD (On-Screen Display) menu provides human friendly interface for naming each PCs and selecting one of them. -
Page 4: Package Content
Supports both AT and PS/2 type keyboards (AT requires AT - PS/2 adapter) User inexpensive and commonly found standard cables Package Content Before you begin to install your DKVM-8E, please make sure that you received the following materials as listed below: mouse conversion ®... - Page 5 Item DKVM-8E Power Adapter 3 in 1 KVM cable kit Mouse Adapter cable User’s Manual Rack mount bracket Screw Rubber foot 1 pcs. Keyboard, mouse & monitor switch 1 pcs. DC12V,1A 1 set : 3 feet 3-in-one Cable Kit to...
-
Page 6: Hardware Installation
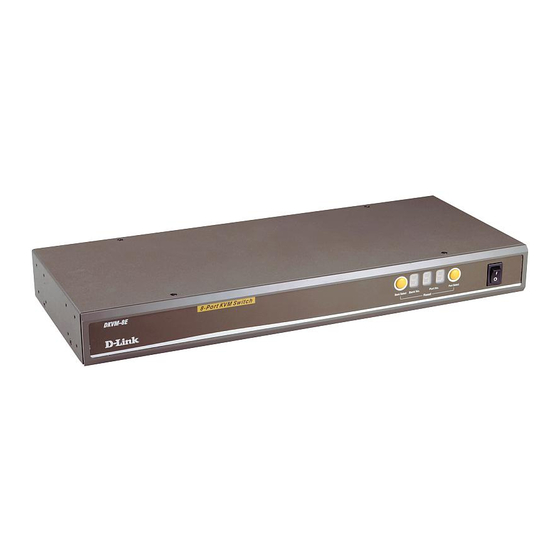
Hardware Installation This section will explain how to connect the console and the computers to the DKVM-4 switch unit. First the layout of front and rear panel will be shown. Front Panel Layout Current Active Bank Display Current Active Port Display Bank Select Port Select Power Switch... -
Page 7: Real Panel Layout
Installation WARNING! Before attempting to connect anything to the DKVM-8E or the computers, make sure everything is powered off . Otherwise, plugging and unplugging cables may cause irreversible damage to your computers and the DKVM-8E. Please follow the steps below closely and in the order as shown, otherwise, keyboard and/or mouse errors may occur. - Page 8 19” rack. When mounting to a rack, attach the included brackets to the sides of the DKVM-8E. Take note of the length of your cables so that your computers, DKVM-8E, keyboard, mouse...
- Page 9 Step 3 Connect the keyboard to the DKVM-8E. If you have an AT type keyboard, you will need an AT to PS/2 adapter. Step 4 Connect the mouse to the DKVM-8E. Step 5 - 7 -...
- Page 10 (VGA) connections first. Connect a VGA cable (15-pin HDDB Male / Male) with the Male side to both of the PC and the rear panel of the DKVM-8E unit to the connector labeled VGA. Repeat this for all PCs. Back...
- Page 11 DKVM-8E. Using another PS/2 cable connect one end to PS/2 keyboard port on the computer, and the other end to the PC1 keyboard port on the back of DKVM-8E. If your computer has an AT type keyboard port, you will need a PS/2 to AT keyboard adapter.
- Page 12 Please be remind to plug in power adapter. Although the PCs connected to DKVM-8E are able to support enough power to the stand alone switch, DKVM-8E still needs a power adapter for daisy chain more banks. If you forgot to plug in power adapter on the status of daisy chain, it may cause the unpredictable behavior or shut down the PC.
-
Page 13: Usage
– i.e. keep the default eight zero (00000000) value. Otherwise, if you have set the password and unfortunately forget the password, you will need to contact supplier (D-Link) to have the unit re-set. The Push Buttons Pressing the button cyclically through all the ports. - Page 14 DKVM-8E. If you add a new DKVM-8E as a slave bank, please use reset button of master DKVM-8E to assign a new ID to it. You can view this new slave bank go through OSD menu.
- Page 15 Lock” “Scroll Lock” key), the keyboard will back to under Operation System control state. Below are the different hot key commands within 2 seconds Scroll Lock Scroll Lock Note: You also could press “up arrow key” or “down arrow key” to speed up selecting the destination port) Scroll Lock...
- Page 16 Note: 1. If you set up scan mode command already, DKVM-8E issue one beeper for confirmation every time when one of PC ports hop to next PC port. 2. To get out of Auto Scan Mode, press any key or SPACE bar.
-
Page 17: Daisy Chain Diagram
Lock Daisy Chain Diagram Please follow the steps below closely to daisy chain DKVM-8E. You can daisy chain up to 8 DKVM-8Es. 1. Connect Keyboard, Mouse and Monitor to the console port (white color block) of bank 1 KVM switch. -
Page 18: Hot Plug
SLAVE (Bank 2) SLAVE (Bank 3) SLAVE (Bank 8) Hot Plug The DKVM-8E supports “Hot Plug“ function for easy addition or removal of PCs. The user can arrange or maintain PCs as follows: A PC can be disconnected and reconnected to the... - Page 19 DKVM-8E without having to power it off as long as it is not the Daisy-chain port or pass through port. When the pass through port is active and selected, you must switch to a different port before you change the configuration, and then you can switch back to the pass through port.
-
Page 20: On Screen Display Operation
On Screen Display Operation When you pop up the OSD manual window go through the hot key, you will see the following small window on your monitor. BANK: SYSTEM 01 0 ¤ SYSTEM 03 0 ¤ SYSTEM 04 0 ¤ SYSTEM 05 0 SYSTEM 07 OSD: SEC. - Page 21 default of 8 port KVM switch PC name is from “SYSTEM 01”, “SYSTEM 02”,…, “SYSTEM 08”. The sun symbol “¤ “ beside the PC name shows that the respective PC system is powered on. The “OSD: 10 SEC” means that the OSD windows display or PC system name exists 10 sec.
- Page 22 ENTER NEW PASSWORD: RETYPE NEW PASSWORD: You need to retype the password again for rechecking your previous key-in password is matched or not. NEW PASSWORD COMPLETE ESC: QUIT “CONSOLE ON/OFF“ lets you select the console access of the KVM switch. If you select “CONSOLE ON“, any user can use the console.
- Page 23 To use up arrow key “ —“ or down arrow key “˜“ to select port for destination PC name. After you have selected the PC port already, you can press the ENTER Key to switch the PC port you want immediately To use “PgUp“...
- Page 24 keys in order. The Display LEDs on the front panel will be flashed during the refresh process. REFLASH When the OSD value back to default setting, the Display LEDs on the front panel will stop flashing - 22 -...
-
Page 25: Trouble Shooting
Q: The OSD menu does not display a “ where a computer is connected and powered up. What do I do? A: ? DKVM-8E will updated “ key to access the OSD menu again and it should have re-detected all the active channels. -
Page 26: Monitor/Video Problems
Monitor/Video Problems Q: I am getting ghosting shadowing or fuzzy images on my monitor. What do I do? A: ?Check the cables and make sure they are inserted properly. ?Your resolution and / or refresh rate is extremely high, or your cable is too long. Replace your VGA cables with coaxial, double-shielded cables. -
Page 27: Ps/2 Mouse Problems
PC, whether stand-alone or connected to a DKVM-8E. Q: The computers boot up fine, but the keyboard does not work. A: ?Check the cables and make sure they are inserted properly in the correct ports. ? Make sure the keyboard works when directly plugged into the computers. - Page 28 ? Try a different mouse. ? Make sure the mouse is a true PS/2 mouse. A combo mouse will work just a s long as it is set for PS/2 mode with the correct adapter. A serial-only mouse with a combo mouse adapter WILL NOT work.
-
Page 29: Problems With Computers Using Serial Mouse Output
Q: The wheel on the Mouse does not work on my computer. Why? A: ? Make sure the mouse is fully compatible to Microsoft® Intellimouse® or Microsoft® Intellimouse® Explorer®. ? DKVM-8E does not support special wheel function of mouse. Problems with power supply integrated... - Page 30 Although the PCs connected to DKVM-8E are able to support enough power to the stand alone switch, DKVM-8E still needs a power adapter for daisy chain more banks. - 28 -...
-
Page 31: Specification
Specification Computer Connections : 8 Display LED Indication Keyboard Mouse Monitor Cascade Cascade Port On Screen Display 19” Rack Mount Cascade (Level) Max. Access PCs Manual Selection Hot Key Switching Confirmation : Buzzer Keyboard state Keyboard Mouse Monitor Display Data Channel... - Page 32 FCC Certifications This equipment has been tested and found to comply with the limits for a Class B digital device, pursuant to Part 15 of the FCC Rules. These limits are designed to provide reasonable protection against harmful interference in a residential installation.
- Page 33 Operation is subject to the following two conditions: (1) This device may not cause harmful interference, and (2) This device must accept any interference received, including interference that may cause undesired operation. CE Mark Warning This is a Class B product. In a domestic environment, this product may cause radio...
- Page 34 Le Florilege #2, Allee de la Fresnerie 78330 Fontenay le Fleury France TEL: 33-1-302-38688 FAX: 33-1-3023-8689 URL: www.dlink-france.fr GERMANY D-LINK Central Europe/D-Link Deutschland GmbH Schwalbacher Strasse 74 D-65760 Eschborn, Germany TEL: 49-6196-77990 FAX: 49-6196-7799300 URL: www.dlink.de BBS: 49-(0)6192-971199 (Analog) 49-(0)6192-971198 (ISDN)
- Page 35 URL: www.d-link.co.jp RUSSIA D-LINK RUSSIA Michurinski Prospekt 49, 117607 Moscow, Russia TEL: 7-095-737-3389, 7-095-737-3492 FAX: 7-095-737-3390 URL: www.dlink.ru SINGAPORE D-LINK INTERNATIONAL 1 International Business Park, #03-12 The Synergy, Singapore 609917 TEL: 65-774-6233 FAX: 65-774-6322 URL: www.dlink-intl.com S. AFRICA D-LINK SOUTH AFRICA...
-
Page 36: Contacting Technical Support
Contacting Technical Support You can find software updates and user documentation on the D-Link website. D-Link provides free technical support for customers within the United States and within Canada for the duration of the warranty period on this product. U.S. and Canadian customers can contact D-Link technical support through our web site, or by phone. - Page 37 Link at an Authorized D-Link Service Office. The replacement hardware need not be new or have an identical make, model or part. D-Link may, at its option, replace the defective Hardware or any part thereof with any reconditioned product that D-Link reasonably determines is substantially equivalent (or superior) in all material respects to the defective Hardware.
- Page 38 If a material non-conformance is incapable of correction, or if D-Link determines in its sole discretion that it is not practical to replace the non-conforming Software, the price paid by the original licensee for the non-conforming Software will be refunded by D-Link;...
- Page 39 Any hardware, software, firmware or other products or services provided by anyone other than D-Link; and Products that have been purchased from inventory clearance or liquidation sales or other sales in which D-Link, the sellers, or the liquidators expressly disclaim their warranty obligation pertaining to the product.
- Page 40 Connect the equipment into an outlet on a circuit different from that to which the receiver is connected. • Consult the dealer or an experienced radio/TV technician for help. For detailed warranty information applicable to products purchased outside the United States, please contact the corresponding local D-Link office.
- Page 41 Registration Product registration is entirely voluntary and failure to complete or return this form will not diminish your warranty rights.
Need help?
Do you have a question about the DKVM-8E and is the answer not in the manual?
Questions and answers