Table of Contents
Advertisement
Advertisement
Table of Contents

Subscribe to Our Youtube Channel
Related Manuals for Bush CTT5


Summary of Contents for Bush CTT5
- Page 1 Instruction manual CTT5...
- Page 2 You’ll soon be enjoying your new Turntable. It all begins here, with your instructions. Don’t worry, there’s nothing too technical coming up. Just simple, step-by-step guidance to get you up and running quickly. Sound good? Then let’s get started. Help and Guidance We’re here to help you get the most from your Turntable.
-
Page 3: Table Of Contents
Contents Safety information Safety information Getting to know your Turntable Ready? Let’s begin Accessories Features Connecting to an external sound system Listening to an external source Handling vinyl Fitting the dust cover Using your Turntable Getting started Connecting the power Turn the power On/Off Play a record Replacing the turntable stylus (needle) - Page 5 Safety information...
-
Page 6: Safety Information
Safety information Important - Please read these instructions fully before installing or operating Power source • This symbol means that this unit is double insulated. An earth connection is not required. • The appliance must be connected to a 100-240 volt 50/60Hz AC supply by means of a three pin socket. - Page 7 Safety information Important - Please read these instructions fully before installing or operating Heat sources and flames • To prevent risk of fire or electric shock, avoid overloading wall outlets, extension cords, or integral convenience receptacles. Servicing and repairs • Refer all servicing to qualified service personnel •...
-
Page 9: Getting To Know Your Turntable
Getting to know your Turntable... -
Page 10: Ready? Let's Begin
If you require any further assistance, our technical experts are happy to help. For full details, refer to the product support section at the end of these instructions. Accessories 1. CTT5 turntable 2. Mains adapter 3. 1 x spare stylus/needle 4. -
Page 11: Features
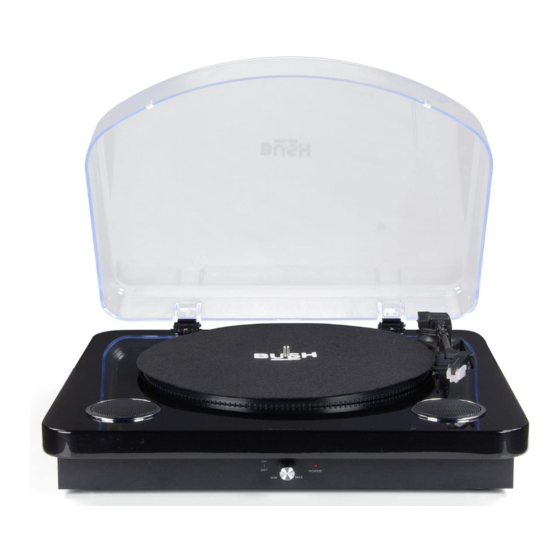
Getting to know your Turntable You’ll be up and running in no time AUX IN DC 5V 1. TURNTABLE platter 5. TONE-ARM 2. TONE-ARM rest/lock 6. SPEED selector (33, 45 & 78rpm) 3. CARTRIDGE/STYLUS 7. TONE-ARM - lift lever POWER 4. - Page 12 Getting to know your Turntable You’ll be up and running in no time AUX IN DC 5V POWER VOLUME 8. AUX-IN 3.5mm socket 11. DUST cover 9. DC MAINS input socket 12. ON/OFF/Volume control knob 10. RCA LINE LEVEL output sockets 13.
-
Page 13: Connecting To An External Sound System
Getting to know your Turntable You’ll be up and running in no time Connecting to an external sound system Should you wish to connect the turntable to an external amplifier follow the below steps. AUX IN DC 5V 1. Connect an RCA audio cable (not supplied) to the AUDIO LINE OUT sockets on the rear of the turntable. -
Page 14: Listening To An External Source
Getting to know your Turntable You’ll be up and running in no time Listening to an external source Connect other audio sources such as a smartphone to the turntable to allow playback through the built-in speakers. Follow the below steps to get connected. AUX IN DC 5V 1. -
Page 15: Fitting The Dust Cover
Getting to know your Turntable You’ll be up and running in no time Fitting the dust cover Refer to the diagram below to attached the plastic dust cover. AUX IN DC 5V AUX IN DC 5V AUX IN DC 5V Take care when fitting, and do not press down too hard. -
Page 17: Using Your Turntable
Using your Turntable... -
Page 18: Getting Started
Using your Turntable Let’s get started Getting started 1. Remove all packaging from the turntable including the security wire around the tone- arm rest/lock (2) and the white plastic cartridge protector. 2. Place the turntable on a stable surface. Connecting the power AUX IN DC 5V Fig 1. -
Page 19: Play A Record
Using your Turntable Let’s get started Play a record 1. Before use, ensure the security wire (tone-arm rest/lock) and the cartridge protector (stylus/cartridge) have been removed. And the tonearm lock is released. 2. Place a record on the turntable platter (1). 3. -
Page 21: Other Information
Other information... -
Page 22: Care & Maintenance
Other information Helpful technical information Care & maintenance After using the Turntable • Set to Standby. • Switch the unit off at the mains and unplug it if you are leaving it unattended for a long period (holidays etc). Care & cleaning •... -
Page 23: Product Support
Product support... -
Page 24: Troubleshooting
Product support Help is always at hand Troubleshooting Problem Reason(s) Solution(s) No power. Power cable not connected Make sure the plug is to wall socket. connected. Power socket is not Switch the power on. switched on. No sound when connected Volume is too low. -
Page 25: Disposal
Product support Help is always at hand Disposal • Disposal of your old product. Your product is designed and manufactured with high quality materials and components, which can be recycled and reused • When this crossed out wheeled bin symbol is attached to a product it means the product is covered by the European Directive 2002/96/EC. -
Page 26: Help And Assistance
If you still require further assistance, call one of our experts on 0345 600 3021*. To help give us give you a fast and efficient service please have the following information ready: You can find these CTT5 Model Ref. on the rating plate - a... -
Page 27: Guarantee
Call us now and activate your 12 month guarantee Thank you for choosing Bush. Your new product is guaranteed against faults and breakdowns for 12 months. Don’t forget to register it with us today so we can provide you with our best possible after-sales service and useful updates. - Page 28 Contact: www.argos-support.co.uk Helpline: 0345 600 3021 Rev1.7...
Need help?
Do you have a question about the CTT5 and is the answer not in the manual?
Questions and answers