
Related Manuals for Curtis RCD831


Summary of Contents for Curtis RCD831
- Page 1 MODEL NO. RCD831 RADIO CD MICRO SYSTEM OWNER'S MANUAL PLEASE READ BEFORE OPERATING THIS EQUIPEMNT...
-
Page 2: Safety Instructions
SAFETY INSTRUCTIONS CAUTION RISK OF ELECTRIC SHOCK DO NOT OPEN CAUTION: TO REDUCE THE RISK OF ELECTRIC SHOCK, DO NOT REMOVE COVER (OR BACK). NO USER-SERVICEABLE PARTS INSIDE. REFER SERVIC- ING TO QUALIFIED SERVICE PERSONNEL. DANGEROUS VOLTAGE: The lightning flash with arrowhead symbol, within an equilateral trian- gle is intended to alert the user to the presence of uninsulated dan-... - Page 3 SAFETY INSTRUCTIONS Before using the unit, be sure to read all operat- ing instructions carefully. Please note that these are general precautions and may not pertain to your unit. For example, this unit may not have the capability to be connected to an outdoor antenna.
- Page 4 SAFETY INSTRUCTIONS voltage points or short out parts that could result in fire or electric shock. Never spill or spray any type of liquid on the product. 17. OUTDOOR ANTENNA GROUNDING If an outside antenna is connected to the prod- uct, be sure the antenna system is grounded so as to provide some protection against voltage surges and built-up static charges.
- Page 5 NOTES FOR REMOTE CONTROL To install or replace the battery: Pull the battery tray out of the remote. If you are replacing the battery, remove the old battery and dispose of it properly. Note the orientation of the + and - sides of the battery.
-
Page 6: Connecting The Speakers
PREPARATION FOR USE Power Sources This portable audio system is designed to operate on either 120V AC, 60Hz house current. AC Operation Unwind the AC cord and extend it to its full length. Insert the small end of the AC cord into the AC socket on the rear of the unit. -
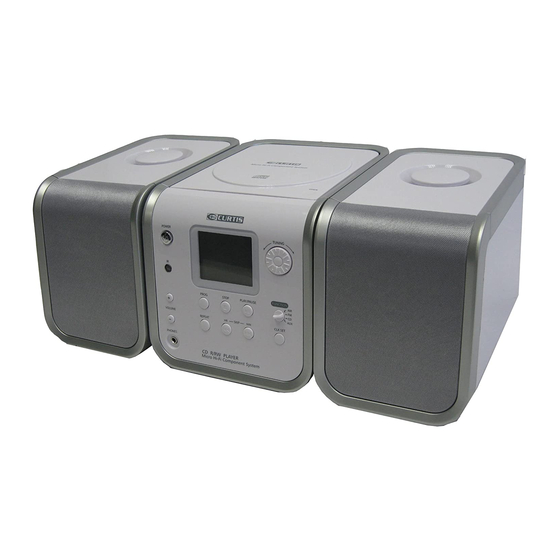
Page 7: Location Of Controls
LOCATION OF CONTROLS MAIN UNIT: Controls: 1. POWER Button 2. VOLUME DN Button 3. VOLUME UP Button 4. PLAY / PAUSE Button 5. STOP Button 6. SKIP UP / MIN Button 7. SKIP DN / HR Button 8. PROG (Program) Button 9. - Page 8 LOCATION OF REMOTE CONTROLS REMOTE: Controls: POWER Button 2. VOLUME DN Button 3. VOLUME UP Button 4. PLAY / PAUSE Button 5. STOP Button 6. SKIP UP Button 7. SKIP DN Button 8. PROG (Program) Button 9. REPEAT Button 10. RAND (Random) Button...
- Page 9 1/2 inch between the main unit and the speakers so that any vibration from the speakers will not interfere with the CD player in the main unit. Remove the main unit, the speakers, and the remote control unit.
- Page 10 OPERATING INSTRUCTIONS Stereo Headphone Jack You may connect stereo headphones (not included) to the Headphone jack on the front panel of this system for private listening without disturbing others. When headphones are connected the speakers are automatically shut off. IMPORTANT: Before you connect your headphones, set the VOLUME control of this system to a low level.
- Page 11 OPERATING INSTRUCTIONS To set up a CD program (program up to 20 tracks): Press the POWER Button to turn on your unit, and then rotate the FUNCTION Knob to CD position. The CD track "--" appears on the display. Insert a CD into the CD compartment. If the CD starts playing, press the STOP Button.
- Page 12 OPERATING INSTRUCTIONS Caring for Compact Discs • Treat the disc carefully. Handle the disc only by its edges. Never allow your fingers to come in contact with the shiny, unprinted side of the disc. • Do not attach adhesive tape, stickers, etc. tothe disc label. •...
-
Page 13: Troubleshooting Guide
Try another CD. Clean the CD with soft cloth Try another CD. Remove the CD and leave the CD tray open for about one hour to let the CD player dry out. Set Function switch to CD Close CD compartment door.
Need help?
Do you have a question about the RCD831 and is the answer not in the manual?
Questions and answers