Table of Contents
Advertisement
Quick Links
Advertisement
Table of Contents

Subscribe to Our Youtube Channel
Related Manuals for Curtis RCD688


Summary of Contents for Curtis RCD688
- Page 1 RCD688 INSTRUCTION MANUAL...
-
Page 2: Important Safety Instructions
TO PREVENT FIRE OR SHOCK HAZARD, DO NOT USE THIS PLUG WITH AN EXTENSION CORD, RECEPTACLE OR OTHEROUTLET ULESS THE BLADES CAN BE FULLY INSERTED TO PRESENT BLADE EXPOSURE. TO PREVENT FIRE OR SHOCK HAZARD. DO NOT EXPOSE THIS APPLIANCE TO RAIN OR MOISTURE. -
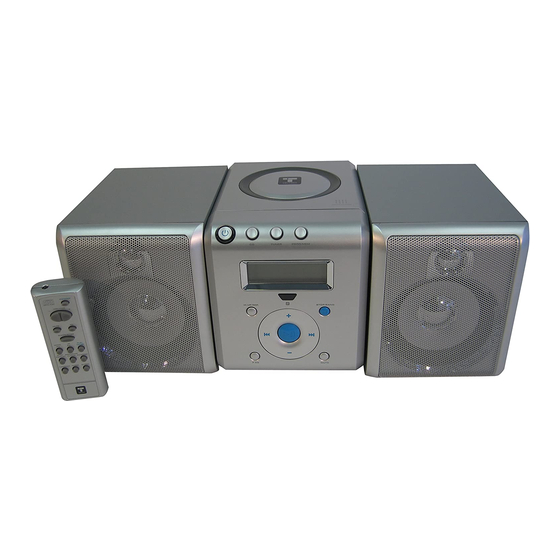
Page 3: Front View
Quick View To get the maximum enjoyment and performance from this product, please read this manual and familiarize yourself with the functions and controls before attempting to operate it . Correc usage will assure years of trouble free performance and listening pleasure. Front View Power Display... -
Page 4: Remote Control
Remote Control Power Volume - Volume + Mute Band/Stop Selection Skip Forward Play/Pause Skip Back Random M-UP/Repeat Program/Clock Sleep Tuner/CD Timer... -
Page 5: Getting Started
Getting Started Unpacking your RCD888 Micro System Carefully remove your CD micro system from its packaging .You may wish to store the packaging for future use. Box Contents: CD micro system 2 speakers (speaker cables attached) Remote control AM Loop Antenna User Guide Front View Plug the power cord into an AC outlet having 120V/60Hz only. -
Page 6: Operating The Remote Control
Remote Control 1. Open the battery compartment cover. 2. Insert two AAA (Um4) batteries (not included )to match the polarities as indicated inside the battery compartment. 3. Close the cover. NOTE: When the batteries become too weak, the operating distance of the remote controller is greatly reduced and you will need to replace the batteries. -
Page 7: Volume Control
Operation Now your CD micro system is installed and ready for use, please refer to the following instructions for correct operation AC Power Operation The CD micro system will be in standby mode, when the AC power supply is connected and switched on . -
Page 8: Am Loop Antenna
FM Antenna Fully extend the FM antenna wire and position it to obtain the best FM reception. FM Stereo The CD micro system is capable of receiving stereo FM broadcasts. When you tuned to a stereo broadcasting, STEREO will be displayed. AM Loop Antenna For AM reception broadcasts are picked up through a loop antenna that plugs into the back of the unit. -
Page 9: Track Selection
CD player Operation At the front of the CD micro system or using the remote control, press POWER, to switch the CD micro system on.The LCD display will light up. Set the function switch to CD. The display will initially flash zeros then show Only use CDs that bear the CD logo. -
Page 10: Programmed Playback
Using the unit controls: 1. During play, press either of the track will automatically start to play. Stop Play 1. Press BAND/STOP on the remote control or the unit. The isplay will show the total number of tracks and dtotal playing time. 2. -
Page 11: Sleep Function
Random Play 1. With the CD loaded, press RANDOM on the remote control. The tracks will be played in a random order. 2. To cancel random play either press RANDOM or BAND/STOP on the remote control, or STOP/ BAND on the unit. Repeat Play 1. -
Page 12: Care And Maintenance
Care and Maintenance Compact Disc Care CD Handling When handling CDs: Do not touch the recorded surface. Do not stick paper, or write, on either side of the CD. Do not bend the CD. CD Storage To avoid scratches/damage, always put CDs back in their cases, after use. Do not expose CDs to direct sunlight, high temperature/humid-ity,for long periods. -
Page 13: Specification
Specification POWER SUPPLY Radio FREQUENCY RANGE Laser OPTICAL PICKUP Note: Specification subject to change without notice. 120V~60Hz 87.5 - 108MHz 520 - 1710KHz Class 1 Laser... - Page 14 la puissance l'ecran le senseur M-UP/Repeter sauter arriere/ baisser jouir/pause P.EQ l'antenne de la modulation de frequence le trou du parleur a gauche le trou du parleur a droite le trou de l'antenne de la modulation d'amplitude volume - muet la selection bande/arret sauter devant sauter arriere...
- Page 15 plie pour la suspension plie pour former un stand sur le mur comme fourni...
Need help?
Do you have a question about the RCD688 and is the answer not in the manual?
Questions and answers