Shoprider 6Runner 10 (888WNLM) User Manual
Mid-wheel powerchair
Hide thumbs
Also See for 6Runner 10 (888WNLM):
- Specifications (2 pages) ,
- User manual (24 pages) ,
- User manual (23 pages)
Table of Contents
Advertisement
Quick Links
Advertisement
Table of Contents

Related Manuals for Shoprider 6Runner 10 (888WNLM)


Summary of Contents for Shoprider 6Runner 10 (888WNLM)
- Page 1 Mid-Wheel Powerchair USER MANUAL Model: 6Runner 10 (888WNLM)
-
Page 2: Table Of Contents
ELECTROMAGNETIC INTERFERENCE FROM RADIO WAVES......4 POWERED CHAIR ELECTROMAGNETIC INTERFERENCE (EMI)....5 SAFETY INSTRUCTIONS................. 6-7 FEATURE GUIDE....................8 GETTING TO KNOW YOUR SHOPRIDER ............ 9-10 THE JOYSTICK CONTROLLER (VR2 or Shark)........... 11-12 LOCKING / UNLOCKING THE JOY STICK CONTROLLER………………….13-14 DRIVE/FREEWHEEL MECHANISM..............15 DRIVING YOUR POWERCHAIR .............. -
Page 3: Introduction
We know that your 6Runner 10 Powerchair will provide many years of dignified independent mobility. This manual contains important information regarding the safe use of your Shoprider Powerchair. Please read this manual carefully and thoroughly before using your Powerchair and make sure you understand all the instructions. -
Page 4: Emi Warning
EMI WARNING Electromagnetic Interference (EMI) from Radio Wave Sources Powered electric chairs may be susceptible to electromagnetic interference, which is a kind of interfering electromagnetic energy (EM) emitted from sources such as radio stations, TV stations, amateur radio (HAM) transmitters, two-way radios and cellular phones. -
Page 5: Powered Chair Electromagnetic Interference (Emi)
Power Chair Electromagnetic Interference (EMI) Because EM energy rapidly becomes more intense the closer one moves to the transmitting antenna (source), the EM fields from hand-held radio sources (transceivers) are of special concern. It is possible to unintentionally bring high levels of EM energy very close to the Powerchair’s control system while using these devices. -
Page 6: Safety Instructions
Safety Instructions Please use your Powerchair often and let it expand your horizons. The more mobility your Powerchair brings, the happier you will be! But, with all things, observing a few rules will ensure safe maneuvering. So please… (1) Do not drive the Powerchair without reading this instruction manual. (2) Do not use the joystick in an erratic manner when going up or down an incline. - Page 7 Important Notes The Shoprider Powerchair is designed to assist in your individual mobility needs. Any usage outside of the guidelines in this manual may result in damage to the chair or injury to the user or third party.
-
Page 8: Feature Guide
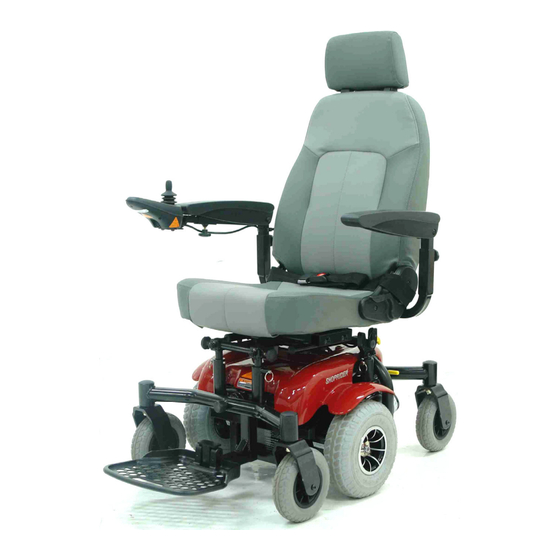
Feature Guide (Fig. 1) (10) Fig. 1 (1) Headrest (adjustable with selected height) (2) Armrest (adjustable with selected width, angle and height) (Flips Up for Easy Sideways Transfer) (3) VR2 or Shark Joystick (mounted onto the armrest) & Main Controller (mounted onto the frame) (4) Charging Port (5) Deluxe Reclining Captain Seat (6) Footrest... -
Page 9: Getting To Know Your Shoprider
Getting to Know Your Shoprider Powerchair The Seat and Arm Assemblies The seat is built for comfort, style, and stability. Your seat comes with a reclining back for comfort. The flip-up arm-rests are especially built for easy side access for getting in and out of your 6Runner 10, with the greatest of ease. - Page 10 Seat Height Adjustment and Easy Battery Access 1. Tightening knob that allows for the seat to be removed if needed, if not, there is a pivot point that allows for the seat to move up and away from the base. 2.
-
Page 11: The Joystick Controller (Vr2 Or Shark)
Joystick Controller (VR2 or Shark) Overview Shark On / Off Button (1) This button turns the joystick controller (hereinafter referred to as VR2 or Shark joystick) on and off. Do not use this button to stop the Powerchair, except in an emergency. Speed Decrease Button (2) This button decreases the maximum speed. - Page 12 Powerchair. Charging Port (10) for Off-Board Charger Only plug a Shoprider certified charger into this port. This port should not be used as a power supply for any other electrical devices. Disregarding this will void the warranty of...
-
Page 13: Locking / Unlocking The Joy Stick Controller
Locking/Unlocking the Joystick If the VR2 Joystick is installed: ****PLEASE NOTE**** LOCK MODE: The VR2 controller may be programmed to have a lock mode function enabled to prevent unauthorized use. The locking method is achieved through a sequence of key presses and joystick movements, as detailed below. To lock Powerchair controller: While the controller is switched on, depress and hold the on/off button. - Page 14 Locking/Unlocking the Joystick If the Shark Joystick is installed: ****PLEASE NOTE**** LOCK MODE: The Shark joystick can be locked to prevent unauthorized use. The locking method is achieved through a sequence of key presses and joystick movements, as detailed below. To lock Powerchair controller: While the power is ON, press and hold the Power button for 4 seconds.
-
Page 15: Drive/Freewheel Mechanism
Drive/Freewheel Mechanism The Powerchair will not function while the drive mechanism is disengaged (in freewheel). Both left and right sides must be in drive mode for power chair to operate. Otherwise the Powerchair motors will spin, but the unit will not move, until both freewheel levers are engaged. -
Page 16: Driving Your Powerchair
Driving Your Shoprider Powerchair Ramps, Slopes and Cambers The indoor/outdoor Powerchair has the ability to negotiate ramps, slopes and cambers of a low to medium gradient. It is of the utmost importance that the following points are observed: 1. Never attempt to go up or down an incline which has a rough, wet or slippery surface (loose gravel, tree roots, wet grass, polished floor, etc.) -
Page 17: Caring For Your Powerchair
Caring for Your Shoprider 6Runner 10 Powerchair First Time Use Prior to using your Powerchair for the first time, you must charge the batteries fully (refer to Battery Charging Procedures). Charging may take up to 12 hours. Charging the batteries completely prior to first time use will benefit battery efficiency and battery life. -
Page 18: Batteries And Battery Charging
Batteries & Battery Charging Batteries The Powerchair is supplied with 2 x 35/36 Ah sealed lead acid, maintenance free batteries. These are located under the seat in the center of the Powerchair. For easy handling, Velcro or plastic carrying straps may be provided to assist in installation or removal of the batteries. - Page 19 Battery Charging (Units Equipped With Off-Board Charger) Familiarize yourself with the safety information below prior to using the battery charger. Safety Information 1. Read the battery charger instructions in this manual and in the manual supplied with the charger prior to charging the batteries. 2.
- Page 20 Charging Instructions 1. Connect the charger to the charging port at the front of the VR2 or Shark Joystick (item 10 in Page 11) 2. Plug the charger into the wall outlet. 3. The charging process will start automatically. Charger Indication Lights The indicator light on the charger gives advice as follows: Red On or Flashing: Fault Yellow On: While in charging...
-
Page 21: Troubleshooting
Troubleshooting If VR2 Joystick is installed: The Self-Help Guide (Table 1) is intended to assist in the location of a fault that may occur in a certain part of the Powerchair. If after checking the fault from the table below and the fault is still showing, do not use the Powerchair. - Page 22 Troubleshooting If Shark Joystick is installed: The Self-Help Guide (Table 2) is intended to assist in the location of a fault that may occur in a certain part of the Powerchair. Flash codes indicate the nature of an abnormal condition directly from the Shark joystick Information Gauge.
-
Page 23: Specifications
Output Power of Motor x2 0.78 hpx2 (Reference Only) As a part of our ongoing product improvement initiative, Shoprider reserves the right to change specifications and design without prior notice. All specifications and dimensions are approximate. Includes the anti-tip wheel. -
Page 24: Quarterly Inspection
Quarterly Inspection For your own safety, quarterly inspection and service on the product with inspection by an authorized dealer is strongly recommended. There may be a nominal dealer inspection fee for this service not covered by warranty. Maintenance records (below) should be kept at all times. -
Page 25: Notes
NOTE... - Page 26 NOTE...
- Page 27 NOTE...
-
Page 28: Disclaimer
Serial No.: SHOPRIDER MOBILITY PRODUCTS, INC 21184 S. FIGUEROA ST CARSON, CA 90745 800-743-0772 P/N: 300904-58-A2 ® ® © Copyright PIHSIANG MACHINERY MFG. CO., LTD. 2003. All rights Reserved. SHOPRIDER / PIHSIANG are registered trademarks of PIHSIANG MACHINERY MFG. CO., LTD.
Need help?
Do you have a question about the 6Runner 10 (888WNLM) and is the answer not in the manual?
Questions and answers