Table of Contents
Advertisement
Quick Links
Advertisement
Table of Contents

Related Manuals for Contest PILOT-192PRO


Summary of Contents for Contest PILOT-192PRO
- Page 1 PILOT - 192PRO USER GUIDE 9073 - July 2008 Version 2.0...
-
Page 2: Safety Information
PILOT-192PRO - 192-channel DMX controller with joystick and USB port English 1 - Safety information Important safety information This unit is intended for indoor use only. Do not use it in a wet, or extremely cold/hot locations. Failure to follow these safety ins- tructions could result in fire, electric shock, injury, or damage to this product or other property. -
Page 3: Front Panel Description
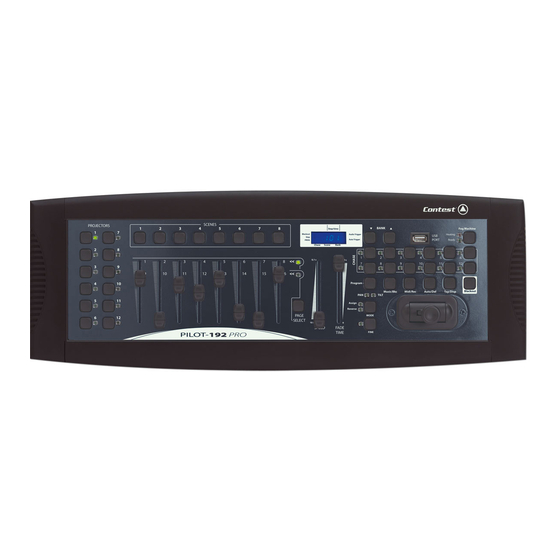
PILOT-192PRO - 192-channel DMX controller with joystick and USB port English 2 - Front panel description 5 6 7 16 17 18 19 20 1 - Projectors (1 to 12) Allow you to select which projectors will be affected by the DMX settings. -
Page 4: Rear Panel Description
PILOT-192PRO - 192-channel DMX controller with joystick and USB port English 15 - Program Press the Program button for 2 seconds to enter/leave this mode. 16 - Music / Bkc a - Allows you to activate the music-sentive mode. b - Allows you to copy banks of scenes when the Program mode is activated. - Page 5 PILOT-192PRO - 192-channel DMX controller with joystick and USB port English 4 - Configuring the joystick A - ASSIGNING THE JOYSTICK 1 - Press the PROGRAM button for 2 seconds until the prog indicator on the display flashes. The flashes indicate the Program mode is activated and the button can be released.
- Page 6 1 - Use the power switch of the rear panel to turn off the PILOT-192PRO. 2 - Simultaneously press the AUTO/DEL and MODE button, then turn on the PILOT-192PRO with the power switch. All the LEDs will flash 3 times to confirm the suppression.
-
Page 7: Manual Control
PILOT-192PRO - 192-channel DMX controller with joystick and USB port English 6 - Manual control The default program is the manual/black-out mode. All outputs are in black-out mode. The console is in manual mode if the black-out light indicator of the display is not flashing. Press the BLACK-OUT button to switch from black-out mode to manual mode, then select a projector by pressing the corresponding PROJECTORS button and use the 8 faders, the joystick and the PAGE SELECT button to control your projectors. -
Page 8: Modifying A Scene
PILOT-192PRO - 192-channel DMX controller with joystick and USB port English 8 - Modifying a scene 1 - Press and hold the PROGRAM button for 2 seconds, until the Prog indicator flashes to indicate the Prog mode has been activated. -
Page 9: Delete All Scenes
PILOT-192PRO - 192-channel DMX controller with joystick and USB port English 11 - Delete all scenes 1 - Use the power switch of the rear panel to turn off the PILOT-192PRO. 2 - Simultaneously press the AUTO/DEL and BANK buttons, then turn on the PILOT-192PRO with the power switch. -
Page 10: Programming A Sequence
English 13 - Programming a sequence The PILOT-192PRO features 12 sequences (chases). Each one of them can contain up to 240 scenes. Here are the steps to follow to program one of these sequences: 1 - Press and hold the PROGRAM button for 2 seconds, until the Prog indicator flashes to indicate the Prog mode has been activated. -
Page 11: Editing A Sequence
PILOT-192PRO - 192-channel DMX controller with joystick and USB port English 14 - Editing a sequence A - ADDING A STEP TO A SEQUENCE 1 - Press and hold the PROGRAM button for 2 seconds, until the Prog indicator flashes to indicate the Prog mode has been activated. -
Page 12: Playing A Sequence
The Black-out indicator will flash to confirm you have left the Program mode. D - DELETE ALL SEQUENCES 1 - Use the power switch of the rear panel to turn off the PILOT-192PRO. 2 - Simultaneously press the AUTO/DEL and BANK buttons, then turn on the PILOT-192PRO with the power switch. - Page 13 PILOT-192PRO - 192-channel DMX controller with joystick and USB port English C - AUDIO TRIGGER 1 - Press the MUSIC/REC button, the Audio Trigger indicator will light on to confirm the music-sensitive mode has been activated. 2 - Use the CHASE button to select the sequence you want. The sequence will switch to music-sensitive mode thanks to the built-in microphone or the Audio Line input.
- Page 14 Blackout on/off Enter MIDI OUT MODE via the switch at the rear of the console. Use the Projector 1 to 12, Scene 1 to 12, Chase 1 to 12 ans Joystick to use the PILOT-192PRO as MIDI controller. The functions are available via 10 pages as follows:...
- Page 15 20 - USB cable: Transferring data from your console to your computer These instructions will allow you to transfer data from your PILOT-192PRO console to your computer vers un You will be required to install the software and pilots supplied with your USB cable.
- Page 16 (A message will then appear on your computuer, indicating "waiting receive data"). 7 - Simultaneously press the SCENES 7 and SCENES 8 buttons of your PILOT-192PRO. The data transfer will start immediately. The display will indicate "Out" during the data transfer. "101" will be displayed at the end of the transfer to indicate it was successful.
- Page 17 23 - USB key : Transferring datas from your USB key to your console These instructions will allow you to transfer data from your USB key to your PILOT-192PRO. You will be required to install the software and pilots supplied with your USB cable.
- Page 18 PILOT-192PRO - 192-channel DMX controller with joystick and USB port English 4 - Click on "Directory". The folder tree of your USB key will appear in the options of the Ustick. 5 - Click on the folder you want to store on your computer.
-
Page 19: Technical Specifications
PILOT-192PRO - 192-channel DMX controller with joystick and USB port English 27 - Technical specifications - 8 faders for an optimal manual control - 192 DMX channels - 1 speed-dedicated fader, and 1 for the fade time - 30 banks of scenes, and 8 customisable scenes per bank... - Page 20 That is why technical specifications and the products physical configuration might differ from the illustrations. ® Make sure you get the latest news and updates about the CONTEST products on www.contest-lighting.com CONTEST ®...
Need help?
Do you have a question about the PILOT-192PRO and is the answer not in the manual?
Questions and answers