Table of Contents
Advertisement
Quick Links
Advertisement
Table of Contents

Related Manuals for Heatmiser PRT-ETS

Summary of Contents for Heatmiser PRT-ETS
- Page 1 Model: PRT-ETS / PRT-ENTS Model: PRT-ETS / PRT-ENTS...
-
Page 2: Table Of Contents
Model: PRT-ETS / PRT-ENTS Table Of Contents Temperature Hold Product Image Holiday Programming Table of Contents Frost Protection What is a Programmable Room Thermostat? Heating ON/OFF Installation Procedure Optional Features Explained 19-21 LCD Display Adjusting the Optional Settings Setting the Clock... -
Page 3: Model: Prt-Ets / Prt-Ents
The way to set and use your programmable room thermostat is to find the lowest temperature settings that you are comfortable with at the different times you have chosen, and then leave it alone to do its job. TouchScreen Series Model: PRT-ETS / PRT-ENTS... -
Page 4: Installation Procedure
Terminate the thermostat as shown in the diagrams on pages 27-30 of this booklet. Step 3 Screw the thermostat back plate securely into the back box. Step 4 Clip the front of the thermostat back onto the thermostat back plate. TouchScreen Series Model: PRT-ETS / PRT-ENTS... -
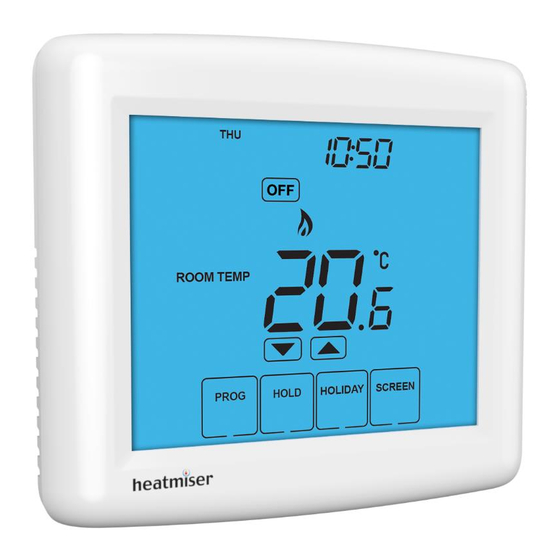
Page 5: Lcd Display
View Floor Temperature Key - Used to change display to show floor temperature. Current Temp - Indicates the current sensor temperature. Units of Temperature - Degrees Celsius or Fahrenheit. Comfort Level Selection Keys - Used in comfort level setup (see page 11). TouchScreen Series Model: PRT-ETS / PRT-ENTS... -
Page 6: Setting The Clock
When the thermostat is in air and floor sensing mode, the thermostat will display a FLOOR button. Pressing this allows you to view the current floor temperature. Pressing FLOOR again will return the thermostat to the room temperature display. TouchScreen Series Model: PRT-ETS / PRT-ENTS... -
Page 7: Comfort Levels Explained
“Sat Sun” prompting you to program the display Tue. Leave 22:00 16°C temperature levels for the weekend. Return --,-- --°C Sleep --,-- --°C • When complete, press DONE to confirm settings and exit .... TouchScreen Series Model: PRT-ETS / PRT-ENTS... -
Page 8: Clean Screen
At this time, the thermostat will revert back to the programmed levels. • When activated, you will see the Keypad Lock symbol. • To cancel, press the bottom right corner of the display again for 10 secs. Keypad Lock Indicator Set Temperature Set Icon TouchScreen Series Model: PRT-ETS / PRT-ENTS... -
Page 9: Temperature Hold
00:00 on Monday. Holiday Icon Holiday Days Hold Temperature To cancel a Holiday setting, reduce the Holiday time to 00 days. To cancel a Temperature Hold, follow the same steps but reduce the time to 00:00. TouchScreen Series Model: PRT-ETS / PRT-ENTS... -
Page 10: Frost Protection
To cancel the frost protect mode, press the key once. To turn the thermostat back ON, press the ON key once ..........Thermostat completely OFF Thermostat powered ON Frost Protection Mode Enabled *See Feature 3 on page 19 TouchScreen Series Model: PRT-ETS / PRT-ENTS... -
Page 11: Optional Features Explained
Each thermostat on the network must have a function works for Sensor Modes 03 & 04 (see above). The default setting is 28 unique communication address. This can be set from 01-32. TouchScreen Series Model: PRT-ETS / PRT-ENTS... -
Page 12: Adjusting The Optional Settings
Use the Up/Down keys at the top of the screen to select the feature number (shown on pages 19-21) and then use the Up/Down keys in the center to adjust the setting ................• Press DONE to confirm settings and exit ............TouchScreen Series Model: PRT-ETS / PRT-ENTS... -
Page 13: Optional Settings - Features Table
C = Default) Optimum Start 00 = Disabled (Default) 01 = 01hr, 02 = 02hr, 03 = 03hr Rate of Change For Information Only Program Mode 00 = Weekday/Weekend (Default) 01 = 7 Day Programming TouchScreen Series Model: PRT-ETS / PRT-ENTS... -
Page 14: Re-Calibrating The Thermostat
Press the ON key once to turn the thermostat back ON ..........• Press the ON key once to turn the thermostat display back ON ......Factory reset is complete. All icons displayed simultaneously. Calibration Temperature Setting Set Icon TouchScreen Series Model: PRT-ETS / PRT-ENTS... - Page 15 The mains supply must be properly protected and fused. The mains supply must be properly protected and fused. PRT-ETS with remote oor and air probes for use in wet areas. PRT-ETS wired with remote oor probe used for normal ‘dry’ zones or where direct control of the oor is needed...
- Page 16 Max Load - 3 Amps 12VDC Remote Air Sensor 12VDC Network PRT-ENTS PRT-ENTS PRT-ENTS for use in wet area where oor temperature control or limiting is required. For 230V switched live output, link mains L to C TouchScreen Series Model: PRT-ETS / PRT-ENTS...
- Page 17 Heating Professionals: Request a copy of our product installation guide containing detailed technical specifications for our complete product range: www.heatmiser.com/guide Want More Information? Call our support team on: +44 (0)1254 669090 Or view technical specifications directly on our website: www.heatmiser.com Twitter: heatmiseruk Facebook: facebook.com/thermostats...
Need help?
Do you have a question about the PRT-ETS and is the answer not in the manual?
Questions and answers