Table of Contents
Advertisement
Quick Links
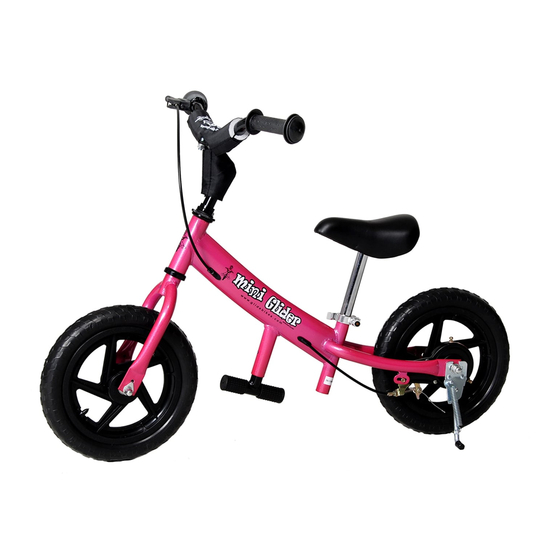
Mini Glider Manual
Congratulations on your purchase of the Mini Glider! Your glider is designed for years of nearly carefree use by
your child. These instructions include how to set up your glider and the maintenance procedures which you should
perform to ensure long-lasting use and optimal performance
Tools needed for Assembly:
Wrench (included)
Philips Screwdriver (not included)
Assembly Instructions
Your Glider comes partially assembled. The only things that you need to do are install the front wheel, install and
adjust the handlebars, and put in the seat.
Installing and Adjusting the Handle bar:
Advertisement
Table of Contents

Related Manuals for Glide Bikes Mini Glider

Summary of Contents for Glide Bikes Mini Glider
- Page 1 Mini Glider Manual Congratulations on your purchase of the Mini Glider! Your glider is designed for years of nearly carefree use by your child. These instructions include how to set up your glider and the maintenance procedures which you should...
- Page 2 Remove the plastic cover on the end of the handlebar stem by first removing the Velcro cover on top of the handlebar stem and then loosening the chrome 13 mm bolt by 2-3 Turns to the left. The plastic cover should slide off.
- Page 3 Installing Front Wheel With the bike upside-down on its seat and handlebars, remove the nuts and washers from both sides of the axle. Check to make sure that the front wheel is being installed in the same direction as the rear wheel. Remove fork protector.
- Page 4 Insert the wheel into the fork and replace the hook washers onto the axle so the tab fits into the corresponding hole, then put on flat washer and tighten the axle nuts with the provided tool. Brake Handle Adjustment The brake handle comes attached by the factory but you can adjust it for ease of use. To adjust the brake, use a Philips screwdriver to loosen the screw holding the lever to the handlebars and set the brake lever distance so that the child can easily reach it, then retighten the screw.
- Page 5 If the brake is too tight after you have turned the barrel adjuster clockwise all the way in or too loose after adjusting barrel counter clockwise all the way out, the cable will need to be adjusted. Adjust the brake cable by loosening nut on the banjo bolt slightly so you can pull the cable through more and retighten the nut.
- Page 6 remove it). Taking the kickstand, align the dimple onto the hole from where the hook washer was removed. Replace flat washer and axle nut and realign tire with frame and retighten the axle nuts. NOTE: If the dimple does not line up with the hole then loosen the screw that attaches the brake component to the frame.
- Page 7 The Mini Glider works by allowing children to learn at their own pace while feeling safe that they are not going to fall. The bike was designed with a low-center of gravity and slack head angle for better control and balance.
- Page 8 Check handlebars and stem for signs of stress or failure and that they are tight Inspect tires for damage Check seat for proper installation A bicycle that does not work properly can cause you to lose control and fall. Inspect the entire bicycle thoroughly before every ride, and do not ride it until any problems have been corrected.
Need help?
Do you have a question about the Mini Glider and is the answer not in the manual?
Questions and answers