Table of Contents
Advertisement
Quick Links
Advertisement
Table of Contents

Related Manuals for Zehnder Rittling ComfoControl Ease


Summary of Contents for Zehnder Rittling ComfoControl Ease
- Page 1 ComfoControl Ease Installer manual Heating Cooling Fresh Air Clean Air...
- Page 2 All rights reserved. This documentation has been compiled with the utmost care. The publisher cannot be held liable for any damage caused as a result of missing or incorrect information in this manual. 2 - EN...
-
Page 3: Table Of Contents
Installation conditions ..................5 The System ......................6 Wall mounting ................... 6 Cabling ....................... 6 Commissioning ....................7 Use of the ComfoControl Ease ..............7 P menus ....................15 Maintenance ....................24 Malfunctions ....................24 Warranty and liability ..................26... -
Page 4: Foreword
Read this manual carefully before What is the purpose of this control use. unit? The ComfoControl Ease, referred to This manual provides all the information further as CC Ease, enables users required for safe and optimal installation, to easily and comfortably operate a... -
Page 5: Checking The Delivery
3. Installation conditions 2. Checking the delivery In order to determine whether the CC Ease can be installed in a certain Checking the delivery area, the following aspects must be taken Contact your supplier immediately in case into account: of damage or an incomplete delivery. The ■... -
Page 6: The System
4. The System 4.1. Wall mounting The CC Ease can be mounted in a standard wallmounted or flushfit casing. Wallmounted casings in the same colour as the CC Ease are available from 4.2. Cabling Zehnder. When connecting or Dimension sketch disconnecting the CC Ease, 1.22"... -
Page 7: Commissioning
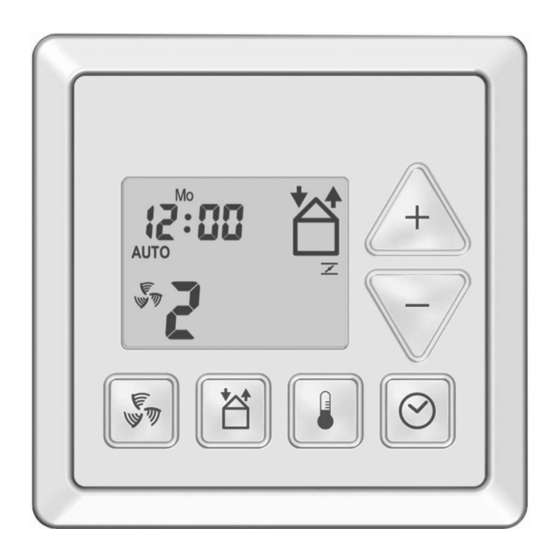
5. Commissioning 5.1 Use of the ComfoControl Ease The overview below summarizes the information that will be displayed on the CC Ease. Time and date Supply air or exhaust air Ventilation programme ON or OFF (AUTO) or manual ventilation (MANUAL) - Page 8 The CC Ease allows the following ■ Setting additional ventilation functions to be programmed and programmes/options in the P menus. displayed: ■ Reading and setting the day and time; A concise explanation of the above listing ■ Reading and setting the comfort is given in the paragraphs below.
- Page 9 Reading and setting the comfort temperature Comforttemperatuur aflezen en instellen < 2 sec. View Main comfort temp. screen The comfort temperature can be set to It is best to set the comfort the required indoor temperature. Based temperature to the same on this temperature, the ComfoAir will temperature as the room then automatically switch to free cooling...
- Page 10 The ComfoAir will switch to the highest ventilation position set in the house unless overruled by an automated software programme. ■ Setting 1 Low. In the event a required ventilation setting Use for low ventilation is being overridden by a signal from a levels;...
- Page 11 Temporarily activating high setting Start Temporary > 2 sec. high setting (P27) Once the programmed time delay is complete, the ComfoAir automatically switches back to the former ventilation setting. The timer of the temporary high setting can be switched off early by pressing EN - 11...
- Page 12 Switching supply and exhaust fan on/ off (optional) While the open fire programme is activated, the supply and exhaust fan cannot be manually switched off. Bear in mind that switching off Supply fan switched off the supply or exhaust fan will temporarily immobilize your dwelling’s balanced ventilation system.
- Page 13 Setting ventilation programme Day options are: - Separate days - Sa/Su > 2 sec. “Sa” flashes Select day - Mo/Tu/We/Th/Fri - Sa/Su/Mo/Tu/We/Th/Fri "d" = delete ventilation ventilation profile stage profile stage flashes moment (1-8) > 2 sec. = fast-set Hour Select flashes hour...
- Page 14 Resetting malfunctions > 2 sec. Reset error messages or filter dirty Programme mode > 2 sec. Start programme > 2 sec. programme mode mode (InR) Using P menus > 2 sec. User Installer > 2 sec. P menu P menu (P1, P2, P9) (P1-P9) Select P menu...
-
Page 15: P Menus
5.2 P menus The ComfoAir installer manual states Not all functions are supported by every which functions are supported. This ComfoAir. manual will also mention the effects of the This might result in certain P menus not different functions. being visible. It is also possible that some changes you enter appear to have no effect. - Page 16 Time delay values Sub-menu Description Minimum Maximum Factory reset Filter warning 10 weeks 26 weeks 16 weeks ■ Here the user can indicate when the “filter dirty” alert must appear. 1 Min. 20 Min. 10 Min. 1 Min. 120 Min. 30 Min.
- Page 17 Menu P9 Status of programmes (from menus P5 and P6: additional programmes) Status Sub-menu Description Factory reset Open fire programme active? Yes (1) / No (0) Bypass Open? Yes (1) / No (0) Yes (1) / No (0) Postheater on? Yes (1) / No (0) Analogue ports (010V) active? Yes (1) / No (0)
- Page 18 P menus for installer. Menus without minimum and maximum values are read-only menus. Menu P3 Setting ventilation programmes Ventilation programme values Sub-menu Description Minimum Maximum Factory reset Setting the capacity (in %) of the exhaust fan in 0% or nL / HL absent setting.
- Page 19 Menu P5 Setting additional programmes Additional programme values Sub-menu Description Minimum Maximum Factory reset Activation of the 0 (= No) 1 (= Yes) open fire programme. 0 (= No) 1 (= Yes) 0 (= No) 1 (= Yes) Confirming the presence of a bypass. 0 (= No) 1 (= Yes) The standard ComfoAir configuration includes a bypass.
- Page 20 P6 Setting additional programmes (Optional) Additional programme values Sub-menu Description Minimum Maximum Factory reset 0 (= No) 3 (= Yes) 0ºC 15ºC 7ºC 10ºC 25ºC 23ºC Tah (= temperature of the Postheater), required 5ºC 40ºC 18ºC (Optional) Note: The Postheater will be deactivated once the set temperature has been reached. All temperatures are in degrees Celsius (°C).
- Page 21 (Malfunction) information values Sub-menu Description Minimum Maximum Factory reset Selftesting the ComfoAir. 1(= activate) Note: ■ The LEDs on the display of the ComfoAir will start flashing. ■ The ComfoAir will start running at its maximum speed (RPM). ■ The bypass valve of the ComfoAir will open and close. The frostfree element valve of the ComfoAir will open and close once the bypass valve is ■...
- Page 22 Menu P8 Setting the analogue ports (0-10V) Values of analogue port Sub-menu Description Minimum Maximum Factory reset Analogue input 1 0= not fitted 1 = fitted 0= control 1 = programme (analogue input 1) set point analogue input 1 (programme) min.
- Page 23 Values of analogue port Sub-menu Description Minimum Maximum Factory reset readout analogue input 4 EN - 23...
-
Page 24: Maintenance
6. Maintenance The CC Ease does not require maintenance. However, the ComfoAir controlled by the CC Ease does require periodic maintenance. The maintenance required by the ComfoAir is stipulated in the ComfoAir’s manual. All these malfunction alerts on the 7. Malfunctions CC Ease can be reset by following the If the ComfoAir has a malfunction, then in steps below:... - Page 25 Malfunction alerts Meanings of malfunction alerts Alerts of possible malfunctions can be found in the ComfoAir’s manual. Code Description The system should remain connected NTC sensor T1 is defective. (= outside air temperature) to its power supply unless the ComfoAir NTC sensor T2 is defective.
-
Page 26: Warranty And Liability
8. Warranty and liability Liability The CC Ease is designed and manufactured for use with a balanced Warranty conditions ventilation system with heat recovery. Any The CC Ease is covered by a other application is seen as inappropriate manufacturer’s warranty for a period of 24 use and can result in damage to the CC months after fitting up to a maximum of Ease or personal injury, for which the... - Page 27 Temperature conversion table °C °F °C °F 41.0 73.4 42.8 75.2 44.6 77.0 46.4 78.8 48.2 80.6 50.0 82.4 51.8 84.2 53.6 86.0 55.4 87.8 57.2 89.6 59.0 91.4 60.8 93.2 62.6 95.0 64.4 96.8 66.2 98.6 68.0 100.4 69.8 102.2 71.6 104.0...
- Page 28 Zehnder America Inc. 540 Portsmouth Avenue Greenland · NH 03840 T +1 603 422 6700 · F +1 603 422 9611 info@zehnderamerica.com · www.zehnderamerica.com...
Need help?
Do you have a question about the ComfoControl Ease and is the answer not in the manual?
Questions and answers