Table of Contents
Advertisement
Available languages
Available languages
Quick Links
Instructions and Warnings
• Read and understand these instructions
before use!
• For outdoor use only!
• Keep out of reach of children and pets.
• Never leave a burning Fire Sculpture unattended.
• Hot while in Use.
• To prevent burn injuries, snuff and allow to
cool for 30 minutes before handling, refilling or
• Failure to follow Instructions and Warnings may
result in serious injury or property damage.
• Keep clothing, hair and face away from flame.
• Do not place Fire Sculpture under covered shelter or
umbrella, near pedestrian traffic or combustibles such
as wood structures, fuel, clothing or dry vegetation.
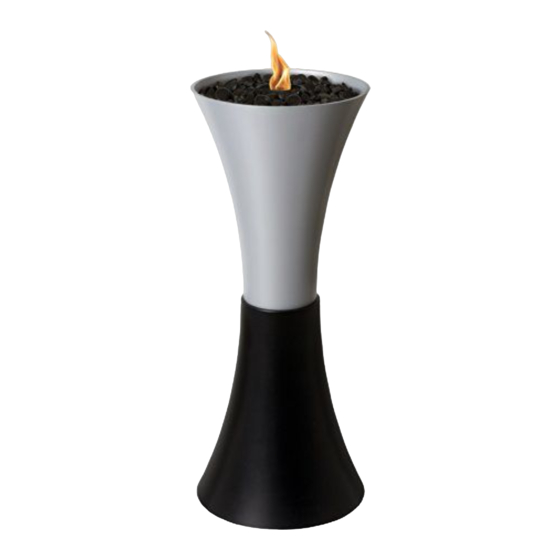
Fire Sculpture Assembly and Installation:
• Place the Top Half Bell Stand (C) upside down on a flat surface. Place
the Bottom Half Bell Stand (D) upside down on the top half and position
the alignment hole feature so no gap exists between the two sections
(see FIG 1).
Save these instructions for future reference.
CAUTION
Fire Sculpture - Fuel Options
Fuel Canister - Fill with TIKI
Citronella or OFF! BiteFighter
Torch Fuel.
Product Box Contents:
A. 1 Snuffer
B. 1 Fuel Canister (includes wick,
flame guard and canister)
C. 1 Top Half Bell Stand
D. 1 Bottom Half Bell Stand
E. 2 Bags of Decorative Rock
F. 1 Phillips/Hex Head Bolt,
M10 x 20 mm
Tools Required for Assembly:
• 1 Phillips Screwdriver
WARNING
• Use only TIKI
gasoline or other flammable fuels.
• Do Not Overfill. Remove excess fuel from bowl
prior to lighting
• Never fill a burning Fire Sculpture
• Before refilling, carefully place the Snuffer over
the flame to extinguish.
• Torch fuel is harmful or fatal if swallowed.
Contains petroleum hydrocarbons.
• Do not use Fuel Canister outside of the Fire
Sculpture.
• Read Warnings on torch fuel container carefully.
Brand
®
®
1
E
Brand torch fuel - Do not use
®
FIG 1
Bottom Half
Bell
Stand (D)
12/12
A
B
C
D
F
Top Half
Bell
Stand (C)
4000017
Advertisement
Table of Contents

Related Manuals for tiki Alumina


Summary of Contents for tiki Alumina
- Page 1 • Read Warnings on torch fuel container carefully. CAUTION FIG 1 • Keep clothing, hair and face away from flame. • Do not place Fire Sculpture under covered shelter or Bottom Half umbrella, near pedestrian traffic or combustibles such Bell as wood structures, fuel, clothing or dry vegetation. Stand (D) Fire Sculpture - Fuel Options Fuel Canister - Fill with TIKI Brand ® Citronella or OFF! BiteFighter ® Torch Fuel. Top Half Bell Fire Sculpture Assembly and Installation: Stand (C) • Place the Top Half Bell Stand (C) upside down on a flat surface. Place...
- Page 2 Fire Sculpture Assembly and Installation (cont’d): • Fasten the Bottom Half Bell stand to the Top Half FIG 2 Bell stand using the M10 x 20 mm Phillips/Hex Head Bolt supplied (E). Thread the Bolt (M10 x 20 mm) through the Bottom Half Bell stand to fasten the two sections of the Fire Sculpture together with a Phillips screwdriver (see FIG 2).
- Page 3 FIG 4 Filling and Lighting: • Remove the Snuffer Cap (see FIG 4). • Remove the Fuel Canister from the Fire Sculpture (see FIG. 5). • Unscrew the Flame Guard from the Fuel Canister (see FIG 6). • Slowly fill the Fuel Canister with TIKI Brand Torch Fuel (see FIG 7) ® – DO nOT OvER FIll. • Reattach the Flame Guard to the Fuel Canister (see FIG 6) – DO nOT OvERTIGHTEn. • Wipe away any spilled fuel before lighting. • Place the Fuel Canister into the Fire Sculpture (see FIG 5). • Allow the Wick to become saturated with fuel before lighting. • Use a TIKI Brand lighter or long fireplace match to the light ®...
- Page 4 FIG 9 Wick Replacement: • Carefully remove the Wick from the Fuel Canister (see FIG 9). Properly dispose of the Wick in accordance with local laws and regulations. • Replace the Wick with a new TIKI Torch Wick and position ® the Wick with 1/2" (13 mm) exposed (see FIG 10). • Trim as required. FIG 10 1/2” (13 mm) Proper Wick Position FIG 11 Storage: • Completely empty the Fuel Canister and properly dispose of the Fuel in accordance with local laws and regulations.
- Page 5 • Antes de volver a llenar, coloque con cuidado la tapa • Al usarla, estará caliente. apagadora para que se extinga la flama. • Para evitar quemaduras, apáguela y deje que se • El combustible para antorcha es perjudicial o fatal si enfríe durante 30 minutos antes de manipularla, se ingiere. Contiene hidrocarburos de petróleo. llenarla o limpiarla. • No use la lata de combustible fuera de la escultura • No cumplir con las Instrucciones e Advertencias para flama. puede provocar daños graves o daños materiales. • Lea con cuidado las Advertencias del envase de • Use solo combustible marca TIKI para combustible para antorcha. ® antorchas – No use gasolina ni ningún otro PRECAUCIÓN FIG. 1 • Mantenga la ropa, el cabello y la cara lejos de la flama. • No coloque la escultura para flama debajo de un techado Soporte de la o de una sombrilla, ni cerca de la circulación de peatones o de material inflamable como estructuras de madera, media campana combustible, ropa o vegetación seca.
- Page 6 Instalación y armado de la escultura para flama (continuación): FIG. 2 • Una el soporte de media campana inferior con el de la superior utilizando el perno Phillips/de cabeza hexagonal M10 x 20 mm (E). Con un destornillador Phillips, pase el perno (M10 x 20 mm) a través de la media campana inferior para que ambas secciones de la escultura para flama queden unidas (vea la FIG. 2). • Enderece la escultura para flama. Para completar el armado, coloque la lata de combustible y la tapa matafuegos. Coloque en la charola las piedras negras decorativas alrededor de la lata de combustible (vea la FIG.
- Page 7 FIG. 4 Para llenar y encender: • Retire la tapa matafuegos (vea la FIG. 4). • Saque la lata de combustible de la escultura para flama (vea la FIG. 5). • Desatornille el guardaflama de la lata de combustible (vea la FIG. 6). • Llene la lata de combustible con Combustible TIKI para antorchas ® (vea la FIG. 7) – nO llEnE DE MáS. • Coloque de nuevo el guardaflama en el recipiente de combustible (vea la FIG. 6) – NO APRIETE DE máS. • Limpie el combustible que se haya derramado antes de encender. • Ponga la lata de combustible dentro de la escultura para flama (vea la FIG. 5). • Antes de encender, permita que la mecha se sature de FIG. 5 combustible.
- Page 8 FIG. 9 Para cambiar la mecha: • Con cuidado retire la mecha de la lata de combustible (vea la FIG. 9). Deseche la mecha de manera adecuada según las leyes y normas locales. • Cambie la mecha por una mecha nueva TIKI para ® antorcha y colóquela dejando 1/2” (13 mm) expuesta (vea la FIG. 10). • Recórtela según se requiera. FIG. 10 1/2” (13 mm) Posición correcta de la mecha FIG. 11 Para almacenar: • Vacíe completamente la lata de combustible y deseche el combustible conforme a las leyes y normas locales.
Need help?
Do you have a question about the Alumina and is the answer not in the manual?
Questions and answers