Table of Contents
Advertisement
Quick Links
Advertisement
Table of Contents

Related Manuals for GearLite SHC-9642

Summary of Contents for GearLite SHC-9642
- Page 1 SHC-9642 User Guide...
- Page 2 Thank You for Choosing Ross You've made a great choice. We expect you will be very happy with your purchase of Ross Technology. Our mission is to: 1. Provide a Superior Customer Experience • offer the best product quality and support 2.
-
Page 3: Statement Of Compliance
SHC-9642 · User Guide • Ross Part Number: 9642DR-004-06 • Release Date: May 14, 2018. The information contained in this manual is subject to change without notice or obligation. Copyright ©2018 Ross Video Limited, Ross®, and any related marks are trademarks or registered trademarks of Ross Video Limited. All other trademarks are the property of their respective companies. -
Page 4: Environmental Information
Maintenance/User Serviceable Parts Routine maintenance to this GearLite product is not required. This product contains no user serviceable parts. If the module does not appear to be working properly, please contact Technical Support using the numbers listed under the “Contact Us” section on the last page of this manual. - Page 5 Company Address Ross Video Limited Ross Video Incorporated 8 John Street P.O. Box 880 Iroquois, Ontario Ogdensburg, New York Canada, K0E 1K0 USA 13669-0880 General Business Office: (+1) 613 4886 Fax: (+1) 613 4425 Technical Support: (+1) 613 4886 ...
-
Page 7: Documentation Conventions
Contact your IT department before connecting to your facility network to ensure that there are no conflicts. They will provide you with an appropriate value for the IP Address, Subnet Mask, and Gateway for your SHC-9642. Contacting Technical Support At Ross Video, we take pride in the quality of our products, but if problems occur, help is as close as the nearest telephone. - Page 8 This team of highly trained staff is available to react to any problem and to do whatever is necessary to ensure customer satisfaction. • Technical Support: (+1) 613-652-4886 • After Hours Emergency: (+1) 613-349-0006 • E-mail: techsupport@rossvideo.com • Website: http://www.rossvideo.com 8 • Introduction SHC-9642 User Guide (v6.0)
-
Page 9: Before You Begin
Before You Begin If you have questions pertaining to the operation of SHC-9642, contact us at the numbers listed in the section “Contacting Technical Support” on page 7. Our technical staff is always available for consultation, training, or service. Overview The SHC-9642 SDI to HDMI Converter is a high-quality signal conversion solution within the family of GearLite compact, self-contained modular products. - Page 10 10 • Before You Begin SHC-9642 User Guide (v6.0)
-
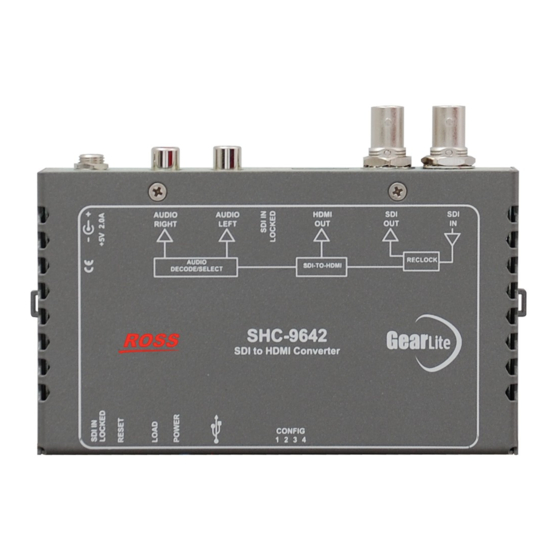
Page 11: Hardware Overview
SHC-9642 SDI to HDMI Converter AUDIO CONFIG Figure 3.1 SHC-9642 — Faceplate Label POWER Connection The SHC-9642 has a standard miniature power jack (center pin positive) that connects to the PS-9000 power supply. (Figure 3.2) Left Right POWER Connection Figure 3.2 SHC-9642 (Top) — POWER Connection For More Information on... -
Page 12: Analog Audio Connections
If this LED is unlit, power is not supplied to the SHC-9642. Verify the cable. ANALOG Audio Connections The SHC-9642 provides two analog audio RCA outputs that can be connected to a line-level amplifier or receiver input. (Figure 3.4) Left... -
Page 13: Dip Switches
Figure 3.8 SHC-9642 (Bottom) — USB Port DIP Switches The SHC-9642 provides a block of four DIP Switches that are used to configuring the HDMI output audio channels and specify the HDMI output mode. (Figure 3.9) SHC-9642 User Guide (v6.0) -
Page 14: Reset Button
SHC-9642. This Reset should not be necessary under normal circumstances, but is available if the SHC-9642 no longer responds to changing DIP Switch settings or input changes. Similar results can also be achieved by cycling power to the SHC-9642. -
Page 15: Physical Installation
Physical Installation If you have questions pertaining to the installation of SHC-9642, please contact us at the numbers listed in the section “Contacting Technical Support” on page 7. Our technical staff is always available for consultation, training, or service. For More Information on... - Page 16 Install the Flat Metal Plate onto the bottom of the chassis Figure 4.2 using the screws removed in Step 1.. Figure 4.2 Flat Metal Plate Installation Option Install the chassis in the desired location using the Mounting Holes on the Flat Metal Plate. 16 • Physical Installation SHC-9642 User Guide (v6.0)
-
Page 17: Optional Mounting Accessories
BPM-9000 The BPM-9000 Angle Mounting Bracket (Figure 4.3) allows a single GearLite module to be installed in positions not possible with the flat metal plate. The bracket has a 90° angle. - Page 18 18 • Physical Installation SHC-9642 User Guide (v6.0)
- Page 19 It is not necessary to terminate unused outputs. Connecting to an HDMI Monitor Connect the HDMI output cable to the SHC-9642 according to the designations indicated on the chassis label and Figure 5.1. To HDMI Monitor Figure 5.1 Cabling — HDMI Output Proceed to the section “Specifying the HDMI Output Mode”...
- Page 20 @ up to 2A. The DC power cord has a locking connector that securely fastens into the power supply DC jack on the SHC-9642. The SHC-9642 has a standard miniature power jack (center pin positive). Caution — Use of improper adapters may damage the SHC-9642 and will void the warranty. 20 • Cabling SHC-9642 User Guide (v6.0)
- Page 21 To connect the SHC-9642 to the PS-9000 Connect the female end of the provided PS-9000 cable into the socket marked POWER on the SHC-9642 chassis. PS-9000 Note: It is recommended that you always connect the PS-9000 to the SHC-9642 before connecting to Mains Power.
- Page 22 22 • Cabling SHC-9642 User Guide (v6.0)
- Page 23 Configuration The SHC-9642 includes four DIP Switches located on the bottom of the module. These switches are used to configure the SHC-9642 as outlined in this chapter. Before You Begin are set in the UP () position by default as illustrated in “DIP Switches” on page 13. This configures the SHC-9642 as follows: •...
-
Page 24: Video Formats
Video Formats The SHC-9642 produces the same video format at its HDMI output as you apply to the SDI input. It performs no scaling or other modification of the image. If there is no image displayed on your HDMI monitor, or the image is unstable, the most likely cause is that the monitor is incapable of displaying the video format that is present in your SDI signal. -
Page 25: Warranty And Repair
Should you find that this SHC-9642 has failed after your warranty period has expired, we will repair your defective product should suitable replacement components be available. You, the owner, will bear any labor and/or part costs incurred in the repair or refurbishment of said equipment beyond the THREE (3) year warranty period. - Page 26 26 • Warranty and Repair SHC-9642 User Guide (v6.0)
-
Page 27: Technical Specifications
Technical Specifications This chapter provides technical information for SHC-9642. Specifications are subject to change without notice. SDI Input and Output Table 8.1 Technical Specifications — SDI Input and Output Item Specifications Transmission Standards SMPTE 259M SMPTE 292M SMPTE 424M... - Page 28 0°C – 40°C (32°F – 104°F) ambient, non-condensing Dimensions Table 8.7 Technical Specifications — Dimensions Item Specifications Physical Dimensions 4.0” x 5.65” x 1.25” (10.16cm x 14.35cm x 3.18cm) Weight 15oz (425g) 28 • Technical Specifications SHC-9642 User Guide (v6.0)
-
Page 29: Software Licenses
AND ON ANY THEORY OF LIABILITY, WHETHER IN CONTRACT, STRICT LIABILITY, OR TORT (INCLUDING NEGLIGENCE OR OTHERWISE) ARISING IN ANY WAY OUT OF THE USE OF THIS SOFTWARE, EVEN IF ADVISED OF THE POSSIBILITY OF SUCH DAMAGE. SHC-9642 User Guide (v6.0) Software Licenses • 29... - Page 30 30 • Software Licenses SHC-9642 User Guide (v6.0)
Need help?
Do you have a question about the SHC-9642 and is the answer not in the manual?
Questions and answers