Table of Contents
Advertisement
Available languages
Available languages
Quick Links
Advertisement
Chapters
Table of Contents

Subscribe to Our Youtube Channel
Related Manuals for Nogueira VMN 4.0

Summary of Contents for Nogueira VMN 4.0
- Page 1 Mixer - Mezclador VMN 4.0 Instructions Manual Manual de Instrucciones...
- Page 3 Nogueira S/A is always ready to serve you and answer any questions or doubts and supply effective and permanent technical support you may need. The images displayed in this manual are only for illustrative purposes. Thus to facilitate your viewing, the images show cutaway or the safety shielding removed for displaying it more clearly.
-
Page 4: Table Of Contents
Adhesives security Presentation of mixer VMN 4.0 Coupling the driveshaft Principle of operation Technical specifications Preparation and coupling of the mixer VMN 4.0 Adjust the length of the driveshaft Checking the work angle Operating adjustments PTO speed Guidance on the discharge flow... -
Page 5: Safety Instructions
Notes: 1) Nogueira aim is the constant update and improvement of its products, keeping itself the right of introduce changes without previous advice. 2) The figures used in this manual are merely as ilustration. Safety Instructions Also follows the recommendations of your tractor´s manual to a safety and efficient operation. - Page 6 3- Do not allow people to remain on the load and not handing on the sides of the mixer during the loading, transportation, unloading or operating the tractor. 4- Loose clothes or long hair might caught by moving mechanisms. Therefore, never get close to operate the machine in such conditions.
-
Page 7: When Making Maintenance In The Machine
Whenever you have to transport the machine for longer distances, when there is need for using public roads, the transport must be done on truck or trailer. The mixer must be fully inside the body of the truck or trailer that carries it, attached by cords or cables. VMN 4.0... -
Page 8: Elevation
Elevation Use only the four hooks found within the four corners of the upper carriage compliance with the details of the scheme to the side and performing operations with adequate equipment, depending on the weight indicated in the manual. Safety Standards - The instructions in this manual and those posted directly on the mixer, in particular those relating to security, should be read carefully. -
Page 9: Adhesives Security
Maximum weight on the hitch 1.500 kg high pressure. Warning! Do not put your hand on the door mat when it is moving. Indicates where lubrication must do and next, attention, one should not put your hand on the mat moving. VMN 4.0... - Page 10 Adhesives Security Range Zebra: corner or part in lifting the machine, run into the danger of injury. Indicates the mounting position of the load cell. NEVER put hands or try to climb on the Attention to the high pressure hose. mixer, especially with the same motion.
-
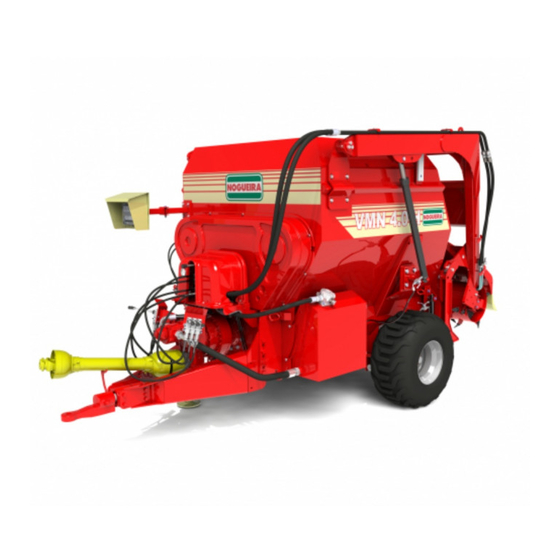
Page 11: Presentation Of Mixer Vmn 4.0
Presentation of Mixer VMN 4.0 3.1 - Components Identification 01- Terminal coupling 02- Header 03- Support Foot (Hydraulic Jack) 04- Planetary gear 05- Wheel 06- Balance Auto Mix 07- Rotor Beater 08- Breaking Hay 09- Hydraulic Motor 10- Conveyor Belt... -
Page 12: Coupling The Driveshaft
When the “left” or “right” terms are used, it is considered as a reference point the position of the operator of the tractor. The mixer VMN 4.0 is a device designed to perform mixing and discharge in different situations in height. His project has been designed with flexibility and efficiency in this application. -
Page 13: Technical Specifications
Download Time 2.0 m3/minute Required Power 50 cv Tire 265/70 R16 8 ply 16 W8 Air Chamber 16 L540 Pressure 44 PSI (3 bar) Rotation PTO 540 RPM 2154 mm 2154 mm 2344 mm* * Measured with belt open. VMN 4.0... -
Page 14: Preparation And Coupling Of The Mixer Vmn 4.0
Pull the lock pin (5) and place the foot support (3) horizontal. Then, install the locking pin again. PS. During operation of the VMN 4.0, the supporting leg must be in working position (horizontal). e) To have an accurate weighing, the mixer needs to be leveled. -
Page 15: Adjust The Length Of The Driveshaft
Checking and adjusting the length of the PTO: 3 cm Tractor A) Engage the tractor mixer. Mixer B) Always operate the tractor so that the rear tires to a close as possible to the header. 3 cm VMN 4.0... -
Page 16: Checking The Work Angle
C) Remove the driveshaft. Engage the tube (1) the tractor power take-off and the bar (2) in the mixer. D) Get the parts of the driveshaft side by side and see if there is a minimum clearance of 3 cm at each end. If clearance is less than the quoted or does not exist, mark and cut the tube (1) and bar (2), and the protective tube (3), all at the same rate (measured). -
Page 17: Operating Adjustments
For this, turn off the tractor and after, sometimes crank levers (2) relieving the system. b) With the levers (2) control in neutral, pull the hoses quickly: a disconnection occur with minimal loss of oil. c) Next, replace all protective caps (1). VMN 4.0... -
Page 18: Pto Speed
3- Regulating valve installed at the beginning of the hose. If for example, the rotor speed of the mixer VMN 4.0 is too high relative to the mat, there could be accumulation of material at the exit door, as well as non-uniform distribution. In the case, you should slow the treadmill, following the instructions of the above. -
Page 19: Operation
Lift the front of the belt (5) slightly until the hinge pin to be suspended. e) Pull the support belt (4) to unlock the pin. f) Move the belt (4) up or down to the desired position. g) Push the latch support belt (4) to fit the pin. VMN 4.0... -
Page 20: Maintenance Instructions
2- Only perform this procedure with conveyor and mixer inactive. 3- Ensure that the belt (4) is actually locked. 4- To carry out this operation, the tractor must be off and the PTO disconnected from the outlet of the mixer VMN 4.0. Balance Automix See manual of the scale... -
Page 21: Replacing The Weighing Cell
- Wire with 5 meters to pull the cable again. To replace the front load cell: a) Instead VMN 4.0 plan and the level, release the connector (FRONT) of the balance (A). b) Using a suitable wire cutter, cut the straps that hold the cables. - Page 22 To replace the rear load cells: a) Instead VMN 4.0 plan and the level, release the connector (right or left) of the scale (B). b) Using a suitable wire cutter, cut the straps holding the cables.
-
Page 23: Adjustment Of The Discharge Conveyor
Check every 50 hours or weekly work and complete if necessary. Gearbox: Remove the cap (1) and make sure the oil is filling at least half of the box. If necessary, complete the level through the plug hole (5). VMN 4.0... -
Page 24: Lubrication
Drainage and Oil replacement The drainage and the first oil change should be made after 250 hours of work. Then, repeat the procedure every 2.500 working hours or annually. Make drainage after the work period, while the gear box and are still warm, because it facilitates the flow of oil and impurities. -
Page 25: Cleaning
Declines all responsibility for injury or damage to components due to the use of non-original replacement parts and exceptional items that can change security without authorization from the manufacturer. Do not spill on the environment, polluting liquids, used parts and maintenance waste. Dispose of the laws on the matter. VMN 4.0... -
Page 26: Schedule Maintenance
- Observe the inspection and maintenance schedule to ensure appropriate conditions of service and explosion protection. - Cover all holes with screws and folder Loctite 510 or product with similar properties and application range. - Before intervening in the internal part for maintenance or repairs, delaying the opening of the gear and wait for its complete cooling, to avoid risk of burns due to the presence of pieces are still hot. -
Page 27: Checking The Oil Level In Gear Units (Atex)
A) With PTO disengaged, simultaneously press the three locks (2) and push the “skirt” (3) down. Repeat the procedure in “skirt” the other end. B) Remove the lock ring (4) at both ends, releasing one of the parts of the tube. VMN 4.0... -
Page 28: Tire Pressure
C) Drawing out the cover (5) of the tube. D) Lubricate the inner end of the driveshaft tube and bar with good quality grease. E) Replace the cover (5) and secure it with the circular locks (4). F) With PTO upright, slide the “skirts” (3) to its original position. Align the greasing of the “skirts”... -
Page 29: Conservation Of The Mixer Vmn 4.0
Conservation of the Mixer VMN 4.0 As important as preventive maintenance is the daily maintenance of the machine. This care consists primarily of protecting the Mixer VMN 4.0 of the intemperies and the corrosive effects of some products. Follow these recommendations to ensure a long life for your equipment: - Remove all waste products that remain inside the mixer. - Page 30 Output shaft does not rotate even with the Gears damaged Consult authorized technician engine running Note: Nogueira aims at the constant updating and improving products and reserves the right to make changes in its components and accessories without notice. Operation Technical Manual...
-
Page 31: Additional Information
Additional Information Screws size table Torque table Torque unit in N.m VMN 4.0... -
Page 32: Technical Assistance
Technical Assistance The Mixer VMN 4.0 Nogueira is identified by the serial number, located on the plate (1) attached near the machine hitching points. Write down here the Serial Number of your machine: Notes: 1) Whenever sending communication or requesting help from Nogueira Technical assistance, always let us know the series number and model of your machine that are in the identification plate (1). - Page 35 Mezclador VMN 4.0. Recomendamos su lectura atenta, antes de poner la máquina en funcionamiento. Se encuentra fijada en la máquina una plaqueta de identificación con su número de serie de fabricación.
- Page 36 Presentación del mezclador VMN 4.0 Acoplando el cardan Principio de funcionamiento Especificaciones técnicas Preparación y enganche del mezclador VMN 4.0 Ajuste de la longitud del cardan Verificando el ángulo de trabajo Reglajes de operación Rotación de la toma de potencia Orientaciones sobre el flujo de descarga Operación...
-
Page 37: Medidas De Seguridad
Jamás opere la máquina sin las defensas, tapas y carenados Al Operar la Máquina 1- El mezclador VMN 4.0 fue desarrollado exclusivamente con la función de mezclar los ingredientes. 2- Nunca utilice el mezclador para transportar personas o animales. VMN 4.0... - Page 38 3- No permita que personas permanezcan sobre la carga y ni colgado en las laterales del mezclador durante el proceso de carga, transporte, descarga o con el tractor en funcionamiento. 4- Ropas sueltas y pelo largo pueden ser apañados por mecanismos en funcionamiento.
-
Page 39: Al Hacer La Manutención De La Máquina
Allá de esto, se puede utilizar cabos o cuerdas especiales para prender el mezclador a la carrocería. VMN 4.0... -
Page 40: Elevación
Elevación Utilizar exclusivamente los cuatro ganchos encontrados en el interior de los cuatro ángulos de la parte superior del mezclador respectando las indicaciones del esquema al lado y efectuando las operaciones con equipamientos adecuados, en función de la masa indicada en el manual. -
Page 41: Adhesivos De Seguridad
Atención! No colocar la mano en la puerta de la estera cuando la misma encontrarse abierta. Indica donde se debe hacer la lubricación y al lado atención, no se debe colocar la mano en la estera en movimiento. VMN 4.0... - Page 42 Adhesivos de Seguridad Faja Listada: Esquina o parte en elevación de la máquina, peligro de lesión al topar. Indica la posición de montaje del la célula de carga, usando el hilo como referencia. NUNCA colocar las manos o intentar Atención con la manguera de alta subir en el mezclador, principalmente presión.
-
Page 43: Presentación Del Mezclador Vmn 4.0
Presentación del Mezclador VMN 4.0 Identificación de los Componentes 01- Terminal de acoplamiento 02- Cabecera 03- Pie de apoyo (gato hidráulico) 04- Reductor planetario 05- Rueda 06- Auto Balance de la mezcla 07- Rotor Mezclador 08- Quiebra Heno 09- Motor hidráulico 10- Estera Transportadora 11- Caja de Transmisión... -
Page 44: Acoplando El Cardan
Siempre que los términos "izquierda" y "derecha" sean utilizados, se considera como punto de referencia el puesto del operador del tractor. El Mezclador VMN 4.0 es un equipamiento destinado a realizar mezclas y descarga en diferentes situaciones de altura. Su proyecto fue concebido visando agilidad y eficiencia en esta aplicación, optimizando el pH y reduciendo el riesgo de problemas digestivos. -
Page 45: Especificaciones Técnicas
2.0 m3/ minuto Potencia Requerida 50 cv Neumáticos 265/70 R16 8 capas 16 W8 Cámara de aire 16 L540 Presión 44 PSI (3 bar) Rotación TDP 540 RPM 2154 mm 2154 mm 2344 mm* * Medidas con la estera abierta. VMN 4.0... -
Page 46: Preparación Y Enganche Del Mezclador Vmn 4.0
Puje el pin traba (5) y coloque el pie de apoyo (3) en la posición horizontal. A seguir instale el pin nuevamente trabando él. OBS. Durante el funcionamiento del VMN 4.0, el pie de apoyo debe estar en la posición de trabajo (horizontal). e) Para tener una pesaje precisa, el mezclador precisa estar nivelado. -
Page 47: Ajuste De La Longitud Del Cardan
1- Coloque calzos en las ruedas del mezclador. 2- Utilice el gato hidráulico (1) y un calzo (2) para sustentar el VMN 4.0. 3- Suelte las tuercas (3) y retire los tornillos (4). 4- Posicione la cabecera combinando la perforación (5) para arriba o para abajo conforme la necesidad, de acuerdo con a la altura del tractor. -
Page 48: Verificando El Ángulo De Trabajo
C) Desmonte el cardan. Enganche el tubo (1) en la toma de potencia del tractor y la barra (2) en el mezclador. D) Junte las partes del cardan lado a lado y verifique si existe una huelga mínima de 3 cm en cada extremidad. Si la huelga es inferior al citado o no existir, marcar y corte el tubo (1) y la barra (2), bien como el tubo de protección (3), todos en la misma proporción (medida). -
Page 49: Reglajes De Operación
(2) para aliviando el sistema. b) Con las palancas (2) del control en la posición neutro, puje las mangueras con rápidamente: la desconexión ocurrirá con una mínima pérdida de aceite. c) Después, recoloque todas las tapas de protección (1). VMN 4.0... -
Page 50: Rotación De La Toma De Potencia
Si la velocidad de la estera es muy baja en relación a del rotor del mezclador VMN 4.0, faltará material en la puerta de salida. En este caso, aumente la rotación de la TDP (nunca mayor que 540 rpm). -
Page 51: Operación
Mueva la estera (4) para arriba o para bajo hasta la posición deseada. f) Empuje la traba de sustentación de la estera (5) hasta encajar en el pin. g) Empuje la cerradura de la estera de sustentación (5) para ajustar el pasador. VMN 4.0... -
Page 52: Instrucciones De Manutención
3- Certifíquese de que la estera (4) este realmente trabada. 4- Para realizar esta operación, el tractor debe estar desenchufado y el cardan desconectado de la toma de fuerza del Mezclador VMN 4.0. Balanza Automix Consulte el manual de la balanza Instrucciones de Manutención... -
Page 53: Substitución De La Célula De Carga
- Alambre 5 metros para tirar el cable de nuevo. Para sustituir la Célula de Carga delantera: a) En lugar plano y con el VMN 4.0 nivelado y con las ruedas calzadas, suelte el conector (FRENTE) de la balanza (A). - Page 54 Para sustituir las células de carga traseras: a) En un lugar plano y con el VMN 4.0 nivelado y con las ruedas calzadas, suelte el conector (Derecha o Izquierda) de la Balanza (B).
-
Page 55: Ajuste De La Tensión De La Estera De Descarga
Verifique cada 50 horas de trabajo o semanal y complete si necesario. Reductor: Retire el tapón (4) y verifique si el aceite atinge el borde del orificio del mismo. Retire el tapón superior (5) y si necesario, complete el nivel por el orificio del mismo. VMN 4.0... -
Page 56: Lubricación
Drenaje y Reposición del aceite La primera drenaje y cambio de aceite debe ser hecha después de 250 horas de trabajo. Después, repita el procedimiento cada 2.500 horas de trabajo o anualmente. Haga la drenaje después del período de trabajo, mientras la caja y el reductor aún están calientes, pues facilita el dreno del aceite y de las impurezas. -
Page 57: Limpieza
ítems de seguridad sin la autorización del fabricante. No derramar en el ambiente líquidos contaminantes, las piezas usadas y residuos de manutención. Efectuar el descarte respetando las leyes vigentes sobre la materia. VMN 4.0... -
Page 58: Manutención Programada
- Respetar los intervalos de inspección y manutención ordinaria para asegurar condiciones de servicio adecuadas y protección anti-explosión. - Cubrir nuevamente todos los tornillos y orificios con pasta Loctite 510 o producto similar en términos de propiedades y campo de utilización. - Antes de intervenir en la parte interna para manutención o reparaciones, retardar la apertura del reductor y aguardar su completo resfriamiento, para evitar el riesgo de quemaduras debido a la presencia de piezas aún calientes. -
Page 59: Verificación Del Nivel De Aceite De Los Reductores (Atex)
A) Con el cardan suelto, presione simultáneamente las tres trabas (2) y fuerce la protección (3) para bajo. Repita el procedimiento en la protección de la otra punta. B) Retire las trabas (4) de ambas puntas, liberando una de las partes del tubo. VMN 4.0... -
Page 60: Calibración De Los Neumáticos
C) Retire fuera la capa (5) del tubo. D) Lubrique la extremidad interna del tubo y la barra del cardan con engrase de buena calidad. E) Ponga nuevamente la capa (5) y fije con las trabas (4). F) Con el cardan en la posición vertical, deslize las protecciones (3) hasta la posición de origen. -
Page 61: Conservación Del Mezclador Vmn 4.0
Conservación del Mezclador VMN 4.0 Tan importante cuanto la manutención preventiva es la conservación diaria de la máquina. Este cuidado consiste básicamente en la protección del Mezclador VMN 4.0 de las intemperies y de los efectos corrosivos de algunos productos. - Page 62 Enganajes dañadas Consultar un técnico autorizado funcionamiento Nota: La Nogueira tiene por objetivo la constante actualización y mejoramiento de sus productos, reservándose el derecho de introducir modificaciones en sus componentes y accesorios sin previo aviso. Manual Técnico de Operación...
-
Page 63: Informaciones Adicionales
Informaciones Adicionales Tabla de medidas de llaves LINEA METRICA LINEA DE PULGADA LLAVE BITOLA LLAVE BITOLA Tabla de llave y calibre Unidad de apriete en N.m CLASE DE RESISTENCIA CALIBRE PASO GRADO DE RESISTENCIA PASO CALIBRE VMN 4.0... -
Page 64: Asistencia Técnica
Anote aquí el Número de la máquina: Al enviar comunicaciones o solicitar ayuda de la Asistencia Técnica Nogueira, informe siempre el serial y el modelo de la máquina, presentes en la tarjeta de identificación. Al sustituir piezas, utilize siempre ítems originales Nogueira. Solamente las piezas originales son fabricadas de acuerdo con los dibujos, materiales y especificaciones del proyecto, pasando por un riguroso estándar de calidad. -
Page 65: Certificado De Garantía
09 (nueve) últimos meses - garantía adicional concedida por Nogueira Máquinas Agrícolas. 2- Consiste en la presente garantía, en el compromiso de Nogueira en reparar o sumi- nistrar gratuitamente, en su fábrica, las piezas que a su exclusivo juicio presentan defectos de fabricación. - Page 66 1. Llene el TÉRMINO DE RECIBO con la información solicitada y fi rme; 2. Dispare el TÉRMINO DE RECIBO completado y la factura de venta; 3. Acceder al sitio www.nogueira.com.br y haga clic en la pestaña “TÉRMINO DE RECIBO” o acceda nogueira.industriasnb.com/entrega ;...
- Page 68 NOGUEIRA Ind. Com. Impl. Máquinas Agrícolas S.A. St./R: Fernando de Souza, 533 - Distrito Industrial - CEP 13877-775 Tel/Phone.: (19) 3638.1500 - Fax: (19) 3638.1556 nogueira@nogueira.com.br - www.nogueira.com.br CNPJ: 08.510.974/0001-27...
Need help?
Do you have a question about the VMN 4.0 and is the answer not in the manual?
Questions and answers