Table of Contents
Advertisement
Quick Links
SANAV SJ-205HAB
Home Unit
User Manual
Part Number: SJ-205HAB
Doc Type : User Manual
Doc Id: WI-RD-E-047
Reversion : V1.0
Copyright © 2020 San Jose Technology, Inc. All Rights Reserved.
This document contains information that is the property of SANAV. This document may
not be copied, reproduced, reduced to any electronic medium or machine readable form,
or otherwise duplicated, and the information herein may not be used, disseminated or
otherwise disclosed, except with the prior written consent of SANAV
1
Advertisement
Table of Contents

Related Manuals for San Jose Technology Unictron SANAV SJ-205HAB


Summary of Contents for San Jose Technology Unictron SANAV SJ-205HAB
- Page 1 Doc Id: WI-RD-E-047 Reversion : V1.0 Copyright © 2020 San Jose Technology, Inc. All Rights Reserved. This document contains information that is the property of SANAV. This document may not be copied, reproduced, reduced to any electronic medium or machine readable form,...
-
Page 2: Table Of Contents
Contents Document Amendments ....................5 SJ-205HAB Hardware General Introduction ............6 Specification ........................6 Package Contents ......................7 Front View .......................... 8 SJ-205HAB Quick START/Setting Guide .............. 10 Command Setup for SJ-205HAB ................11 Change User Name ...................... 12 Change Password ......................13 Request IMEI Number .................... - Page 3 Appendix 2: Report Data Output Format ............48 Appendix 3: NB5 & RF Within SJ-205HAB Range(RF Tag event) ....49 Warranty Regulation ....................50 11F., No.2, Sec. 4, Jhongyang Rd., Tucheng Dist., New Taipei City 236, Taiwan (R.O.C.) Tel: 886-2-22694456|Fax: 886-2-22694451|service@unictron.com...
- Page 4 SJ-205HAB User Documentation Introduction SANAV SJ-205HAB is a low-powered, more compact version of 2G/3G tracker targeting the animal or asset tracking market. Moving targets can be tracked in real-time through internet or specified terminals. The device can communicate with the server through 2G/3G networks, to provide emergency & power alerts, geo- fencing, remote monitoring, and automatic back-up regarding tracking history.
-
Page 5: Document Amendments
Document Amendments Revision Date Comments 2020/10/26 Formal release 11F., No.2, Sec. 4, Jhongyang Rd., Tucheng Dist., New Taipei City 236, Taiwan (R.O.C.) Tel: 886-2-22694456|Fax: 886-2-22694451|service@unictron.com... -
Page 6: Sj-205Hab Hardware General Introduction
SJ-205HAB Hardware General Introduction Specification Specifications Electrics Data RF Frequency: 436.8MHz Antenna Embedded GSM and RF Antenna GSM Frequency GSM/GPRS/EDGE: Quad band 850/900/1800/1900MHz UMTS/HSPA+: Five band 800/850/900/1900/2100MHz GSM Module Cinterion EHS6 Memory Built-in 32M X 8bit NAND FLASH Power Supply External Power Supply 12V DC / 18W Internal Battery Life... -
Page 7: Package Contents
Package Contents SJ-205HAB x 1 Adapter AC Adapter x 1 100~240V AC / 1.2A Note: Connect Power Cord to AC Adapter to be a whole power charging solution. 11F., No.2, Sec. 4, Jhongyang Rd., Tucheng Dist., New Taipei City 236, Taiwan (R.O.C.) Tel: 886-2-22694456|Fax: 886-2-22694451|service@unictron.com... -
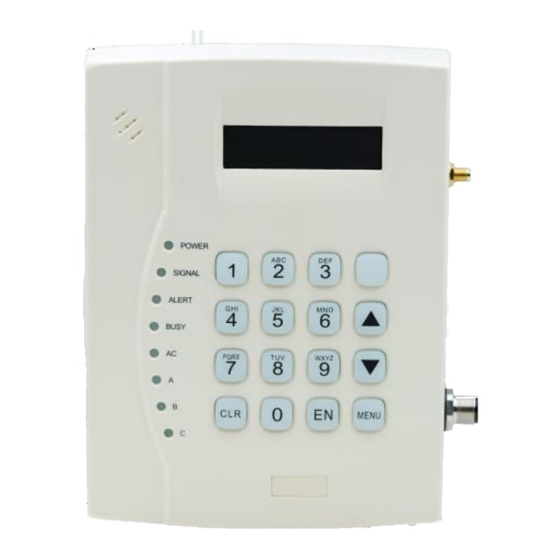
Page 8: Front View
Front View Green LED (Label 1): Power ON – both external and internal Light on when it is powered on Red LED (Label 2): SIGNAL Status Turn on when GSM is in service Flash per 1s when without GSM service ... - Page 9 Charging SJ-205HAB Power Supply Connect 12V DC Input 11F., No.2, Sec. 4, Jhongyang Rd., Tucheng Dist., New Taipei City 236, Taiwan (R.O.C.) Tel: 886-2-22694456|Fax: 886-2-22694451|service@unictron.com...
-
Page 10: Sj-205Hab Quick Start/Setting Guide
SJ-205HAB Quick START/Setting Guide STEP 1: APN Identification. Ensure APN Name, APN username and APN password for GSM SIM Card Cell carrier. Wrong APN setting will cause the device unable to report via internet service. STEP 2: Send SMS command to device (Check the IMEI and make sure device can be set up by SMS): #username,0000,imei* STEP 3: Send SMS command to device to set up APN: #username,0000,3,APN,username,password,DNS (if needed)*... -
Page 11: Command Setup For Sj-205Hab
Command Setup for SJ-205HAB SJ-205HAB currently provides SMS command and COTA (TCP) command for remote setup. User can setup the SJ-205HAB by following the instructions shown in following chapters via SMS/COTA. Key the specific SMS message in your cellular phone and send it to the SIM number of SJ-205HAB. The setup messages are showed in the following sections. -
Page 12: Change User Name
Change User Name Generally, SMS command execution needs correct user name with password, or it will remain the same setting. The SMS command default user name is “username”. It can be changed by following the command format. For example, entering the SMS command as the following allows user to change the user name from “username” to a new user name “SANAV”. -
Page 13: Change Password
Change Password Generally, SMS command execution needs correct user name with password, or it will remain the same setting. The SMS command default password is “0000”. It can be changed by following the command format. For example, entering the SMS command as the following allows user to change the password from “0000” to a new password “1111”. -
Page 14: Request Imei Number
Request IMEI Number IMEI stands for International Mobile Equipment Identification, a unique number for identifying mobile devices validity in 2G/3G network. As above stated, each device has a unique IMEI number. Entering the command as the following allows user to check the IMEI number of the device for network registration and tracking. -
Page 15: Set Up Apn For Mobile Network Service
Set up APN for mobile network Service Access Point Name (APN) is a protocol that typically allows a user's device to access the internet using the mobile phone network. It is a network identifier used by a mobile device when connecting to a 2G/3G carrier. The carrier will then examine this identifier to determine what type of network connection should be created. - Page 16 Situation Message Reply Setup Succeeds [username] + Device GPRS APN is updated. Setup Fail [username] + Device GPRS APN setup Fail! Incorrect username or [username] + command error password, Incorrect command format Table 8: APN Setup Response Description 11F., No.2, Sec. 4, Jhongyang Rd., Tucheng Dist., New Taipei City 236, Taiwan (R.O.C.) Tel: 886-2-22694456|Fax: 886-2-22694451|service@unictron.com...
-
Page 17: Set Up Url
Set up URL This SMS command instructs the device to transmit GPS (GPRMC) positioning data to a specified URL (Uniform Resource Locator) or IP address of HTTP protocol server for real time GPS tracking. Entering the SMS command as the following allows user to changes the address to “http://www.sanavtw.com/uploadM1.php”. - Page 18 Situation Message Reply Setup Succeeds [username] + Device IP/Domain is updated. Setup Fail [username] + IP/Domain setup Fail! Incorrect username or [username] + command error password Incorrect command format Table 10: URL or IP Setup Response Description 11F., No.2, Sec. 4, Jhongyang Rd., Tucheng Dist., New Taipei City 236, Taiwan (R.O.C.) Tel: 886-2-22694456|Fax: 886-2-22694451|service@unictron.com...
-
Page 19: Set Up Tcp Ack Function
Set up TCP ACK function The Home Unit has TCP ACK function to make sure no data lose. Use this command to toggle this feature. Setup format: #<User Name>, <Password>, <Function Code>, <ON/OFF>, <Timeout>* Command: #username,0000,tcpack,1,10* SMS/ COTA Command Description Start sign. -
Page 20: Set Up Phone Book List
Set up Phone Book List There are three main purposes of Phone Book List setup: The Home Unit can save 10 phone numbers for receiving or sanding SMS. Function Code “5” can setup phone1~3 Function Code “e5” can setup phone4~10 Use this SMS command to set up the cellular phone book as the following format: Setup Format: #<User Name>, <Password>, <Function Code>, <Phone number>* Command: #username,0000,5, phone1,phone2,phone3*... -
Page 21: Set Up Location Auto Report Mode
Set up Location Auto Report Mode Generally, the device will generate GPS (GPRMC) data and report to server, specified cellular phone or network routes. Retrospective Location Mode setup can enable the device report GPS data automatically during a period of time. Use this command to set up the frequency of Retrospective Location Mode. -
Page 22: Set Up Answer Call Mode
Set up Answer Call Mode User can use Answer Call (Voice Mode) command to define the response when MU-201 S3 is receiving an incoming call. The device can answer the call automatically or hang up the call and send current location message. Setup Format: #「USERNAME」,「Password」,「Function Mode」, 「Mode」* Command: #USERNAME,0000,8,1* Note: If user has enabled “Security Phone Book”... -
Page 23: Set Up Mandatory Polling Report
Set up Mandatory Polling report The user can send the SMS/COTA polling according to the shown example to get desired information. It defines the report format when you set SMS polling. Setup Format: #「USERNAME」,「Password」,「Function Mode」* Command: #USERNAME,0000,10* SMS/ COTA Command Description Start sign. -
Page 24: Set Up Route For Data Transmission
Set up Route for Data Transmission User can follow the instructions below to set the device’s data transmission via HTTP/TCP/UDP or SMS routes. Please confirm the back-end server protocol type and corresponding URL or IP address (with port number if required) before setup. -
Page 25: Get Pairing Information
Get Pairing Information Use this SMS/COTA command to get pairing device ID and status. Setup Format: #「USERNAME」,「Password」,「Function Mode」* Command: #USERNAME,0000,apstatus* SMS/ COTA Command Description Start sign. USERNAME Default ID of the device. If you have changed the user name, please use the updated one. ... -
Page 26: Set Up Auto Reboot Time
Set up Auto Reboot Time User can use the following commands below to set the device’s auto reboot for clean up the system status regularly. Setup Format: #「USERNAME」,「Password」,「Function Mode」,「Intervals (30 min.) 」* Command: #USERNAME,0000,rst,48 * SMS/ COTA Command Description Start sign. USERNAME Default ID of the device. -
Page 27: Set Up Tcp/Udp Server Address
Set up TCP/UDP Server Address User can use the following commands below to set the device’s GPS (GPRMC) positioning data to a specified IP address and port for real time tracking. Entering the SMS command as the following allows user to change the address to specified IP and port. The IP address will be assigned to receive the GPS data sent by the device. -
Page 28: Set Up Turbo Link Mode
Set up Turbo Link Mode User can use the following commands below to set the device to maintain network connection or disconnect after reporting data. Setup format:#「USERNAME」,「Password」,「Function mode」, 「ON/OFF」* Command: #USERNAME,0000,trb,0* SMS/ COTA Command Description Start sign. Default ID of the device. USERNAME If you have changed the user name, please use the updated one. -
Page 29: Set Up Command By Gprs
Set up Command By GPRS Use this SMS command to setup sending commands over the network. Setup Format: #「USERNAME」,「Password」,「Function Mode」,「0/1」,「IP: Port」* Command: #USERNAME,0000,cmdbygprs,0,202.39.31.179:13377* SMS/ COTA Command Description Start sign. USERNAME Default ID of the device. If you have changed the user name, please use the updated one. ... -
Page 30: Set Up Device Position
Set up Device Position User can use the following commands below to set the device positon. Setup Format: #「USERNAME」,「Password」,「Function Mode」,「Latitude」,「N/S」,「Longitude」,「E/W」* Command: #username,0000,gpspos,2458.0000,N,12136.0000,E* SMS/ COTA Command Description Start sign. USERNAME Default ID of the device. If you have changed the user name, please use the updated one. ... -
Page 31: Set Up Rtc Time
Set up RTC time User can use the following commands below to set the RTC time. SMS Setup Format: #「USERNAME」,「Password」,「Function Mode」,「YYYY&MM&DD&TTTTTT」* Command: #username,0000,setrtc,150115115000* COTA Setup format:<@PCswrtc>,<YYYY&MM&DD&TTTTTT> COTA Command: @PCswsetrtc,170528170501 SMS/ COTA Command Description Start sign. USERNAME Default ID of the device. ... -
Page 32: Set Up Tamper Function
Set up Tamper Function The Home Unit tamper switch is located at rear side of Home Unit and should be pressed for detection. Once the Home Unit is moved to have tamper status changed, the Home Unit will report periodical tamper event with loud beep sound. -
Page 33: Set Up Vibration Detection Function
Set up Vibration Detection Function The Home Unit has built-in vibration detection function. Once the Home Unit is moved and detected by vibration sensor, the Home Unit will report periodical vibration event with loud beep sound. This MT event which generates MT reports will end when the home unit stops moving. -
Page 34: Set Up Alarm Off
Set up Alarm OFF The Home Unit has alarm off function to disable all current alarm reporting and return to normal status as the following: Rear Side Tamper Switch (TT) Once the alarm off command is sent, the Home Unit will stop all current alarm reporting (alarm status). Note that the device still is detecting violation event. -
Page 35: Disable The Beep Sound When Alarm Event Is Triggered
Disable the beep sound when alarm event is triggered When the alarm events such as MT event are triggered, SJ-205HAB (Home Unit) will generate the beep sound during the event until it has received the “Alarmoff” Command. We can disable this beep sound. The device still alarms as the event has been triggered but without beep sound While this feature is disabled. -
Page 36: Set Up Rf Power Of Home Unit
Set up RF power of Home unit The ankle bracelet RF transmit power can be set for HAB (Home Unit) curfew range adjustment as well as the Home Unit RF transmit power. RF transmit power: There are totally 8 levels of RF transmit power that can be set. The stronger the RF transmit power is, the wider the curfew range would be. -
Page 37: Set Up Aes 128 Encryption
Set up AES 128 Encryption The Home Unit has data encryption function to protect the transmitted data. Use this command to toggle this feature. SMS Setup Format: #「USERNAME」,「Password」,「Function Mode」,<ON/OFF>* SMS Command: #username,0000,aes,1* SMS/ COTA Command Description Start sign. USERNAME Default ID of the device. ... -
Page 38: Set Up Fota (Over-The-Air Technology)
Set up FOTA (Over-the-Air Technology) The Home Unit provides OTA upgrade function. Put the upgrade file on the server and update the device through SMS command. SMS Setup Format: #「USERNAME」,「Password」,「Function Mode」,「File URL」* SMS Command: #username,0000,fota, http://220.128.123.1:30000/FW_file.txt* SMS/ COTA Command Description Start sign. -
Page 39: Set Up Paired With The Bracelet (Nb5)
Set up paired with the bracelet (NB5) IDPAIR (Pair) The Home Unit can detect if the bracelets or the extenders are in the RF Range. However, the bracelet’s HAID and the extender’s ID should be set to the Pair-list (idpair) which is restored in the SJ-205HAB. We send this “Idpair”... -
Page 40: Set Up Unpaired With The Bracelet (Nb5)
Set up unpaired with the bracelet (NB5) IDUNPAIR (Unpair) Use this “Idunpair” command to clear the pairing. For instance, when SJ-205HAB receives this command and there is a pair number(I0251) in the Pair-list, then this pair number will be deleted. SMS Setup Format: #「USERNAME」,「Password」,「Function Mode」,「Bracelet HAID」* SMS Command: #username,0000,idunpair,I0251* SMS/ COTA Command... -
Page 41: Idrst (Clear All Of The Idpair At The Same Time)
IDRST (Clear all of the idpair at the same time) Use this “Idrst” command to clear all the pairing number in the list which is restored in Home Unit. SMS Setup Format: #「USERNAME」,「Password」,「Function Mode」* SMS Command: #username,0000,idrst* SMS/ COTA Command Description Start sign. -
Page 42: Rf Command
RF Command The Home Unit can forward RF command to set the bracelet. SMS Setup Format: #「USERNAME」,「Password」,「Function Mode」,「Device ID」,「Function」,「Value」* There are three function can use. Set transmission time frequency. Range is 1 ~ 999 sec Example: #username,0000,rfcmd,I0251,rt,60* Set RF power. Range is 1 ~ 8 Example: #username,0000,rfcmd,I0251,pw,8* ... -
Page 43: Erase The Backup Data(Clear The Flash Memory)
Erase the Backup Data(Clear the flash memory) The device reports GPRMC data to the server/cell phone normally via 3G mobile network. When the 3G is not in service or the 3G signal strength is poor, the GPRMC data will not be able to report to the server. -
Page 44: Setup Buzzing When Receiving Rf Signal
Setup buzzing when receiving RF signal As this feature is on, the Home Unit will generate a buzz sound while receiving RF signal. We usually use this feature as a purpose of testing so that is easier for testers to make sure whether there is a RF connection or not. The default setting is OFF. -
Page 45: Setup Rfall Feature
Setup RFall feature As this feature is on, the Home Unit will receive all of the bracelets nearby without pairing in advance. We usually use this feature as a purpose of testing; therefore the default setting is OFF. Generally, we recommend pairing the bracelet while monitoring in order to prevent from receiving unnecessary data. -
Page 46: Set Up Low Power Reminder
Set up Low Power reminder The user can set the SMS/COTA command to alert user if the battery voltage is low or automatically shut down system when the battery voltage reaches a certain threshold . Setup Format: #「USERNAME」,「Password」,「Function Mode」, 「Voltage Value 1」, 「Voltage Value 2」* Command: #USERNAME,0000,LP,3650,50* SMS/ COTA Command Description... -
Page 47: Appendix 1: Tracker Event List
Appendix 1: Tracker Event List This table shows the different events/ messages sent from the device. There are more than 9 different situations that can trigger the device to respond to positioning commands and tracker status messages as the following. Note: Any event marked with the letter “B”... - Page 48 Appendix 2: Report Data Output Format 357042062420808 $GPRMC 132152 2458.973 N 12125.66 357042062420808 $GPRMC 134914 2458.973 N 12125.66 300620 A*46 300620 A*4A AUTO N0000 4079mV RFIN I0001 N0006 4087mV Field Description Field Description Device Type Event GSM IMEI RF Identification number Log header RF Tag Event ;...
- Page 49 Appendix 3: NB5 & RF Within SJ-205HAB Range(RF Tag event) hexadecimal hexadecimal Bit7 Bit6 Bit5 Bit4 Bit3 Bit2 Bit1 Bit0 UNPLUG if charge not (Disconnect FBR (Strap ACK bit Device completed (Extremely Charging Low Battery from main Tamper) (Reserved) Tamper when unplug Low Power) power)
- Page 50 Service assistance by phone is also provided during the warranty period. Limitations This warranty is limited only to the repair or replacement of defective parts confirmed by SAN JOSE Technology to be a result of faulty materials or workmanship. Instruments mechanically or physically damaged due to the following conditions are beyond our warranty: 1.
- Page 51 FCC Statement This device complies with part 15 of the FCC rules. Operation is subject to the following two conditions: (1) this device may not cause harmful interference, and (2) this device must accept any interference received, including interference that may cause undesired operation. Changes or modifications not expressly approved by the party responsible for compliance could void the user's authority to operate the equipment.
Need help?
Do you have a question about the Unictron SANAV SJ-205HAB and is the answer not in the manual?
Questions and answers