Walker Edison W58FPBD Assembly Instructions Manual
Hide thumbs
Also See for W58FPBD:
- Assembly instructions manual (33 pages) ,
- Assembly instructions manual (34 pages)
Table of Contents
Advertisement
Quick Links
Advertisement
Table of Contents

Related Manuals for Walker Edison W58FPBD


Summary of Contents for Walker Edison W58FPBD
- Page 5 Attach cam bolts (B) to parts (1) and (2). Insert wooden dowels (A) to part (2). Attach cam bolts (B) to parts (9) and (18). Insert wooden dowels (A) to parts (8, 10, 19).
- Page 6 Insert wooden dowels (A) into designated areas in parts (3, 4, 5, 6, 7). Attach cam bolts (B) to parts (3, 4, 5, 6). Attach parts (3) and (5) to part (7), and then attach cam locks (C) to fully assembled part (7).
- Page 7 Attach parts (4) and (6) to the other part (7), and then insert cam locks (C) to the fully assembled part (7). Attach cam locks (C) to parts (13) to panel (2). Attach slat (19) to panel (2) by using screw (W) as guides.
- Page 8 Attach cam locks (C) to part (8) to connect part (9), and to part (10) to connect to the other part (9). Use the wrench (U) to use bolts (D) to connect parts (9) and (10) to part (2).
- Page 9 Use cam bolts (C) to connect parts (3) and (5) to part (2). Use cam bolts (C) to connect parts (4) and (6) to part (2).
- Page 10 Slide parts (14) into designated area. Use cam bolts (C) to connect part (18) to part (1).
- Page 11 Use cam bolts to connect part (1) to the designated areas on parts (7), (8), and (10). Attach the plastic wedges (K) by using the screws (L) onto the corners of parts (14).
- Page 12 Attach doorstopper (P) to designated areas by using screws (Q). Place sticker (T) in designated areas.
- Page 13 Slide part (15) between parts (7) and (9). Slide part (16) between parts (10) and (7). Attach shelf support pins (J). Attach hinges (E) to the doors (11,12) by using screws (F).
- Page 14 Attach handles (G) to the doors (11,12) by using bolts (H). Attach metal part (M) to the doors (11,12) by using screw (N). Attach hinges (E) by using screws (F).
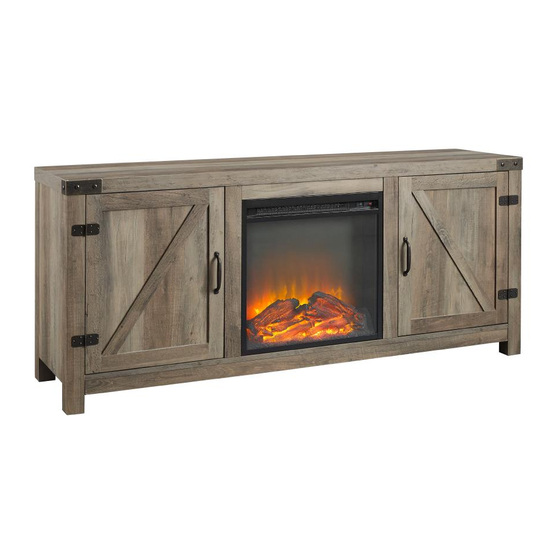
- Page 15 Insert fireplace (R) to the front by sliding it through the back of the unit and attach by using screws (S). Attach part (17) above part (2) behind the fireplace unit by using cam bolts (C) and bolts (B).
- Page 16 Place stickers (T) in designated areas onto part 17.
Need help?
Do you have a question about the W58FPBD and is the answer not in the manual?
Questions and answers