Scheer MH Series Installation And Maintenance Manual
Hide thumbs
Also See for MH Series:
- Installation and maintenance instructions manual (32 pages) ,
- User manual (18 pages)

Related Manuals for Scheer MH Series


Summary of Contents for Scheer MH Series
- Page 1 installation and maintenance manual MH-Serie water-heaters MH 10/17 MH 15/23 MH 10 Micro MH 20 Micro L MH 30/40 heating systems of the extra class...
- Page 2 Fax: + 49 (0) 4839 453 info@scheer-heizsysteme.de www.scheer-heizsysteme.de Note: Always carefully follow SCHEER installation and repair instruction and heed all WARNINGS. SCHEER rejects any liability for defects and damage, which are due to installation or repair by unauthorized and untrained persons. www.scheer-heizsysteme.de...
-
Page 3: Table Of Contents
• oil nozzle replacement .................... electrical connections ....................................electrical schematics of controller electrical schematics of control box A 2-stage ..............electrical schematics of control box M ................room thermostat (optional) ..................service-kits ......................... service-protocols ......................www.scheer-heizsysteme.de... -
Page 4: Statutory Regulations Governing Installation
To prevent misuse and the associated hazards, render your old device unusable before disposing of it. To do this, disconnect the device from the mains supply and remove the mains connection cable from the device. For the disposal of the device, observe the regulations applicable in your country and in your municipality. www.scheer-heizsysteme.de... -
Page 5: Warning And Safety Signs (Definition)
Always grasp the housing of the power plug. The burner elements and connections have 230 V voltage. • NOTICE Repeated emtying of fueltank can cause damage to the burner! If the heater is operated without fuel it can cause damage (e. g. on the oil nozzle). www.scheer-heizsysteme.de... -
Page 6: First Start-Up
SCHEER for approval. If this approval is not obtained, all warranty and liability claims will be void. NOTICE SCHEER rejects any liability for defects and damage, which are due to installation or repair by unau thorized and untrained persons. •... -
Page 7: Type / Model
The MH water heaters are approved for the fuels „diesel“ and „heating oil“ as well as GTL/BTL. Other fuels must be approved by the manufacturer SCHEER before use. The heaters are designed for 230 volts. The connection in the vehicle is to be fed by the vehicle‘s battery via an inverter approved for road traffic within the scope of the ECE regulations. -
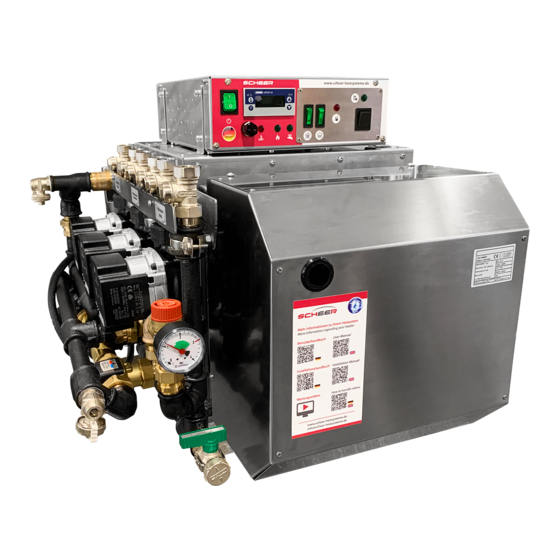
Page 8: Overview Mh-Series
A for MH-Series Underfloor heating (optional) Tank-Control Radiators (optional) (if the tank is empty - lights up red) (optional) Item No. control box A 0754481 hot water (optional) STL release Burner demand electric heating (optional) button STL indicator www.scheer-heizsysteme.de... -
Page 9: Heating Controller
Press and hold the burner suppressor button briefly for about 1 second, not longer than 3 seconds. • The warning lamp of the burner will turn off and the burner is reset. If the burner should switch to malfunction twice, please have a repair carried out by your specialist com- pany. www.scheer-heizsysteme.de... -
Page 10: Pipe Group (Examples)
(This article does not apply to the micro versions) The pipe group is configured by SCHEER according to customer requirements. plate heat exchanger for hot domestic water (optional) All materials used for the plate heat exchanger comply with the definition of DIN 1988 to be suitable for fresh water. -
Page 11: Hybrid-Heating With Electric Power (Optional)
As long as the electric heater is switched on, the burner remains blocked, even if the power supply to the electric heater is interrupted. If the electric heater is switched on, the boiler thermostat indicates a heat request, but the LED indicator does not light up, the power supply to the electric heater is interrupted. www.scheer-heizsysteme.de... -
Page 12: Dimensions Mh-Series
Stand: 18.11.2020 MH10 und MH10/17 MIT ROHRGRUPPE COMBI UND REGELUNGSBOX dimensions MH-series MH 10/17 Abmessungen MH-Serie Stand: 20.11.2020 MH15/23 MIT ROHRGRUPPE COMBI UND REGELUNGSBOX Hybrid MH 15/23 Stand: 20.11.2020 MH30, MH40 und MH30/40 MIT ROHRGRUPPE COMBI UND REGELUNGSBOX MH 30/40 www.scheer-heizsysteme.de... -
Page 13: Overview Mh Micro
(behind the cover exhaust gas fresh air supply max. flow rate of heated domestic water must be set before commissioning Resetbutton for the burner Output heating oil filter Input Pipe connection machine domestic water domestic heating (optional) water water www.scheer-heizsysteme.de... -
Page 14: Burner Assembly Mh Micro
13cm Disassembly direction for the burner Extension 73,3 cm MH 20 micro L, length + 13 cm • NOTICE During installation, make sure that the burner and its hood can be dismantled. Approx. 30 cm are required for this. www.scheer-heizsysteme.de... -
Page 15: Control Box Mh Micro
Let the heating system cool down. • Push the reset (STL) button in. (followed by a click sound) • The heating system is ready to start again. In case the (STL) is triggered again, let the system be repaired by a SHEER trained person. www.scheer-heizsysteme.de... -
Page 16: Fuel Supply / Fuel Filter
- Significantly longer shelf life than propylene glycol Antifreeze components: -1.3 propanediol (100% plant derived) - HTX1 approval for food related areas - CO2 reduced Automatic venting for heating water with 1/2“ male thread with hose connection Item No.: 190089 Item.-No.: 190088 www.scheer-heizsysteme.de... -
Page 17: Combustion Air Supply
The exhaust line must be insulated, if it is installed near heat-sensitive parts of the vehicle or inside a box. The exhaust opening can not be located underneath the combustion air intake! Do not install the exhaust pipe opening in a proximity of less than 50 cm to the combustion air intake. www.scheer-heizsysteme.de... -
Page 18: Burner Components
The blower keyboard automatically adjusts the speed of the blower according to the atmospheric pressure (location of the vehicle) and thus sets an optimum combustion quality. Item No. MH 10/17 016026 MH 15/23 016027 MH 30/40 016028 MH 10 micro 0160290 MH 20 micro L 0160291 www.scheer-heizsysteme.de... - Page 19 Operating status display: LED: off flame detector not active LED: flashes safety test conducted, flame detector is active, no flame detected LED: on (flickers) safety test conducted, flame detector is active, flame detected www.scheer-heizsysteme.de...
- Page 20 / deactivating, and diagnostics. The multi color signal lamp behind the clear cover of the lockout reset button is the key indicating component for visual diagnostics and interface diagnostics. Item No. MH 10/17 0201026 MH 15/23 MH 30/40 0201026 MH micro 0201029 www.scheer-heizsysteme.de...
-
Page 21: Pipe Group Components
Plate heat exchanger (This article does not apply to the micro versions) Plate heat exchanger Item No.: 036480 mixer Item No. mixer micro 0304001 mixer MH Serie radiators 030400 mixer MH Serie floor heating 030398 Mixer for setting the flow tempera- ture of the heating water www.scheer-heizsysteme.de... - Page 22 Door- and boilerisolation (This article does not apply to the micro versions) Art.-Nr. Art.-Nr. MH 10/17 44-003 MH 10/17 44-004 MH 15/23 47-004 MH 15/23 47-005 MH 30/40 49-004 MH 30/40 49-005 door insulationartic- boiler insulation Oil hoses (pair) Item No. 041418 MH Micro 041409 Oil hoses www.scheer-heizsysteme.de...
-
Page 23: Maintenance
Make sure to reassemble the unit completely after servicing. Note: When placing an order please indicate the model and serial number of the MH-series unit. They are located on the right side of the heater and on the burner. www.scheer-heizsysteme.de... -
Page 24: Maintenance Intervals
Adjust the pressure of the oil pump for the first and second step of the burner separately at the respective adjustment screw. step 2 step 1 pressure adjustment pressure measuring step 1 port for manometer pressure adjustment step 2 –measuring connection www.scheer-heizsysteme.de... -
Page 25: Boiler Cleaning
If the negative pressure values are between -0.3 and -0,5 bar a change of the filter cartridge is recommended. • If the negative pressure is lower than -0,5 bar the cartridge must be replaced to avoid mal- function and/or increased pump wear. Note: Please ensure environmentally safe disposal of the filter cartridge. www.scheer-heizsysteme.de... -
Page 26: Mixing Cartridge Control
5 mm. If the distance is greater or smaller than specified, they have to be replaced with genu- ine SCHEER ignition electrodes. (Do not bend the used electrodes they could break! Unused elec- trodes can slightly be bend to the correct distance.) Check the oil nozzle. -
Page 27: Oil Nozzle Replacement
Item No. MH 10 / 17 0.30/60° SCD 022380 MH 15 / 23 0.35/60° SCD 022378 MH 30 / 40 0.65/60°SCD 022377 MH 10 micro 0.25/80° SC 022277 set screw MH 20 micro L 0.30/60° SC 022278 oil pre heater www.scheer-heizsysteme.de... -
Page 28: Electrical Connections
7-pin connector burner < > controller air pressure switch request solenoid valve level 2 level 1 connector 4-pol. brown heater QX4 QX4 FX4 blue failure light level 2 grey black burner reset blue black time relais brown black www.scheer-heizsysteme.de... -
Page 29: Electrical Schematics Of Control Box A 2-Stage
A 2-steps Please contact info@scheer-heizsysteme.de to obtain the circuit diagram of the device with your configuration. electrical schematics of controller box M www.scheer-heizsysteme.de... -
Page 30: Room Thermostat (Optional)
• 0.5 ° C given • Short-term memory in the event of a power failure • 5 + 1 + 1 weekly program with 6 periods comprehensive time program • Controllable by Amazon Echo, Google Home, Tmall Genie dimensions www.scheer-heizsysteme.de... - Page 31 There is a possibility that people could receive an elec- tric shock or a short circuit could damage equipment or the product. Before starting the installation, make sure that the power supply and all other connec- ting cables are voltage-free! www.scheer-heizsysteme.de...
- Page 32 Remove the mounting Plate by rotating the LCD part. Step 3 Connect power supply, with the appropriate terminals. Step 4 Fix the mounting plate into the wall with screws in the box. Step 5 Fasten body of thermostat and the mounting plate through rotating. www.scheer-heizsysteme.de...
- Page 33 To set the program schedules through your thermostat (NOT via your smartphone/tablet) simply follow the instructions as below: Please note: Setting the programme schedule through your thermostat can only be carried out if there is no Wi-Fi connection between your thermostat and smartphone/tablet www.scheer-heizsysteme.de...
- Page 34 01: all buttons locked sensor types In: Internal Sensor (to control the temp.) Ou: External Sensor (to control the temp.) AL: Internal/ External Sensor (Internal sensor to control the temp., external sensor to limit the floor temp.) min. set tempature 5-15°C www.scheer-heizsysteme.de...
- Page 35 Search for IOS devices in the Apple Store, for Android devices in the Google Play Store for “Smart Life” and load them. Alternatively, you can scan the QR code (Fig. 1-2). step 2: Register your account Fig. 2-1 Fig. 2-2 Fig. 2-3 Fig. 2-4 www.scheer-heizsysteme.de...
- Page 36 Press the „+“ on the upper right corner of the page (see Fig 3-1-1) to add your device. Click Confirm, when the indicator rapidly blinks (Fig 3-2),f then select your network and go back to your app to enter the password of www.scheer-heizsysteme.de...
- Page 37 4-2 and 4-3). Return to the app and press „Connect now“ again. The app automatically connects to the room thermostat (Fig. 3-4). This can take anywhere from 5 to 90 seconds. If the device is connected, you can change the device name (Fig. 4-4) and add further thermostats. www.scheer-heizsysteme.de...
- Page 38 After clicking the Weekend (Saturday - Sunday) settings at the top of the page, repeat the steps. • Once your schedule is set, click SAVE and the app will send the schedule to the thermostat and report that the schedule has been saved. www.scheer-heizsysteme.de...
- Page 39 Use a new LCD panel or new Power Unit Box to anything replace the old one. Room tempreture massivly varies from Perform the temperature calibration in point 1 of the op- actual room temperature tions for the high performance range www.scheer-heizsysteme.de...
- Page 40 The guarantee is only valid if the complete protocol is completed! Send the completed protocol to info@scheer-heizsysteme.de or by mail to SCHEER Heizsysteme & Produktionstechnik GmbH | Chausseestraße 16 | D-25797 Wöhrden | Germany Here is some place for your SCHEER-...
-
Page 41: Service-Kits
MH 30/40 big 0730820 Service-Kit MH 10 Micro 073086 Appropriate electrodes and oil nozzles Service-Kit MH 20 Micro L 073087 service log for boiler-No.: ____________________________ burner-No.:_______ with Art.-No.: _____________________ Date/stamp ______________________________________________ Date / Place serviceworker (name, company, signature annotations telephoneno., E-Mail) www.scheer-heizsysteme.de... - Page 42 - MH-series - SCHEER Heizsysteme & Produktionstechnik GmbH Chausseestr. 16 D-25797 Wöhrden Germany Tel.: + 49 (0) 4839 / 905-0 Fax.: +49 (0) 4839 / 453 info@scheer-heizsysteme.de www.scheer-heizsysteme.de best in convenience and comfort...
Need help?
Do you have a question about the MH Series and is the answer not in the manual?
Questions and answers