Table of Contents
Advertisement
Available languages
Available languages
Advertisement
Chapters
Table of Contents

Subscribe to Our Youtube Channel
Related Manuals for Definitive Technology DESCEND DN8


Summary of Contents for Definitive Technology DESCEND DN8
- Page 1 DESCEND ™ Owner’s Manual DN8 and DN10 Subwoofers...
-
Page 2: Table Of Contents
Welcome Contents Thank you for choosing a Definitive Technology Safety Precautions ............3 Descend subwoofer. To ensure that you experience the finest performance possible, we encourage you Getting to Know Your Subwoofer ......7 to take a moment to fully read this owner’s manual and familiarize yourself with the proper installation Getting Started ............8... -
Page 3: Safety Precautions
Safety Precautions to promote the sustainable reuse of material resources. To return your used device, please use the return and collecti Guarde todas las cajas y el CAUTION material de embalaje en caso de que se mude o necesite enviar su sistema. on systems or contact RISK OF ELECTRIC SHOCK! DO NOT OPEN! the retailer where the product was purchased. - Page 4 Safety Precautions (continued) radiators, heat registers, stoves, or other apparatus 19. Unplug the apparatus during lightning storms (including amplifiers) that produce heat. or when unused for long periods of time. 13. No naked flame sources, such as lighted candles, 20. Refer all servicing to qualified personnel. Servicing should be placed on the apparatus.
- Page 5 Safety Precautions (continued) 2. Important Notice: Do Not Modify This Product. • Consult the local retailer authorized to distribute This product, when installed as indicated in the this type of product or an experienced radio/TV instructions contained in this manual, meets FCC technician for help.
- Page 6 Safety Precautions (continued) • Do not place objects filled with liquids, such as Each subwoofer leaves our plant in perfect vases, on the unit. condition. Any visible or concealed damage most likely occurred in handling after it left our plant •...
-
Page 7: Getting To Know Your Subwoofer
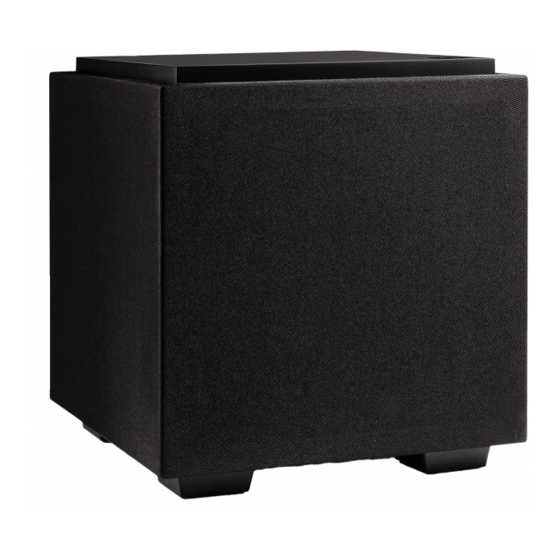
Getting To Know Your Subwoofer Legend LEFT HIGH LEVEL INPUT LEFT/RIGHT (SPEAKER LEVEL IN) – VOLUME UP/DOWN KNOB LOW PASS FILTER UP/DOWN KNOB – LFE IN PHASE SWITCH (0 = DEFAULT) RIGHT STATUS LED AC POWER VOLTAGE SELECTOR SWITCH POWER ON/OFF SWITCH FUSE ~100-120V T6.3AL/250V ~220240V T4AL/250V AC POWER INLET... -
Page 8: Getting Started
Getting Started 1. Make sure the amplifier is set to the correct voltage designated for your country. 2. Plug in the subwoofer to the wall outlet and power up the subwoofer using the power switch on the amplifier panel. 3. Set the volume to the half-way (12:00) position. 4. -
Page 9: Positioning The Subwoofer
Positioning the Subwoofer There are some general guidelines that you should Potential bear in mind when locating your subwoofer: Subwoofer Locations 1. For best results, place the subwoofer on the same side of the room as your front speakers. 2. Placement near walls and in a corner will increase the subwoofer’s output, but the sound may be “muddy”... -
Page 10: Ac Mains (Power) Connection
AC Mains (Power) Connection Note: Please ensure the voltage switch adheres to To prevent accidental damage to your subwoofer your regional guidelines. from overdriving the system, the subwoofer features an internal overload protection circuit, which will turn the subwoofer off or down when overdriven or overheated and will then resume normal operation after a few minutes. -
Page 11: Connection And Setup
Connection and Setup There are two options for connecting your 8. Set the main, center, and surround speakers’ low- subwoofer, LFE INPUT and SPEAKER LEVEL IN: pass filters to an appropriate frequency (see page 14 for a guide). LFE INPUT SETUP 9. - Page 12 Connection and Setup (continued) IMPORTANT NOTE: One terminal on each channel input is marked with a red band (+) and the other is marked with a black band (–). Make certain that you connect the wire from the red (+) terminal of your amplifier or receiver to the red (+) terminal of the subwoofer and the wire from the black (–) terminal of your amplifier or receiver to the black (–)
-
Page 13: Using And Adjusting The Descend Subwoofer
Using and Adjusting the Descend Subwoofer Amplifier Controls 5. Flip the phase switch to either 0 or 180 degrees. Use the volume, phase and low-pass controls on the Then listen to how well the subwoofer blends with amplifier panel to optimize your sound experience. your speaker system by how little you can tell the 1. -
Page 14: Subwoofer Low-Pass Filter Guide
Subwoofer Low-Pass Filter Guide MAIN FRONT SPEAKER TYPE SUGGESTED SETTINGS LARGE, FULL-RANGE FLOORSTANDING 40–80 HZ SMALL FLOORSTANDING AND LARGE BOOKSHELF 60–100 HZ SMALL BOOKSHELF/MINI-MONITORS/LARGE SATELLITES 80–120 HZ SMALL SATELLITES 100–140 HZ USING LFE FROM A RECEIVER OR PRE-AMP 150 HZ WITH INTERNAL BASS MANAGEMENT Specifications DN10... -
Page 15: Service
Service Service and warranty work on your Definitive Technology loudspeaker will normally be performed by the Definitive Technology dealer or importer. If, however, you wish to return the speaker to us, please contact us first, describing the problem and requesting proper authorization. -
Page 16: Limited Warranty
DN8/DN10 Manual version 1 to the Product caused by installation or removal of the Product. Definitive Technology makes no warranty with respect to its This product complies with the essential requirements of the products purchased from dealers or outlets other than Definitive EMC directive 89/336/EEC. - Page 17 Bienvenido Contenido Gracias por elegir un altavoz de graves Definitive Instrucciones de seguridad ........18 Technology Descend. Para asegurarse de que experimenta el mejor rendimiento posible, Conozca su altavoz de graves ........22 le recomendamos que se tome un momento para leer todo este manual del propietario y Introducción ...............23 familiarizarse con los procedimientos de instalación y configuración adecuados para su altavoz.
-
Page 18: Instrucciones De Seguridad
Instrucciones de seguridad eliminación incontrolada de desechos, recíclelos de manera responsable para promover la reutilización sostenible de los recursos materiales. Para devolver su CAUTION dispositivo usado, utilice los sistemas de devolución y recolección o comuníquese con el minorista donde RISK OF ELECTRIC SHOCK! DO NOT OPEN! compró... - Page 19 Instrucciones de seguridad (continuación) radiadores, rejillas de calefacción, estufas u otros 19. Desenchufe el aparato durante tormentas eléctricas aparatos (incluidos amplificadores) que produzcan calor. o cuando no se utilice durante períodos prolongados. 13. Las fuentes de llama desnuda, como velas 20.
- Page 20 Instrucciones de seguridad (continuación) 2. Aviso importante: No modifique este producto. • Consulte con el distribuidor local autorizado para Este producto, cuando se instala como se indica en distribuir este tipo de producto o con un técnico las instrucciones contenidas en este manual, cumple de radio/TV experimentado para obtener ayuda.
- Page 21 • Cuando el interruptor está en la posición OFF su distribuidor de Definitive Technology donde (STANDBY), el equipo no está completamente compró su producto. Desembale su sistema con apagado de la RED.
-
Page 22: Conozca Su Altavoz De Graves
Introducción a su altavoz de graves Leyenda DERECHA ENTRADA DE ALTO NIVEL IZQUIER- DA/DERECHA (ENTRADA DE NIVEL – DE ALTAVOZ) PERILLA PARA SUBIR/BAJAR VOLUMEN – PERILLA DE FILTRO DE PASO BAJO ARRIBA/ABAJO IZQUIERDA LFE IN INTERRUPTOR DE FASE (0 = PREDE- TERMINADO) LED DE ESTADO INTERRUPTOR SELECTOR DE TEN-... -
Page 23: Introducción
Introducción 1. Asegúrese de que el amplificador esté ajustado a la tensión correcta designada para su país. 2. Conecte el altavoz de graves a la toma de pared y encienda el altavoz de graves con el interruptor de encendido en el panel del amplificador. 3. -
Page 24: Colocación Del Altavoz De Graves
Colocación del altavoz de graves Hay algunas pautas generales que debe tener en Posibles cuenta al ubicar su altavoz de graves: ubicaciones de altavoz de graves 1. Para obtener mejores resultados, coloque el altavoz de subgraves en el mismo lado de la habitación que los altavoces frontales. -
Page 25: Conexión A La Red De Ca (Alimentación)
Conexión a la red de CA (alimentación) Nota: Asegúrese de que el interruptor de tensión una hora en apagarse. Esto no es nada de qué cumpla con las pautas regionales. preocuparse, ya que el amplificador estará en modo inactivo bajo que usa muy poca energía (menos de 1/2 Watt). -
Page 26: Conexión Y Configuración
Conexión y configuración Hay dos opciones para conectar su altavoz de 8. Configure los filtros de paso bajo de los altavoces graves, ENTRADA LFE y ENTRADA DE NIVEL DE principal, central y envolvente a una frecuencia adec- ALTAVOZ: uada (consulte la página 29 para obtener una guía). 9. - Page 27 Connection and Setup (continued) NOTA IMPORTANTE: Un terminal en cada entrada 7. Ajuste el altavoz de graves en “Ninguno” u de canal está marcado con una banda roja (+) “Desactivado”. y el otro está marcado con una banda negra (-). 8.
- Page 28 Uso y ajuste del altavoz de graves Descend Controles de amplificador volumen si la voz suena “delgada” o sin cuerpo. Utilice los controles de volumen, fase y paso 5. Mueva el interruptor de fase a 0 o 180 grados. bajo del panel del amplificador para optimizar su Luego, escuche qué...
-
Page 29: Guía De Filtro De Paso Bajo Del Subwoofer
Guía de filtro de paso bajo del subwoofer TIPO DE ALTAVOZ PRINCIPAL FRONTAL CONFIGURACIÓN RECOMENDADA DE PIE GRANDE DE RANGO COMPLETO 40–80 HZ ESTANTERÍA GRANDE Y PEQUEÑA DE PIE 60–100 HZ ESTANTERÍA PEQUEÑA/MINI MONITORES/SATÉLITES 80–120 HZ GRANDES SATÉLITES PEQUEÑOS 100–140 HZ USO DE LFE DESDE UN RECEPTOR O PREAMPLIFICADOR CON 150 HZ GESTIÓN DE GRAVES INTERNA... -
Page 30: Servicio
Servicio El trabajo de servicio y garantía en su altavoz Definitive Technology normalmente lo realizará el distribuidor o importador de Definitive Technology. Sin embargo, si desea devolvernos el altavoz, comuníquese con nosotros primero, describiendo el problema y solicitando la autorización correspondiente. -
Page 31: Garantía Limitada
EMC 89/336/EEC. incumplimiento de las advertencias de los fabricantes, negligencia o eventos relacionados. 3) Definitive Technology no ha realizado Copyright © 2020 Definitive Technology ni autorizado la reparación o modificación del Producto. 4) El producto se ha instalado o utilizado incorrectamente. - Page 32 Table des matières Merci d’avoir choisi un caisson de graves Descend Précautions de sécurité ..........33 de Definitive Technology. Pour vous assurer de bénéficier des meilleures performances possibles, Découverte de votre caisson de graves ....37 nous vous conseillons de prendre un moment pour lire entièrement ce manuel du propriétaire et de...
-
Page 33: Précautions De Sécurité
Précautions de sécurité causés par une élimination incontrôlée des déchets, recyclez-les de manière responsable pour promouvoir la réutilisation durable des ressources matérielles. CAUTION Pour retourner votre appareil usagé, veuillez utiliser les systèmes de retour et de collecte ou contacter le RISK OF ELECTRIC SHOCK! DO NOT OPEN! revendeur auprès duquel le produit a été... - Page 34 Précautions de sécurité (suite) 13. Ne posez aucune source de flammes nues, comme 20. Confiez l’entretien de l’appareil à du personnel une bougie allumée, sur l’appareil. qualifié. Un entretien est nécessaire lorsque l’appareil a été endommagé de quelque manière que ce soit, 14.
- Page 35 Précautions de sécurité (suite) 2. Note importante : Ne pas modifier ce produit. • Consultez le revendeur local autorisé à distribuer Ce produit, une fois installé comme indiqué dans ce type de produit ou un technicien radio / TV les instructions contenues dans ce manuel, répond expérimenté...
- Page 36 à votre revendeur • Ne placez aucun objet rempli de liquides, comme Definitive Technology où vous avez acheté votre un vase, sur l’appareil. produit. Veuillez déballer soigneusement votre • Ne manipulez pas le cordon d’alimentation avec système.
-
Page 37: Découverte De Votre Caisson De Graves
Découverte de votre caisson de graves Légende GAUCHE ENTRÉE HAUT NIVEAU GAUCHE / DROITE (ENTRÉE DE NIVEAU – ENCEINTE) BOUTON D’AUGMENTATION / DIMINUTION DU VOLUME – BOUTON D’AUGMENTATION / DIMINUTION DU FILTRE PASSE-BAS DROITE ENTRÉE LFE COMMUTATEUR DE PHASE (0 = PAR DÉFAUT) VOYANT LED D’ÉTAT SÉLECTEUR DE TENSION D’ALIMENTATION CA... -
Page 38: Pour Commencer
Pour commencer 1. Assurez-vous que l’amplificateur est réglé sur la tension correcte pour votre pays. 2. Branchez le caisson de graves sur la prise murale, puis allumez-le à l’aide de l’interrupteur d’alimentation sur le panneau de l’amplificateur. 3. Réglez le volume à la moitié (en position 12 h 00). 4. -
Page 39: Positionnement Du Caisson De Graves
Positionnement du caisson de graves Il y a quelques consignes générales que vous devez Emplacements garder à l’esprit lors du positionnement de votre potentiels des caisson de graves : caissons de graves 1. Pour de meilleurs résultats, placez le caisson de graves du même côté... -
Page 40: Connexion Secteur (Alimentation) Ca
Connexion secteur (alimentation) CA Remarque : Veuillez vous assurer que l’interrupteur complètement. Il n’y a pas de quoi s’en inquiéter, de tension est conforme à vos directives régionales. car l’ampli sera en mode ralenti bas qui utilise très peu d’énergie (moins de 0,5 W). Pour éviter d’endommager accidentellement votre caisson de graves par une surcharge du système, le caisson de graves dispose d’un circuit interne... -
Page 41: Connexion Et Configuration
Connexion et configuration Il existe deux options pour connecter votre caisson 7. Réglez le caisson de graves sur « Yes » (« Oui ») de graves, LFE INPUT (ENTRÉE LFE) et SPEAKER ou « On» (« Sous tension »). LEVEL IN (ENTRÉE DE NIVEAU ENCEINTE) : 8. - Page 42 Connexion et configuration (a continué) NOTE IMPORTANTE : Une borne sur chaque entrée 7. Réglez le caisson de graves sur « None » (« Aucun de canal est marquée d’une bande rouge (+) et ») ou « Off » (« Hors tension »). l’autre est marquée d’une bande noire (-).
-
Page 43: Utilisation Et Réglage Du Caisson De Graves Descend
Utilisation et réglage du caisson de graves Descend Commandes de l’amplificateur 5. Basculez le commutateur de phase sur 0 ou 180 Utilisez les commandes de volume, de phase et de degrés, puis écoutez si le caisson de graves se passe-bas sur le panneau de l’amplificateur pour marie bien avec votre système d’enceintes par le optimiser votre expérience sonore. -
Page 44: Guide Du Filtre Passe-Bas Du Caisson De Graves
Guide du filtre passe-bas du caisson de graves TYPE D’ENCEINTE PRINCIPALE AVANT RÉGLAGES SUGGÉRÉS COLONNE LARGE, SPECTRE COMPLET 40–80 HZ PETITE COLONNE ET GRANDE ENCEINTE BIBLIOTHÈQUE 60–100 HZ PETITE ENCEINTE BIBLIOTHÈQUE / MINI-MONITEURS / 80–120 HZ GRANDS SATELLITES PETITS SATELLITES 100–140 HZ UTILISATION DU LFE À... -
Page 45: Entretien
Les travaux d’entretien et de garantie sur votre enceinte Definitive Technology seront normalement effectués par le revendeur ou l’importateur de Definitive Technology. Toutefois, si vous souhaitez nous renvoyer l’enceinte, veuillez d’abord nous contacter, en décrivant le problème et en demandant une autorisation appropriée.
Need help?
Do you have a question about the DESCEND DN8 and is the answer not in the manual?
Questions and answers
I bought the power switch two month ago bug I know it has wires on to go but I need to know there two red and two yellow how to replace does wire correction way because is a four power switch on and off I forgot how it was it has two red wire and two yellow if it goes on top on pins the two red and on the bottom the two yellow or on the right had the red and yellow on the left side it's a descend 8 technology sub woofer