Table of Contents
Advertisement
Quick Links
Toucan Touchscreen Gauge and Trim/Compensation
Selection Unit
User Guide (MoTeC M1) V1.0
Firmware Versions 1.84 and above
Disclaimer
Disclaimer
Although every care is taken with the design of this product, JT Innovations Ltd.
can in no way be held responsible for any consequential damage resulting from
the use of Toucan in your vehicle.
support@JTi.uk.com
Always operate your vehicle safely and do not allow yourself to be distracted by
your Toucan display while driving. Minimise the amount of time you spend
viewing the screen. Do not access any function requiring prolonged use of the
menus whilst driving.
support@JTi.uk.com
www.JTi.uk.com
JT Innovations Ltd
Unit 23
Tradecroft Ind. Estate
Portland
Dorset
UK
+44 (0) 1305 534535
© JT Innovations Ltd. 2019
Page 1
Advertisement
Table of Contents

Subscribe to Our Youtube Channel
Related Manuals for JT Innovations Toucan

Summary of Contents for JT Innovations Toucan
-
Page 1: Toucan Touchscreen Gauge And Trim/Compensation Selection Unit
Firmware Versions 1.84 and above Disclaimer Disclaimer Although every care is taken with the design of this product, JT Innovations Ltd. can in no way be held responsible for any consequential damage resulting from the use of Toucan in your vehicle. -
Page 2: Table Of Contents
Contents Sensor Alarms ........14 Launch Control ........14 Toucan Touchscreen Gauge and Trim/Compensation Selection Unit ..1 Antilag Control ........14 User Guide (MoTeC M1) V1.0 ....1 Firmware Updates ........ 14 Introduction ..........3 Shiftlight Configuration ..... 15 Installation .......... -
Page 3: Introduction
Introduction Thank you for purchasing a Toucan display. We hope it will be easy to install and configure, and we recommend you read this guide before you start. Installation Before You Start Please check the box contents to ensure nothing is missing. You should have:... -
Page 4: Power
M1 variant for the correct pin numbers. Multiway Connector This connects to the rear of the Toucan unit. Note that it has a latching tab that must be depressed before the connector and cable can be detached. -
Page 5: In-Vehicle Mounting
500kbit/s via the Toucan menus if required. This stream should be enabled on the CANbus channel that Toucan has been wired to – the setting is in M1 Tune via the “ECU Transmit” options under the Communications tab of Vehicle settings. -
Page 6: Motec Control Functions
Select the Physical CANbus channel used (e.g. CAN Bus 1) • Set the CAN ID to 528 (NB – Toucan transmits with ID 529, but the setting in M1 Tune has to be a multiple of 16 as the “base” address for 16 received channels, which in this case is 528). -
Page 7: Menus And Operation
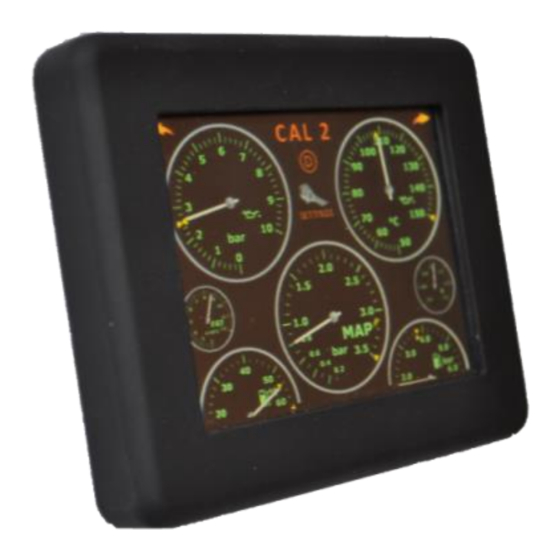
Menus and Operation Touch here to change current Gauge Screens calibration. Label shown is the first 5 characters of the text Touch here to go to next Touch here to go to entered. gauge page previous gauge page Touch here to enter Touch to turn launch SETTINGS menus control on or off... -
Page 8: Large Gauges
Large Gauges Goes to parameter list view. Touch here to return to main gauge screen. Touch here to mute an active alarm. Will be automatically unmuted when the alarm next clears Resets the peak marker. Settings Menu Touch here to select full Touch here to mute or brightness unmute audible alarms. -
Page 9: Gauge Layout
Gauge Layout This is accessed via the Gauge Setup button, and then “Gauge Select”. Touch here to select Touch the gauge that you wish to change. A 3 which of the 4 pages to setup letter mnemonic describes the current gauge selected for each position Gauge name is shown... -
Page 10: Trim/Compensation Cal Pin Protection
• In the event that Toucan is disconnected from the Syvecs ecu, the ecu will, in most cases default to CAL 8 (although this can be CAL 1 if a Syvecs input with no pullup resistor is used). It is generally recommended that the valet or anti-theft CAL is in position 8, or the PIN protect first CAL function (or first *and* last) is used. -
Page 11: Alarm Configuration
When an alarm is activated, the relevant large gauge has a mute button. This may be used to temporarily mute that specific alarm. It will remain muted until either that alarm condition clears or Toucan is repowered. Alarms for other fault conditions will not be supressed or muted. -
Page 12: Available Alarms
Available Alarms • Lambda 1 and Lambda 2. Any • ACT. Any value in range, in 1°C value in range, in 0.01 steps. Alarm triggered if alarm value is steps. Alarm triggered if alarm value is exceeded. Default 50C. exceeded. Default 1.05. •... -
Page 13: More" Menus
Dynamic peak markers CANbus Termination It may be necessary to enable the bus termination if Toucan is the last device on the CANbus network. By default the termination is switched off, but it may be enabled by sliding the small switch on the rear of the unit towards the 4-prong mounting plate. -
Page 14: Sensor Alarms
Updates are applied using a PC program (also available from the website) and a standard “mini” USB cable. Updates should be applied with the Toucan disconnected from the vehicle. It will be powered from the PC USB port, although the LCD will be shut down. -
Page 15: Shiftlight Configuration
Shiftlight Configuration If a JT Innovations Shiftlight is connected to Toucan, the shift LEDs can be configured from the Toucan screen. This is accessed via the Shift Light Setup button on the Setup screen. Select to allow modes to be configured for Choose the LED to “all LEDs”... -
Page 16: Technical
Processing 190MHz 32 bit ARM9, 8Mbytes Flash memory, 8Mbytes SDRAM. system. Package contents Toucan unit, power/data cable harness, mount, installation guide. Available Air intake temperature; Battery Volts; Boost (2.5 bar and 3.5 bar); Gauges/Alarms Exhaust Gas Temperature (2 channels); Fuel level; Fuel Pressure; Fuel Temperature;...
Need help?
Do you have a question about the Toucan and is the answer not in the manual?
Questions and answers