Table of Contents
Advertisement
Available languages
Available languages
Quick Links
Advertisement
Table of Contents

Subscribe to Our Youtube Channel
Related Manuals for Piusi PW Wi-Fi


Summary of Contents for Piusi PW Wi-Fi
- Page 1 Wi-Fi Installazione e uso Installation and use BULLETIN M0271B ITEN_...
- Page 2 Installazione e uso ITALIANO Bulletin M0271 2 /64 M0271...
-
Page 3: Table Of Contents
PROCEDURA DI RESET E RIPRISTINO IMPOSTAZIONI DI FABBRICA MODULO WiFi 12.1 PRIMO ACCESSO 12.2 PRIMA CONFIGURAZIONE 12.3 PROCEDURA DI RIPRISTINO GLOSSARIO DEMOLIZIONE E SMALTIMENTO 3/124 3 /64 Il presente manuale è proprietà della PIUSI S.p.A. Ogni riproduzione, anche parziale, è vietata. -
Page 4: Dichiarazione Di Conformita
- Direttiva Bassa Tensione 2014/35/UE - Direttiva RED 2014/53/UE La documentazione è a disposizione dell’autorità competente su motivata richiesta presso Piusi S.p.A. o richiedendola all’indirizzo e-mail: doc_tec@piusi.com La persona autorizzata a costituire il fascicolo tecnico e a redigere la dichiarazione è Otto Varini in qualità... -
Page 5: Avvertenze Generali
IL PRESENTE MANUALE È PROPRIETÀ DELLA PIUSI S.p.A. OGNI RIPRODUZIONE ANCHE PARZIALE E’ VIETATA. Il presente manuale è di proprietà di Piusi S.p.A., la quale è esclusiva titolare di tutti i diritti previsti dalle leggi applicabili, ivi comprese a titolo esemplificativo le norme in materia di diritto d’autore. -
Page 6: Istruzioni Di Sicurezza
Installazione e uso ISTRUZIONI DI SICUREZZA ATTENZIONE Evitare assolutamente il contatto tra l’alimentazione elettrica e il liquido Rete elettri- da pompare. ca - verifiche preliminari all’installazione USO IMPRO- Non mettere in funzione l’unità quando si è affaticati o sotto l’influenza di PRIO DELL’AP- droghe o alcol. - Page 7 Il segno Segno di allarme ( ! ) che segue la marcatura CE viene indicato quando sono previste restrizioni all’uso del prodotto LARME (!) CHE SEGUE MARCA- TURA CE 7/124 7 /64 Il presente manuale è proprietà della PIUSI S.p.A. Ogni riproduzione, anche parziale, è vietata.
-
Page 8: Imballo
NOTA Nel caso in cui uno o più componenti di seguito descritti non siano presen- ti all’interno della confezione, contattare il servizio di assistenza tecnica Piusi S.p.A. ATTENZIONE Verificare che i dati di targa corrispondano a quelli desiderati. Per qualsiasi anomalia, contattare immediatamente il fornitore, segnalando la natura dei difetti e, in caso di dubbio sulla sicurezza dell’apparecchiatura, non utilizzarla. -
Page 9: Identificazione Macchina E Costruttore
Dati Tecnici Voltaggio sistema di gestione 100 - 230 Vac Frequenza 50 Hz / 60 Hz Potenza massima 15 W Grado di protezione IP54 9/124 9 /64 Il presente manuale è proprietà della PIUSI S.p.A. Ogni riproduzione, anche parziale, è vietata. -
Page 10: Descrizione Del Prodotto
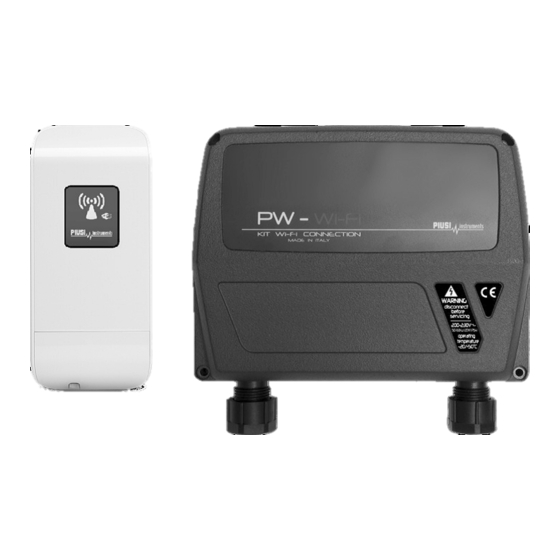
Installazione e uso DESCRIZIONE DEL PRODOTTO PREMESSA PW-WiFi – la nuova soluzione che consente di connettere i dispositivi Piusi ad una rete WiFi. Il prodotto è composto da due dispositivi differenti,: - una a scheda elettronica che converte un segnale RS485 in LAN. -
Page 11: Installazione
Per il fissaggio a parete, utilizzare nr. 2 viti M4 FISSAGGIO 13.5 Per il fissaggio del supporto antenna, utilizzare nr. 2 viti M5 FISSAGGIO ANTENNA 12.5 R 15 11/124 11 /64 Il presente manuale è proprietà della PIUSI S.p.A. Ogni riproduzione, anche parziale, è vietata. -
Page 12: Note Di Installazione
Installazione e uso 10.2 NOTE DI INSTALLAZIONE PREMESSA L’antenna PW WI-FI in dotazione è un’antenna a pannello che ha delle dire- zioni privilegiate di comunicazione ed altre direzioni da evitare. Vengono forniti i diagrammi di radiazione sui piani: Questo significa che prima del fissaggio dell’antenna occorre considerare la sua direttività... -
Page 13: Cablaggi
Rimuovere il coperchio frontale per eseguire i necessari cablaggi Per effettuare un’ o perazione corretta seguire gli step successivi: Collegare il cavo RS485 come mostrato sotto. 13/124 13 /64 Il presente manuale è proprietà della PIUSI S.p.A. Ogni riproduzione, anche parziale, è vietata. - Page 14 Installazione e uso Collegare I 3 cavi di alimentazione come mostrato - Input 100-240 Vac 50/60 Hz. ATTENZIONE CAVO RS485 Utilizzando un cavo certificato per rs485 si possono raggiungere 1200 metri CAVO ETHERNET Utilizzare cavo schermato categoria 5 o superiore. Distanza massima raggiungibile fino a 90 metri.
-
Page 15: Led E Connettori
IP di sicurezza DHCP abilitato, nessun IP dal server DHCP FLASH 192.168.2.10 FAST DHCP Standard IP 192.168.2.10 FLASH disabilitato segnale LAN Power ON 15/124 15 /64 Il presente manuale è proprietà della PIUSI S.p.A. Ogni riproduzione, anche parziale, è vietata. -
Page 16: Configurazione
Installazione e uso 10.5 CONFIGURAZIONE PREMESSA Questo è lo schema di una tipica rete Wireless. WI-FI NETWORK SELF SERVICE PW - WiFi PC NR. 1 PC NR. 2 ROUTER/SWITCH PRINTING UNIT ACCESSO La configurazione del PW-WiFi si effettua in due passi: Configurazione del convertitore 485-LAN Configurazione del modulo WiFi 16 /64... -
Page 17: Convertitore 485 - Lan
Premere Enter (PC) o Return (Mac). Device Default IP Address CONVERTITORE 485 LAN 192.168.2.10 admin piusipass Inserire come nome utente e come Password , cliccare Login. 17/124 17 /64 Il presente manuale è proprietà della PIUSI S.p.A. Ogni riproduzione, anche parziale, è vietata. -
Page 18: Navigazione
Gateway IP; DNS Primario e Secondario. SYSTEM La schermata “System” controlla l’account administrator; l’update del firmware; il backup della configurazione RS485 La schermate “RS485” configura il sistema di conversione RS485, è possibi- le scegliere un prodotto Piusi o settare i parametri manualmente. 18 /64 M0271... -
Page 19: Network
Specifica l’indirizzo DNS secondario del server. Questo campo è opzionale DNS IP e verrà usato solo nel caso in cui il DNS primario non dovesse rispondere 19/124 19 /64 Il presente manuale è proprietà della PIUSI S.p.A. Ogni riproduzione, anche parziale, è vietata. -
Page 20: System
Re-inserire la password per l’account administrator 11.4 RS485 PREMESSA La schermata RS485 consente di configurare il sistema di conversion RS485 1) Caso scelta Prodotti Piusi 2) Caso Altri prodotti Configurazione Default e scelta altri prodotti Setting altri Parametri RS485 PIUSI 20 /64... -
Page 21: Procedura Di Reset E Ripristino Impostazioni Di Fabbrica
COLLEGARE IL485 LAN CONVERTER Per accedere alla configurazione del modulo WiFi, seguire i seguenti step: Scaricare il software ‘PW-CONFIGURATOR’ dal link https://wswebssm. piusi.com/pwconfigurator/setup.exe 21/124 21 /64 Il presente manuale è proprietà della PIUSI S.p.A. Ogni riproduzione, anche parziale, è vietata. - Page 22 Installazione e uso Assicurarsi che la scheda WIreless sul proprio PC sia impostata per riceve- re un IP automaticamente (DHCP). Connettersi alla rete wireless “PW-WIFI“ Lanciare il programma ‘PW-CONFIGURATOR’’ dall’icona Inserire l’indirizzo IP 192.168.1.100 e premere il pulsante per colle- garsi all’antenna.
- Page 23 PW Wi - Fi Lingua Originale Per iniziare la configurazione, accettare i termini e premere sul pulsante ‘BEGIN’ (inizia). 23/124 23 /64 Il presente manuale è proprietà della PIUSI S.p.A. Ogni riproduzione, anche parziale, è vietata.
-
Page 24: Prima Configurazione
Collegamento a PW-STATION – la PW-WIFI si collegherà direttamente ad una PW-STATION (cioè una rete creata con dispositivi PIUSI). Assicurarsi di aver acceso e preconfigurato la PW-STATION prima di procedere con la configurazione della PW-WIFI. 24 /64... - Page 25 Dopo aver indicato a quale tipologia di access point si dovrà collegare la PW-WIFI procedere con la sua configurazione. 25/124 25 /64 Il presente manuale è proprietà della PIUSI S.p.A. Ogni riproduzione, anche parziale, è vietata.
- Page 26 Installazione e uso Per configurare l’apparecchio indicare: • Tipologia di assegnamento dell’indirizzo IP: - Dinamico (DHCP) : l’indirizzo ip della PW-WIFI verrà assegnato automati- camente da un server DHCP giè presente all’interno della rete. Nel caso in cui alla PW-WIFI non venga assegnato un indirizzo IP in modo automatico, funzionerà...
- Page 27 PW Wi - Fi Lingua Originale 27/124 27 /64 Il presente manuale è proprietà della PIUSI S.p.A. Ogni riproduzione, anche parziale, è vietata.
-
Page 28: Procedura Di Ripristino
Installazione e uso 12.3 PROCEDURA DI RIPRISTINO Se il dispositivo viene resettato (utilizzando il tasto di reset) è prevista una procedura di ripristino che deve essere effettuata utilizzando il software ‘PW-CONFIGURATOR’. La procedura riprogramma la PW-WIFI riportando- la alla configurazione di fabbrica. Seguire i passaggi sotto elencati per iniziare la procedura: Collegare la ‘PW-WIFI’... - Page 29 Per recuperare le informazioni necessarie per il corretto ripristino dell’i- dentità del dispositivo, il software, si dovrà collegare ai server PIUSI e quindi alla rete internet. Premere il pulsante per recuperare le informazioni necessarie.
- Page 30 In caso contrario verrà mostrato un messaggio di errore: Se le informazioni relative alla tipologia di antenna vengono recuperate cor- rettamente dai server PIUSI, si può procedere con la riconfigurazione e il ri- pristino del dispositivo. Procedere premendo il pulsante ‘CONFIGURE’ (con- figura).
-
Page 31: Glossario
TO EIRP LIMIT trasmissione in uscita del modulo WiFi permanga entro i limiti legislativi della nazione di utilizzo, considerando il valore di guadagno d’antenna settato. 31/124 31 /64 Il presente manuale è proprietà della PIUSI S.p.A. Ogni riproduzione, anche parziale, è vietata. -
Page 32: Demolizione E Smaltimento
Installazione e uso DEMOLIZIONE E SMALTIMENTO Premessa In caso di demolizione del sistema, le parti di cui è composto devono essere affidate a ditte specializzate nello smaltimento e riciclaggio dei rifiuti indu- striali e, in particolare: Smaltimento L’imballaggio è costituito da cartone biodegradabile che può essere conse- dell’imballaggio gnato alle aziende per il normale recupero della cellulosa. - Page 33 PW Wi - Fi translated from italian ENGLISH Bulletin M0271 33 /64 /124 This manual is the property of PIUSI S.p.A. Any reproduction, even partial, is forbidden.
- Page 34 Installation and use INDEX DECLARATION CE OF CONFORMITY GENERAL WARNINGS SAFETY INSTRUCTIONS FIRST AID RULES GENERAL SAFETY RULES PACKAGING PACKAGE CONTENTS / PRE-INSPECTION MACHINE AND MANUFACTURER IDENTIFICATION TECHNICAL FEATURES OVERVIEW INSTALLATION 10.1 FIXING TO THE WALL 10.3 WIRE CONNECTION 10.4 LED &...
- Page 35 - Low-Voltage Directive 2014/35/EU - RED Directive 2014/53/EU The documentation is at the disposal of the competent authority following motivated request at Piusi S.p.A. or following request sent to the email address: doc_tec@piusi.com. The person authorised to compile the technical file and draw up the declaration is Otto Varini as legal representative.
- Page 36 THIS MANUAL IS THE PROPERTY OF Piusi S.p.A. ANY REPRODUCTION, EVEN PARTIAL, IS FORBIDDEN. This manual belongs to Piusi S.p.A., which is the sole proprietor of all rights indicated by applicable laws, including, by way of example, laws on copyrights.
- Page 37 The Device is not an anti-explosive type The device must be installed outside areas at risk of explosion Do not install in areas where flammable vapors may be present 37 /64 /124 This manual is the property of PIUSI S.p.A. Any reproduction, even partial, is forbidden.
- Page 38 Installation and use DANGER The device must be installed under a roof or in any environment, protected from rain ATTENTION The device must be mounted vertically with the grommets facing down DANGER Installation operations are carried out with the box open and accessible electrical contacts.
- Page 39 Do not use equipment which you suspect might not be safe. PW antenna Module PW-WiFi Instructions manual Mounting bracket 39 /64 /124 This manual is the property of PIUSI S.p.A. Any reproduction, even partial, is forbidden.
- Page 40 Installation and use MACHINE AND MANUFACTURER IDENTIFICATION Introduction Pw-wifi is provided with several identification plates applied on the outer shell, with the following information: model; lot number / Production year; technical data; ATTENTION Before installing, always make sure the model is correct and suitable for the available power supply (Voltage/Frequency.) Make sure that the plate does not deteriorate or become detached over time.
- Page 41 OVERVIEW Introduction Welcome to PW-WiFi – the new solution which allows you to connect Piusi devices to your WiFi network. The product is composed of two different device - an electronic board which convert the signal from RS485 to LAN.
- Page 42 The use of accessories that are unsuitable and were not provided with the system is strictly prohibited. Piusi S.p.A. accepts no responsibility for dam- age to persons, property or the environment caused by failure to comply with this requirement.
- Page 43 10.2 INSTALLATION NOTES FOREWORD The included PW WI-FI antenna is a panel antenna that has privileged com- munication directions and other directions to avoid. Radiation diagrams are provided on the plans: This means that before fixing the antenna it is necessary to consider its directivity and make sure that the transmitter and receiver are aligned as much as possible, to allow the system to perform at its best.
- Page 44 Installation and use 10.3 WIRE CONNECTION FOREWORD Removing the frontal case it is possible to make all the necessary wiring . To do a proper operation, perform the following steps: Fix the the RS485 twisted cable as shown below. Fix the three power supply cable as shown below - Input 100-240 Vac 50/60 44 /64 M0271...
- Page 45 Fix the power cord with the clip provided so that any separation of the cable from the terminals does not lead to dangerous voltages other cables connected to the outside. 45 /64 /124 This manual is the property of PIUSI S.p.A. Any reproduction, even partial, is forbidden.
- Page 46 Installation and use 10.4 LED & CONNECTORS RESET button to restore factory defaults Ethernet connector RS485 connector Power 100/240Vac 50/60 Hz connector LED FLASHING EQUIVALENCE No traffic from RS485 SLOW Traffic from RS485 FLASH Customized IP (different from DHCP Disabled, 192.168.2.10) DHCP Enabled SLOW...
- Page 47 ROUTER/SWITCH PRINTING UNIT ACCESS The PW-WiFi configuration is a two step procedure: The Configuration of the 485-LAN converter The Configuration of the Antenna. 47 /64 /124 This manual is the property of PIUSI S.p.A. Any reproduction, even partial, is forbidden.
- Page 48 Plug-in in the Ethernet cable To access the 485-LAN coverter Configuration Interface, perform the following steps Make sure that your host machine is connected via Ethernet to the Piusi device Configure the Ethernet adapter on your computer with a static IP address on the 192.168.2.x subnet (for example, IP address: 192.168.2.150 and subnet mask:...
- Page 49 RS485 The “RS485 Tab” configures the RS485 conversion system, it is possibile to choose a Piusi product or to set the parameters manually. 49 /64 /124 This manual is the property of PIUSI S.p.A. Any reproduction, even partial, is forbidden.
- Page 50 Installation and use 11.2 NETWORK TAB The Network tab allows to configure TCP/IPv4 parameters. 1) Case DHCP Client 2) Case Static IP ITEM/ SETTING DEVICE NAME Specifies the host name MANAGE- You chooses the formality of management of the IP of the device among 2 options: MENT IP AD- - DHCP Client that it means that in the lan network exist a DHCP server that assigns a dy- DRESS...
- Page 51 Manually enter the RS485 parameters. CONFIGURA- TION CUSTOM This is a four-step procedure: PRODUCT Choose the Baudrate Choose Databit Choose the Parity Choose Bit Stop 51 /64 /124 This manual is the property of PIUSI S.p.A. Any reproduction, even partial, is forbidden.
- Page 52 To proceed with the configuration of the WiFi module, follow these steps: Download the ‘PW-CONFIGURATOR’ software from https://wswebssm. piusi.com/pwconfigurator/setup.exe. Ensure that the wireless card on your PC is set to receive an IP automatically (DHCP). Connect to the “PW-WIFI” wireless network.
- Page 53 After connecting, the Terms of Use for the radio device will appear. Select the appropriate country and read the terms of use carefully. To start configuration, accept the terms and press the ‘BEGIN’ button. 53 /64 /124 This manual is the property of PIUSI S.p.A. Any reproduction, even partial, is forbidden.
- Page 54 Installation and use 12.2 INITIAL CONFIGURATION After completing initial access to the PW-WIFI, the type of device for con- nection must be selected. 54 /64 M0271...
- Page 55 Connection to PW-STATION – the PW-WIFI will connect directly to a PW-STATION (i.e. a network created with PIUSI devices). Ensure that you have access and have preconfigured the PW-STATION before proceeding with PW-WIFI configuration. Connection to third-party ROUTER – the PW-WIFI will connect to a third- party router.
- Page 56 Installation and use To configure the device, indicate: • Type of IP address assignment: Dynamic (DHCP): the IP address of the PW-WIFI will be assigned automati- cally by a DHCP server already present within the network. If the PW- WIFI is not assigned an IP address automatically, it will operate using the fallback IP address indicated.
- Page 57 PW Wi - Fi translated from italian 57 /64 /124 This manual is the property of PIUSI S.p.A. Any reproduction, even partial, is forbidden.
- Page 58 Installation and use 12.3 RESET PROCEDURE If the device is reset (using the reset button), there is a reset procedure that must be carried out using the ‘PW-CONFIGURATOR’ software. The proce- dure reprograms the PW-WIFI, restoring it to the factory configuration. Follow the steps listed below to start the procedure: Connect the ‘PW-WIFI’...
- Page 59 To recover the information necessary to restore the device’s identity correctly, the software must connect to the PIUSI servers, and thus the Internet. Press the button to recover the information necessary. 59 /64 /124 This manual is the property of PIUSI S.p.A. Any reproduction, even partial, is forbidden.
- Page 60 If not, an error message will be displayed: If the information on the type of antenna is retrieved correctly from the PIUSI servers, it is possible to proceed with reconfiguring and restoring the device. Proceed by pressing the ‘CONFIGURE’ button.
- Page 61 This option should remain enabled so it forces the transmit output power to com- TO EIRP LIMIT ply with the regulations of the selected country, accordingly with the settings in the Antenna Gain field. 61 /64 /124 This manual is the property of PIUSI S.p.A. Any reproduction, even partial, is forbidden.
- Page 62 Installation and use DEMOLITION AND DISPOSAL Foreword If the system needs to be disposed, the parts which make it up must be delivered to companies that specialize in the recycling and disposal of industrial waste and, in particular: Disposing of The packaging consists of biodegradable cardboard which can be delivered to packing materi- companies for normal recycling of cellulose.
- Page 64 © PIUSI S.p.A. IT. Il presente documento è stato redatto con la massima attenzione circa la precisione dei dati in esso contenuti. Tuttavia, PIUSI S.p.A. non si assume responsabilità per eventuali errori ed omissioni. EN. This document has been drawn upwith the greatest attention to precision and accuracy of all data herein contained.
Need help?
Do you have a question about the PW Wi-Fi and is the answer not in the manual?
Questions and answers