
Related Manuals for Elite MS1220


Summary of Contents for Elite MS1220
- Page 1 Manual de usuario Por favor lea cuidadosamente este manual, contiene información importante de seguridad. ACOLILLADORA DE 12” MS1220 www.ELITETOOLS.co Keep Working...
- Page 2 CONTENIDO SEGURIDAD ESPECIFICACIONES PARTES OPERACÍON MANTENIMIENTO SOLUCIÓN DE PROBLEMAS GARANTÍA www.ELITETOOLS.co Keep Working...
- Page 3 SÍMBOLOS DE ADVERTENCIA Y DEFINICIONES Éste es el símbolo de alerta de seguridad. Se utiliza para alertarlo sobre posibles riesgos de lesiones personales. Obedezca todos los mensajes de seguridad que siguen a este símbolo para evitar posibles lesiones o la muerte. Indica una situación peligrosa que, si no se evita, PELIGRO provocará...
- Page 4 Tabla A: MEDIDOR DE ALAMBRE MÍNIMO RECOMENDADO PARA CABLES DE EXTENSIÓN (120 VOLTIOS) CABLE DE EXTENSIÓN PLACA DE NOMBRE LONGITUD AMPERIOS (a plena carga) No usar 9. USE EL CABLE DE EXTENSIÓN APROPIADO. Asegúrese de que su cable de extensión esté en buenas condiciones.
- Page 5 17. USE ACCESORIOS RECOMENDADOS. Consulte el manual del propietario para obtener los acce- sorios recomendados. El uso de accesorios inadecuados puede causar riesgo de lesiones a las perso- nas. 18. NUNCA SE PARE EN LA HERRAMIENTA. Se pueden producir lesiones graves si la herramienta se vuelca o si la herramienta de corte se pone en contacto involuntariamente.
- Page 6 5. Nunca se acerque al disco de sierra. 6. Apague la herramienta y espere a que el disco de sierra se detenga antes de mover la pieza de trabajo o cambiar la configuración. 7. Desconecte la energía antes de cambiar el disco o dar servicio. 8.
- Page 7 26. Mantenga etiquetas y placas de identificación en la herramienta. Estos llevan información de seguridad importante. Si no se puede leer o falta, comuníquese con Elite Tools para obtener un reemplazo. 27. Evite arranques involuntarios. Prepárese para comenzar a trabajar antes de encender la herramienta.
- Page 8 Esta herramienta vibra durante el uso. La exposición repetida o prolongada a la vibración puede causar lesiones físicas temporales o permanentes, particularmente en las manos, brazos y hombros. Para redu- cir el riesgo de lesiones relacionadas con la vibración: 1. Cualquier persona que use herramientas vibratorias regularmente o durante un período prolongado primero debe ser examinada por un médico y luego realizarse chequeos médicos periódicos para ase- gurarse de que los problemas médicos no sean causados o empeorados por el uso.
- Page 9 Precaución: El uso de controles o ajustes o la realización de procedimientos distintos a los especificados en este documento pueden provocar una exposición peligrosa a la radiación. Precaución: El uso de instrumentos ópticos con este producto aumentará el riesgo para los ojos. Configuración - Antes de usar: Lea toda la sección INFORMACIÓN IMPORTANTE DE SEGURIDAD al comienzo de este manual, incluido todo el texto debajo de los subtítulos antes de configurar o usar este producto.
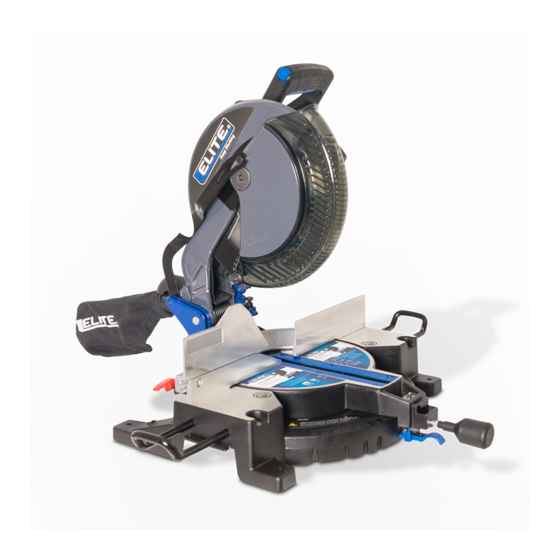
- Page 10 Partes Gatillo de bloqueo Gatillo de bloqueo Gatillo Guardas inferior Bolsa recolectora de polvo perilla de bloqueo deslizante Disco de sierra Indicador ángulo de bisel Guía Abrazadera Extensión Perilla de inglete Escala Tablero Cerradura de inglete de mesa de inglete de corte www.ELITETOOLS.co Keep Working...
- Page 11 Bloqueo de eje Bloqueo cabezal Descripción de funciones seleccionadas Bloqueo de cabezal: Operación de guardia: Cuando se baja la manija, los protectores inferiores se elevan automáticamente. Cuando se levanta la manija, los protectores inferiores vuelven a su posi- ción de seguridad. Mantenga las manos alejadas de la cuchilla cuando baje la manija.
- Page 12 Instrucciones de operación Lea toda la sección INFORMACIÓN IMPORTANTE DE SEGURIDAD al comienzo de este manual, incluido todo el texto debajo de los subtítulos antes de configurar o usar este producto. CONFIGURACIÓN DE HERRAMIENTAS ADVERTENCIA PARA EVITAR LESIONES GRAVES DE LA OPERACIÓN ACCIDENTAL: Apague el interruptor de encendido de la herramienta y desconecte la herramienta de su toma de corriente eléctrica antes de realizar cualquier procedimiento en esta sección.
- Page 13 6. Retire el perno del eje * (168) y la brida externa (167), consulte la Figura B. * IMPORTANTE: el perno del eje tiene una rosca para zurdos y se quita girándolo en SENTIDO HORA- RIO. Nota: Asegúrese de que la brida interior (165) permanezca en su lugar en el eje. FIGURA B 7.
- Page 14 2. Cuando se instala correctamente, la cara superior de las extensiones de la mesa está nivelada con la mesa y proporciona una superficie de soporte más amplia para la pieza de trabajo. 3. Apoye la pieza de trabajo para que quede nivelada con la mesa, y para que después del corte se hagan las piezas cortadas No caerá.
- Page 15 Perilla de bloqueo de bisel Indicador de bisel FIGURA C 1. Afloje la perilla de bloqueo de bisel en la parte posterior de la sierra. 2. Mueva el conjunto de la cuchilla al ángulo deseado. Lea el ángulo en el indicador de bisel. 3.
- Page 16 Usando el tope de profundidad Si se desea un corte con ranuras o rebabas que no atraviese la pieza de trabajo, use el Perno de detención de profundidad para controlar la profundidad del corte. ¡ADVERTENCIA! Solo ajuste el perno delantero. El perno trasero se usa para evitar que la cuchilla corte la mesa durante el corte normal.
- Page 17 Instrucciones generales de operación ¡PELIGRO! LAS SIERRAS DE INGLETE PUEDEN AMPUTAR RÁPIDAMENTE LOS DEDOS SI SE USAN DE FORMA INCORRECTA. Mantenga las manos bien alejadas del área de corte. 1. Desbloquee el bloqueo de la cabeza, consulte la página 9. 2.
- Page 18 Limpieza, mantenimiento y lubricación 1. ANTES DE CADA USO, inspeccione el estado general de la herramienta. Comprobar: • Soporte suelto, • desalineación o atascamiento de partes móviles, • partes agrietadas o rotas, • cableado eléctrico dañado, y • cualquier otra condición que pueda afectar su funcionamiento seguro. 2.
- Page 19 Calibración del indicador de la mesa de ingletes Después de verificar o ajustar la guía para confirmar que está a 90º del disco, verifique la precisión del indicador de ángulo de la mesa de ingletes. 1. Afloje el tornillo que sostiene el indicador de ángulo en su lugar. 2.
-
Page 20: Solución De Problemas
Solución de problemas Problema Posible causa Posible solución La herramienta no 1. No hay energía en el tomacorriente. 1. Verifique la energía en el tomacorriente. se inicia 2. Verifique que el cable esté enchufado. 2. Cable no conectado. La herramienta 1. -
Page 21: Consideraciones Especiales
TIEMPOS DE GARANTÍA Si este producto Elite falla debido a un defecto de material o de fabricación dentro del plazo de un año a partir de la fecha de compra, devuélvalo a cualquier tienda de distribución autorizada Elite, Centros de Servicio Corporativo, Autorizado u otro punto de venta Elite para que sea reparado gratuitamente (o reemplazado si la reparación resulta imposible). - Page 22 User manual Please read this manual carefully, contains important safety information. 12" COMPOUND MITER SAW MS1220 www.ELITETOOLS.co Keep Working...
- Page 23 CONTENT SAFETY SPECIFICATIONS PARTS OPERATION MAINTENANCE TROUBLESHOOTING WARRANTY www.ELITETOOLS.co Keep Working...
- Page 24 General Tool Safety Warnings WARNING Read all safety warnings and instructions. Failure to follow the warnings and instructions may result in electric shock, fire and/or serious injury. Save all warnings and instructions for future reference. 1. KEEP GUARDS IN PLACE and in working order. 2.
- Page 25 9. USE PROPER EXTENSION CORD. Make sure your extension cord is in good condition. When using an extension cord, be sure to use one heavy enough to carry the current your product will draw. An under- sized cord will cause a drop in line voltage resulting in loss of power and overheating. Table A shows the correct size to use depending on cord length and nameplate ampere rating.
- Page 26 17. USE RECOMMENDED ACCESSORIES. Consult the owner’s manual for recommended acces- sories. The use of improper accessories may cause risk of injury to persons. 18. NEVER STAND ON TOOL. Serious injury could occur if the tool is tipped or if the cutting tool is unin- tentionally contacted.
- Page 27 5. Never reach around saw blade. 6. Turn off tool and wait for saw blade to stop before moving workpiece or changing settings. 7. Disconnect power before changing blade or servicing. 8. To reduce risk of injury, return carriage to the full rear position after each crosscut operation. 9.
- Page 28 25. Industrial applications must follow OSHA guidelines. 26. Maintain labels and nameplates on the tool. These carry important safety information. If unreadable or missing, contact Elite Tools for a replacement. 27. Avoid unintentional starting. Prepare to begin work before turning on the tool.
- Page 29 This tool vibrates during use. Repeated or long-term exposure to vibration may cause temporary or permanent physical injury, particularly to the hands, arms and shoulders. To reduce the risk of vibra- tion-related injury: 1. Anyone using vibrating tools regularly or for an extended period should first be examined by a doctor and then have regular medical check-ups to ensure medical problems are not being caused or worsened from use.
- Page 30 Caution: Use of controls or adjustments or performance of procedures other than those specified herein may result in hazardous radiation exposure. Caution: The use of optical instruments with this product will increase eye hazard. Setup - Before Use: Read the ENTIRE IMPORTANT SAFETY INFORMATION section at the beginning of this manual inclu- ding all text under subheadings therein before set up or use of this product.
- Page 31 Functions www.ELITETOOLS.co Keep Working...
- Page 32 Description of Selected Functions Head Lock-down: Guard operation: When the Handle is lowered, the Lower Guards raise automatically. When the Handle is raised the Lower Guards return to their safety position. Keep hands clear of the Blade when the Handle is lowe- red.
- Page 33 Operating Instructions Read the ENTIRE IMPORTANT SAFETY INFORMATION section at the beginning of this manual inclu- ding all text under subheadings therein before set up or use of this product. TOOL SET UP WARNING TO PREVENT SERIOUS INJURY FROM ACCIDENTAL OPERATION: Turn the Power Switch of the tool off and unplug the tool from its electrical outlet before performing any procedure in this section.
- Page 34 6. Remove the Spindle Bolt* (168) and Outer Flange (167), see Figure B. *IMPORTANT: The Spindle Bolt has a left-handed thread and removes by turning CLOCKWISE. Note: Make sure the Inner Flange (165) stays in place on the Spindle. 7. Remove the Blade (166) and replace with a new Blade. Make sure that the Blade's rotation arrow points in the same direction as the rotation arrow on the Upper Guard (94).
- Page 35 2. When properly installed, the upper face of the Table Extensions are level with the Table, and provide a wider support surface for the workpiece. 3. Support the workpiece to be level with the table, and so that after the cut is made the cut off pieces will not fall.
- Page 36 1. Loosen the Bevel Lock Knob at the rear of the saw. 2. Move the blade assembly to the desired angle. Read the angle on the Bevel Indicator. 3. Lock the blade assembly into position by rotating the Bevel Lock Knob clockwise. Tighten firmly but do not over-tighten.
- Page 37 Using the Depth Stop If a kerfing or rabbet cut which does not cut through the workpiece is desired, use the Depth Stop Bolt to control the depth of the cut. WARNING! Only adjust the front Bolt. The rear Bolt is used to prevent the Blade from cutting the table during normal cutting.
- Page 38 General Operating Instructions DANGER! MITER SAWS CAN QUICKLY AMPUTATE FINGERS IF MISUSED. Keep hands well clear of cutting area. 1. Unlock the Head Lock-down, see page 9. 2. Make sure all adjustment knobs are tight (Miter Knob, Bevel Lock Knob, Fence and Table Extension Knobs).
- Page 39 Cleaning, Maintenance, and Lubrication 1. BEFORE EACH USE, inspect the general condition of the tool. Check for: • loose hardware, • misalignment or binding of moving parts, • cracked or broken parts, • damaged electrical wiring, and • any other condition that may affect its safe operation.
- Page 40 Calibrating the Miter Table Indicator After checking or adjusting the fence to confirm that it is at 90º to the Blade, check the accuracy of the Miter Table Angle Indicator. 1. Loosen the screw holding the Angle Indicator in place. 2.
- Page 41 www.ELITETOOLS.co Keep Working...
-
Page 42: Special Considerations
WARRANTY TIMES If this Elite product fails due to a material or manufacturing defect within one year from the date of purchase, return it to any authorized Elite distribution store, Corporate Service Centers, Authorized or other Elite point of sale for It is repaired free of charge (or replaced if repair is impossible). - Page 43 www.ELITETOOLS.co Keep Working...
Need help?
Do you have a question about the MS1220 and is the answer not in the manual?
Questions and answers