Table of Contents
Advertisement
Quick Links
Advertisement
Table of Contents

Related Manuals for pizzi instruments PNT-G2

Summary of Contents for pizzi instruments PNT-G2
- Page 1 Instruments and Systems for Geotechnical and Structural Monitoring PNT – G2 PENETROMETER User Manual Pizzi Instruments S.r.l. • Via del Fornaccio n°46, 50012 Bagno a Ripoli (FI) Italy • Tel. +39 0556810722 Fax . + 39 0556584923 - email: info@pizzi-instruments.it • web: www.pizzi-instruments.it...
- Page 2 Pizzi Instruments S.r.l. is not liable for any damage or loss caused to other equipment or person, whether direct, indirect, incidental, special or consequential which the buyer may experience as a result of the installation or use of the product.
-
Page 3: Table Of Contents
3.1 Damage during shipment ........................6 Storage ..............................6 Description............................6 Components ............................7 Use on the mortar ..........................7 Installation of the “PNT-G2” APP ......................7 APP configuration ..........................9 Preparation of the PNT-G_2......................13 Taking measurements ........................14 5.6.1 Manual Mode ..........................15 5.6.2... - Page 4 Use of this manual This manual must be considered for the installation and use of the Penetrometer model PNT-G_2. Danger and safety Warning for the unpacking of the material: Be careful when handling the packaging to avoid damage to property and / or people. ...
-
Page 5: Simbols And Abbreviations
Please check if all received items correspond with the packing list and your order confirmation. In case of discrepancy please contact Pizzi Instruments S.r.l. or the local representative immediately. All instruments are carefully checked both electrically and mechanically, before leaving the factory. -
Page 6: Damage During Shipment
Report the damage to your shipper immediately Inform Pizzi Instruments or your local representative immediately Keep all packaging and shipping documents NOTE: All shipments must immediately opened upon delivery and the content must be checked, in quality and quantity, on the base of the packing list sent together with the goods. -
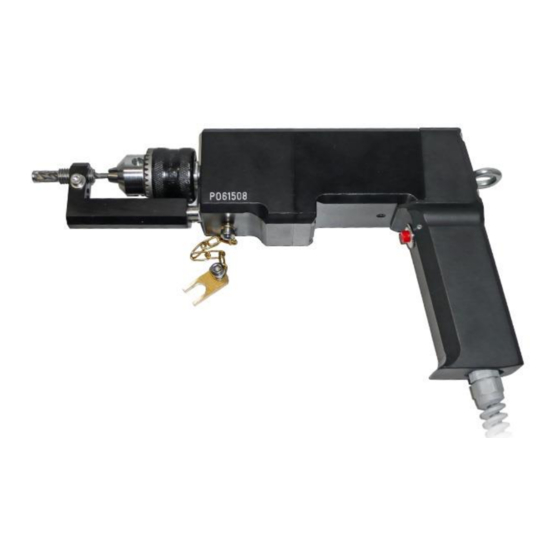
Page 7: Components
5.1 Components The penetrometer will be supplied with the following accessories: - smartphone with the APP “PNT-G2” already installed - penetrometer with 1,5 meters of cable with connector - n°2 batteries - battery charger with connector - smarthpone armband 5.2 Use on the mortar... - Page 8 At the end click on open to go directly to the software or done to finish the installation without opening the Alternatively, you go to the list of applications installed on the smartphone and click on the application PNT-G2 User Manual / Penetrometer PNT - G - 2 REV01 / 05.04.2019...
-
Page 9: App Configuration
The success of the operation will be evidenced by the signal search symbol that will disappear from the home screen of the SW and by the appearance under the writing PNT-G2 of the name of the Penetrometrer. User Manual / Penetrometer PNT - G - 2 REV01 / 05.04.2019... - Page 10 Now you configure the work system by clicking on the menu button (keep pressed for about 2 seconds). First you select if you want to work in manual or automatic mode. User Manual / Penetrometer PNT - G - 2 REV01 / 05.04.2019 Pag.
- Page 11 For each working mode it will be possible to configure some parameters: - Minimum perforation number: function settable only for automatic mode. These are the perforations required to be performed during a test in automatic mode - Energy threshold change bit: limit beyond which the tip of the penetrometer is changed, as it is probably - Percentage gap: function settable only in automatic mode.
- Page 12 Write the name of the plant It is possible to create multiple plants and select them using the MENU> Plant Selection button User Manual / Penetrometer PNT - G - 2 REV01 / 05.04.2019 Pag. 12/26...
-
Page 13: Preparation Of The Pnt-G_2
5.5 Preparation of the PNT-G_2 Once the software part has been configured, you can configure the mechanical part, that refers to the correct positioning of the penetrometer tip. The instrument must make a 5 mm hole For this reason the instrument is equipped with the following accessories: - calibrated thickness of 5 mm - stainless steel bushing necessary to define the beat-up point of the tip - spindle to tighten the tip... -
Page 14: Taking Measurements
-You use one hand to bring into contact the black L-shaped carriage with the calibrated thickness - With the other hand you slide the tip of the penetrometer up to the stop on the stainless steel bushing. Once the tip is brought to the stop, still with the same hand, tighten the tip with the spindle. Now first you lay the spindle then you leave the black L-shaped carriage and, at the end, you remove the calibrated thickness. -
Page 15: Manual Mode
5.6.1 Manual Mode Position the drill in the direction of hole execution at a distance of a few cm from the specimen. As soon as the penetrometer start button is pressed, the cell indicating the measurement in progress will start counting and the writing "START CALIB" will appear. In this phase, the penetrometer management readout unit, incorporated in the instrument, will eliminate the starting power necessary for the instrument to start. - Page 16 The end of the calibration phase will be showed by an acoustic signal. Now you can start the perforation up to the end of the stroke (5mm). The end of the perforation phase will be showed by another acoustic signal. In all these steps the operator must never stop operation of the instrument and during the calibration phases the penetrometer must be in the same position as the perforation Summarizing in a schematic way:...
- Page 17 At the end of the second measurement the following screen will appear : The cell "Measurement Number" indicates the measure number of the specific Place The cell "Average in Place" automatically displays the average of the values of the taken measurements To the left of the “manual measure values”, there are two buttons : - Roll: allows you to scroll and view the measurements performed by the operator - Clear: allows you to cancel the measurement performed by the operator...
-
Page 18: Automatic Mode
You can proceed taking measures up to the end of the test phase. Bottom right of the “manual measure values” there are three buttons : - Voice: allows you to save voice files for the work place - Picture: allows you to take pictures and save them for the work place - Editor: allows to create test files for the work place 5.6.2 Automatic Mode After having selected the automatic mode from the configuration menu and having set the necessary... - Page 19 The average will be calculated on the total of the performed measurements (by default in the number of 15), excluding from the two measurements with higher and lower values . The test validation will be done by verifying if at least 6 measurements, among those performed, fall within the validation value +/- 25% (or other percentage gap value set in the configuration menu).
-
Page 20: Data Backup
During the acquisition in the internal memory of the smartphone a work folder with the name of the Plant will be generated and continuously updated The folder is located in the directory / Storage / Emulated / PNT-G2 User Manual / Penetrometer PNT - G - 2 REV01 / 05.04.2019... - Page 21 Inside the work folder (name of the Plant) you will find the related Place Inside the “Place Folder “ you may find : - audio file - pictures - text file N.B. Measures cannot be displayed until you won’t conclude /save a place User Manual / Penetrometer PNT - G - 2 REV01 / 05.04.2019 Pag.
- Page 22 Clicking OK the place will be saved and on APP, in the cell Place / date, then a subsequent number of places will be displayed. Now if we return to the internal directory of the smartphone / Storage / Emulated / PNT-G2, in the folder Place will be present a .csv file, this file will contain all the taken measurements.
- Page 23 N.B.: This application allow to exit from the same by means of two buttons : l’applicazione permette di uscire dalla stessa per mezzo di 2 tasti: - Button Home of the smartphone (central button) - Back function button Through the home button the application remains open and the data is not saved but the possibility to access the other folders / functions of the smartphone is given.
-
Page 24: Data Process
Closing the application by means of the back button in addition to being saved the data in place will also be created a zip file identical to the Plant Folder (with the same name) containing all the information of the individual places. - Page 25 Grading curve Calibration curve for mortar User Manual / Penetrometer PNT - G - 2 REV01 / 05.04.2019 Pag. 25/26...
-
Page 26: Technical Assistance
The battery is at Pb of 6V and 4Ah and it is rechargeable with the provided battery charger: the time of charge is 1 hour. On the front panel of the app PNT-G2 you can see a value about the state of charge of the battery. User Manual / Penetrometer PNT - G - 2 REV01 / 05.04.2019...
Need help?
Do you have a question about the PNT-G2 and is the answer not in the manual?
Questions and answers