Table of Contents
Advertisement
Advertisement
Table of Contents

Related Manuals for Sunbeam F1


Summary of Contents for Sunbeam F1
- Page 1 User Manual Sunbeam F1...
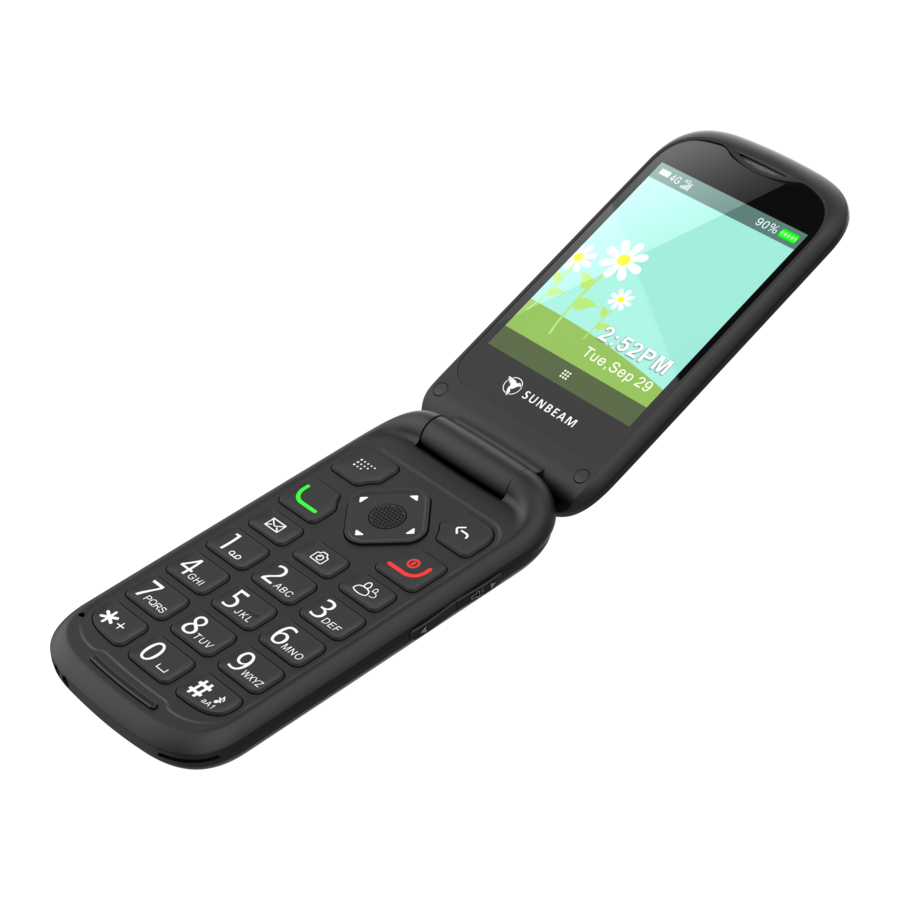
- Page 3 Physical Description 1. Earpiece 3. Menu key 2. Directional keys with center Select key 5. Messages 4. Call key 7. Voice mail 6. Camera/Calculator key 9. + Volume key/Flashlight key 8. Back key 11. - Volume key 10. End call key/Power on/Power off 13.
-
Page 4: Table Of Contents
User Manual Contents Unboxing Instructions………..………… 8 Power Up the Phone…………………..9 Charge the Phone………………………….9 Home Screen……………………………….11 Setting up Shortcuts…………………….13 Entering Text ………………...………….. 14 Voice to Text input ………………………15 Phone Volume Controls……………..17 Select Ring Tones………………..….……18 Voicemail……………………………………..18 Visual Voicemail……………………………19 Call Log…………………………………..….…20 Messaging……………………………….…...24 Recording a Voice Message……..……27 Alarm Clock………………..………….……..27 Calendar………………………………..……..29 Voice Reminder……………….……….…..30... - Page 5 Calculator……………………………………31 Notes………………………………………..32 Flashlight…………………………………….33 Camera………………………..……………..33 Gallery…………………………..……………34 Sound Recorder…………..……………..35 Music………………………….….…………..36 Navigation…………………..………..……36 Weather…………………………….…...….39 Sync…………………………………………...40 Wallpaper…………………………….…….41 SOS……………………………………….……42 Emergency Alerts………………..……43 Phone Settings……………….…..….….46 Call Settings…………………….…...……47 Audio Settings……………….…...……..47 Connectivity……………………..……..47 Safety Information………….………...48 FCC/IC Statement………..….…….…..52...
- Page 6 Installation IMPORTANT Turn off the phone and disconnect the charger before removing the battery cover. Installing the SIM card 1. Insert the SIM Card into the SIM card slot. (Make sure the SIM card’s contacts are facing inwards.) 2. Always turn off the phone before removing the SIM card.
- Page 8 Installing the battery Remove the battery cover, insert the battery into the battery compartment, and replace the battery cover.
-
Page 9: Unboxing Instructions
Sunbeam F1 User Guide Welcome! Thank you for purchasing a Sunbeam Wireless cellular phone. We trust that this • device will provide you with reliable service for years to come. To make the best use of your device, we recommend keeping this manual handy as you get acquainted with your phone. -
Page 10: Power Up The Phone
Using the same procedure will power down your device off. To charge the device: • The Sunbeam phone is supplied with a charging base. To use the charging base, insert the small end of the USB cable charger into the port located on the back of... - Page 11 the charging base and connect the larger end of the USB cable to a suitable power supply. Simply place the device in the charging base to begin charging. A flashing red light on the front of the device indicates that the device is being •...
-
Page 12: Home Screen
• Pressing the [Back] key will move to the previous screen. • Pressing the [End] key from any menu in the phone will return the user to the Home screen and end any current calls. • In any menu with a numbered prefix, pressing that number on your keypad will directly perform that function without requiring you to scroll to and select it. - Page 13 The Home Screen also provides a drop-down menu that is accessed by swiping • down from the top portion of the display. In models without touch screen capability, this action can be performed from the [Menu] key. This menu displays the phone carrier name, the current battery capacity and provides access to other functions such as Wi-Fi, Bluetooth, Do Not Disturb settings, Flashlight and Airplane Mode.
-
Page 14: Setting Up Shortcuts
Setting up Shortcuts: • The Sunbeam phone comes with several function shortcuts preset. Pressing the [directional arrow] keys allows the user to access these functions quickly. Pressing the [up arrow] displays the Alarm function. Pressing the [down arrow] displays the Calendar function. -
Page 15: Entering Text
Entering Text: These instructions are to help the user understand the keyboard functionality. It is possible to access these instructions from the Keyboard settings menu on the device. These instructions are applicable anywhere that text input could be needed. Mode Switching: To switch between input modes, press and hold the Star [*] key and choose the •... -
Page 16: Voice To Text Input
You can use the [Back] key to hide the on-screen QWERTY keyboard any time it is • showing. Capitalization: To change the capitalization in the T9 and Abc modes, press the Star [*] key. • Voice to Text input: • While entering text in any text box, the user may press and hold the Message key to dictate a message and have it transcribed to text. - Page 17 Space and Next keys: By default, when using T9 mode, the Zero [0] key inserts a space, and the Pound [#] • key selects the next word suggestion. It is possible to switch this function to match the functionality of a previous phone, if desired, by going to Keyboard settings. Enter new line: •...
-
Page 18: Phone Volume Controls
Emoji: Press and hold the Star [*] key and choose the Emoji option to insert emoji. • Phone Volume Controls: Volume controls for the device consist of two buttons located on the right-hand side of the handset. These controls only adjust the volume when the phone is open. The phone volume or the ring volume cannot be adjusted with the phone closed. -
Page 19: Select Ring Tones
Select Ring Tones: The Sunbeam phone comes with a variety of available ringtones. To select a ringtone, navigate to [Settings], [Audio settings], [Tones and volume], and scroll down to Phone ringtone. Pressing the [select] key will apply the selected ring tone. Use the [directional arrow] keys to navigate through the ringtone choices. -
Page 20: Visual Voicemail
Visual Voicemail: Open the Visual Voicemail list by pressing the [Call] key and then navigating to the right. And alternate way is to open the Main Menu and then choose “Voicemail” from the list. Select the desired voice mail message by using the [directional arrow] keys Press the [select] key to play the desired message. -
Page 21: Call Log
• Listen to received messages in any order. • Quickly scroll through received messages visually. Save, archive, or delete messages using the touchscreen. • Get a transcription of received messages. • Call log: The call log application stores a list of recent incoming, outgoing, and missed calls. Pressing the [menu] button while in the call log application provides the user with several options that relate to calls in the call log. - Page 22 Contacts: The contacts function allows users to store information in the device such as names, phone numbers, contact information and addresses. To start Contacts, select it from the Main Menu, or simply press the [contacts] key while on the Home Screen. Pressing the [menu] key allows the user to select from several options.
- Page 23 • Navigate to Contacts. • Select [new contact] from the [menu] option. Follow prompts to add details (name, phone number, ringtone) • Select [Save Contact] to save numbers displayed in Call logs. Numbers • manually entered into the phone can also be saved to Contacts. •...
- Page 24 When a contact is highlighted in the phone’s contacts list, the following • options can be performed: Return call, Send message, View, Edit, Select to delete, and Blocked list management. When in a specific contact, the following options can be performed by selecting [menu.]: Add to the Blocked list, Export and Import, Search for a saved contact.
-
Page 25: Messaging
Use the [directional arrow] keys to select the desired contact. The device can be programmed with up to 99 quick dial phone numbers. The [1] key is reserved for the voice mail message speed-dial. Speed dials numbers can be dialed or set by pressing and holding the desired speed dial key for 3 seconds while the associated number is displayed in Contacts, or by dialing two digits and then choosing “Set Speed Dial.”... - Page 26 You may also press the [message] key from the Home Screen to start the Messaging function. Or select a number in your Call Log, Contacts, or Voicemail list and press the [message] key to directly begin a message to that number. Enter the phone number(s) or name(s)of the recipient(s) in the [to] space manually.
- Page 27 Abc or T9 mode to continue entering alphabetical inputs. You may also directly enter digits while in Abc or T9 modes by pressing and holding the desired number key to insert the digit. Symbols provide punctuation and offer special characters. Symbols may be •...
-
Page 28: Recording A Voice Message
Recording a Voice Message: • To attach a voice recording to a text message, start a new text message. Press and hold the button on the rear back of the phone case for the duration of • the recording. Release the button to end recording. The voice message will automatically be •... - Page 29 set the alarm for a specific time, select [time] and use the up and down arrows to input the desired time. Press [save] to save the alarm. The [repeat] option allows the user to select specific days of the week that the alarm will sound.
-
Page 30: Calendar
Calendar • Today's day and date is shown on the display. The arrows located at the top of the display allow the user to move between future and past dates. Touch any date on the display to move to that date. To add a task or event to the calendar, select [options] [add task]. -
Page 31: Voice Reminder
Tasks or event are deleted from the calendar application by navigating to the date of the event, opening the event to be deleted and selecting [delete] from the [options] menu. Press [save] to save the task or event in the calendar application. Press [cancel] to return to the monthly calendar. -
Page 32: Calculator
recorded by selecting the [select] key and recording a voice reminder created by the user. The recording is both started and stopped using the [select] key . Other items such as due date, time, repeat options and reminder intervals can be user determined. Tools: •... -
Page 33: Notes
Pressing and holding the [#] will clear the equation and ready the calculator to perform a new calculation. • Notes The notes application is used to record information that the user may wish to access in the future. While in the notes application, press [options] to create a new note. -
Page 34: Camera
Multimedia: • Camera Selecting the camera application will allow the user to take a color picture. By default, the LED light on the front of the device will illuminate as soon as the camera is enabled. The LED will stay illuminated if the camera application remains open. -
Page 35: Gallery
also be accessed by pressing [gallery] in the multimedia section of the phone menu. • Gallery The gallery is accessed by pressing [gallery] in the multimedia section of the phone menu. Opening gallery from the main menu allows the user access to pictures stored by the device. -
Page 36: Sound Recorder
• Sound Recorder The sound recorder allows the user to record and store audio files within the device. Navigate to [sound recorder] and press the [menu button]. Press the small [red button] to begin the recording. Pressing the small [red button] again will pause the recording. -
Page 37: Music
• Music The music application allows the user to play music files stored in the phone. Music files can be downloaded from a computer to phone using a USB cable. To access the music application, press the [select] key from the Home screen and navigate to Music. - Page 38 the [select] key . The GPS will begin the process of detecting its current location. Selecting the [menu] key provides the user with a variety of options related to the use of the navigation application. Selecting the [go home] option will route the user to the location that has been saved as home.
- Page 39 time will be displayed. Press the [1] key or [start navigation] to begin routing to the selected destination. Selecting [favorites] from the navigation menu allows the user to “star” recent locations for future use. Once a location is discovered, it will be displayed in the [recent] section of the [favorites] screen.
-
Page 40: Weather
when cellular service is not available, select a navigation voice, and other options related to the navigational functionality. • Weather The weather application provides the user with weather information from either a current location or any selected location worldwide. From the main screen, use the [directional arrow] keys to navigate to the weather function. -
Page 41: Sync
with the weather function available. Please note that the [hourly] and [radar] options require a premium feature plan. All screens in the weather application can be navigated using the [directional arrow] keys and the [menu key] . The display in [radar] can be navigated with the [directional arrow] keys . -
Page 42: Wallpaper
System: Wallpaper • The [wallpaper] menu provides various preset backgrounds that can be used to replace the default background on the opening screen. Navigate to the desired background using the [directional arrow] keys and pressing [set] or the [select] key . -
Page 43: Sos
The SOS application provides a way to contact a preselected list of phone numbers if the user needs emergency help. Navigate to the SOS application using the [directional arrow] keys and press the [select] key . The [enable] box must be checked by the user to enable the SOS calling system. The user must then enter up to five phone numbers in the [emergency contacts] menu. -
Page 44: Emergency Alerts
• Emergency Alerts The Sunbeam device is equipped to receive Wireless Emergency Alerts. WEAs are short emergency messages from authorized federal, state, local, or public alerting authorities that can be broadcast from cell towers to any WEA- enabled mobile device in a locally targeted area. WEAs warn the public of an impending natural or human-made disaster. - Page 45 Types of Wireless Emergency Alerts: Presidential Alerts are a special class of alerts only sent during a national emergency. Imminent Threat Alerts include natural or human-made disasters, extreme weather, active shooters, and other threatening emergencies that are current or emerging. Public Safety Alerts contain information about a threat that may not be imminent or after an imminent threat has occurred.
- Page 46 Submit Bug Report If the device creates an error or has a system bug, the user can submit a bug report directly to Sunbeam Wireless. In the field labeled [bug description] briefly describe the problem while being as specific as possible. This information will help us in determining the source of the problem and making appropriate corrections.
-
Page 47: Phone Settings
Settings: 1. Phone Settings: Phone settings allows the user to make several changes to their device. Select Date and Time to adjust the display options. Screen brightness can be adjusted. Please note that increasing the screen brightness will deplete battery reserves more quickly. •... -
Page 48: Call Settings
2. Call Settings: Allows the user to toggle on/off the option to open the device to answer calls and • close device to end calls. 3. Audio Settings: • Allows the user can adjust the Media volume, Alarm volume, Ring volume. •... -
Page 49: Safety Information
enabled, the user can pair and communicate with other Bluetooth devices within range. Pairing between two Bluetooth devices is a one-time process. Once a pairing is created, the devices will continue to recognize their partnership and exchange information without having to re-enter a pairing code. Toggle on/off to enable or disable WLAN. - Page 50 test method. Most hearing aids on the market should be compatible with this phone but compatibility is not guaranteed. Please consult with your Doctor or hearing aid manufacturer before using a hearing aid with this product. Also make sure you position the phone near the hearing device when using the phone, so that it can achieve the best results.
- Page 51 Do not attempt to charge or power the device without the battery installed. Always power down the phone prior to removing the battery to avoid damaging the device. The Sunbeam F1 phone is not waterproof. Exposure to water will damage the • device and void the unit warranty.
- Page 52 Avoid using the phone in extreme temperatures. • • The phone contains sensitive electronic components. To prevent damage to internal and external phone components, do not throw, drop, or subject the device to rough handling. • Service and repair should be done professionals. Customer disassembly of the phone will void the product warranty.
-
Page 53: Fcc/Ic Statement
FCC Statement 15.19 Labeling requirements. This device complies with part 15 of the FCC Rules. Operation is subject to the following two conditions: (1) This device may not cause harmful interference, and (2) this device must accept any interference received, including interference that may cause undesired operation. - Page 54 device, pursuant to Part 15 of the FCC Rules. These limits are designed to provide reasonable protection against harmful interference in a residential installation. This equipment generates uses and can radiate radio frequency energy and, if not installed and used in accordance with the instructions, may cause harmful interference to radio communications.
- Page 55 This product meets the government's requirements for exposure to radio waves. The guidelines are based on standards that were developed by independent scientific organizations through periodic and thorough evaluation of scientific studies. The standards include a substantial safety margin designed to assure the safety of all persons regardless of age or health.
- Page 56 Body-worn Operation This device was tested for typical body-worn operations. To comply with RF exposure requirements, a minimum separation distance of 10mm for body worn must be maintained between the user’s body, including the antenna. Third-party belt-clips, holsters, and similar accessories used by this device should not contain any metallic components.
- Page 57 IC Statement This device complies with Industry Canada’s license-exempt RSSs. Operation is subject to the following two conditions: • This device may not cause interference; and This device must accept any interference, including interference that may cause • undesired operation of the device. Le présent appareil est conforme aux CNR d'Industrie Canada applicables aux appareils radio exempts de licence.
- Page 58 guidelines are based on standards that were developed by independent scientific organizations through periodic and thorough evaluation of scientific studies. The standards include a substantial safety margin designed to assure the safety of all persons regardless of age or health. C RF Exposure Information and Statement The SAR limit of USA (IC) is 1.6 W/kg averaged over one gram of tissue.
- Page 59 requirements, a minimum separation distance of 10mm for body worn must be maintained between the user’s body and the handset, including the antenna. Third-party belt-clips, holsters, and similar accessories used by this device should not contain any metallic components. Body-worn accessories that do not meet these requirements may not comply with RF exposure requirements and should be avoided.
- Page 60 For more information and how-to guides for your device and the services we offer, visit our website at sunbeamwireless.com Sunbeam Wireless support@sunbeamwireless.com 1.660.474.0070 sunbeamwireless.com...
Need help?
Do you have a question about the F1 and is the answer not in the manual?
Questions and answers