Advertisement
Quick Links
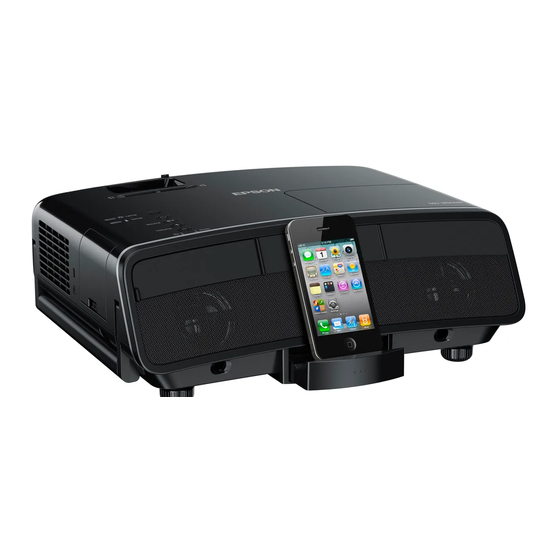
PowerLite® Presenter i/Presenter i +
Guia de instalação • Quick Setup
Antes de usar o projetor, certifi que-se de ler as instruções de segurança no Manual do usuário eletrônico.
Before using the projector, make sure you read the safety instructions in the on-screen User's Guide.
Observaçao:
Estas ilustrações mostram o projetor Presenter i+, mas as instruções são as mesmas para o projetor Presenter i, a não ser que seja
indicado o contrário.
Note:
These illustrations show the Presenter i+, but the instructions are the same for the Presenter i unless otherwise noted.
*412286800*
*412286800*
1
Instale o projetor • Set up the projector
Coloque o projetor em uma superfície estável e plana, a até 2 metros de uma tomada de parede aterrada. Consulte o Manual do
1
usuário eletrônico para determinar a qual distância da tela colocar o projetor, dependendo do tamanho da imagem projetada.
Place the projector on a sturdy, level surface within 6 feet (2 m) of a grounded electrical outlet. See the on-screen User's Guide to
determine how far to place the projector from the screen based on the size of the projected image.
Coloque duas pilhas AAA conforme mostrado.
2
Insert two AAA batteries as shown.
2
Ligue o projetor • Turn on the projector
1
2
O idioma padrão do sistema de menus é o Inglês. Para selecionar outro idioma, pressione o botão Menu no controle remoto.
4
Selecione Extended > Language, depois selecione o seu idioma e aperte o botão enter. Aperte o botão Menu para sair do
sistema de menus.
Observação:
Para desligar o projetor, aperte o botão
de piscar, você pode desconectar o projetor da tomada.
The default language of the menu system is English. To select another language, press the Menu button on the remote control.
Select Extended > Language, then select your language and press the enter button. Press the Menu button to exit the menu
system.
Note:
To shut down the projector, press the
power button and wait for it to beep twice. Once the
unplug the projector.
Conecte o seu iPod, iPhone ou iPad
3
Connect your iPod, iPhone, or iPad
Observação:
O termo "iPod" é usado para descrever um iPod, iPhone ou iPad, a não ser que seja indicado do contrário.
Note:
The term "iPod" is used to describe an iPod, iPhone, or iPad unless otherwise noted.
iPad somente:
Comece com o passo 1. Se não estiver usando um iPad, vá para o passo 4.
iPad only:
Start with step 1. If you are not using an iPad, skip to step 4.
Limpe o projetor para
Remova a parte traseira do suporte
1
2
remover poeira.
do iPad para expor o adesivo.
Clean the projector to
Remove the backing from the iPad
remove any dust.
bracket to expose the adhesive.
Aperte o Dock para ejetá-lo,
Remova qualquer cobertura de proteção do seu aparelho, depois faça a conexão
4
5
depois o solte.
conforme mostrado.
Eject the dock by pressing it
Remove any protective case from your device, then connect it as shown.
until it clicks, then release it.
Cuidado:
Para evitar danos, não faça muita pressão quando conectar o seu aparelho.
Observação:
Se o iPod não for reconhecido pelo projetor, remova-o do Dock e depois encaixe-o novamente. Certifi que-se de que a luz do Dock
está acesa.
Caution:
To avoid damage, do not apply too much pressure when connecting your device.
Note:
If the iPod is not recognized by the projector, remove it from the dock and reseat it. Make sure the Dock light is on.
Observação:
Quando usar o controle remoto, aponte-o para um
dos receptores do controle remoto no projetor, dentro das diretrizes
mostradas a baixo, ou para a tela de projeção.
Note:
When using the remote control, aim it at either of the
projector's remote control receivers within the guidelines shown
below, or at the projector screen.
20 ft (6 m)
20 ft (6 m)
3
de energia e aguarde até que ele emita dois bipes. Quando a luz
power light stops fl ashing, you can
Prenda o suporte do iPad conforme mostrado.
3
Observação:
Não remova o suporte depois que
estiver instalado.
Attach the iPad bracket, as shown.
Note:
Do not remove the bracket once it has been
installed.
Reproduza do seu iPod, iPhone ou iPad
4
Play from your iPod, iPhone, or iPad
Este menu aparece quando você conecta o seu dispositivo.
Observação:
Quando o seu iPod estiver conectado ao projetor, ele carregará sempre que o projetor estiver ligado, mesmo que o projetor esteja em
modo de espera.
This menu appears when you connect your device.
Note:
When your iPod is connected to the projector, it charges whenever the projector is on, including when the projector is in standby mode.
Reproduza vídeos ou música • Play videos or music
Pressione
ou
no controle remoto para selecionar Vídeos ou
1
Música, depois aperte
.
Press
or
on the remote control to select Videos or Music,
then press
.
Navegue os menus na tela até que o título de um vídeo ou música
2
que deseja tocar seja destacado, depois aperte
título selecionado.
Navigate the on-screen menus until the title of a video or song
you want to play is highlighted, then press
selected title.
Use o controle remoto para selecionar outras opções mostradas
3
à direita.
Observação:
O menu Vídeos só exibirá vídeos do seu aparelho que
tenham sido importados para o iTunes. Para reproduzir outros vídeos,
você precisa usar os controles no seu aparelho. Veja a seção "Resolução
de Problemas" para instruções.
Use the remote control to select other options shown at right.
Note:
The Videos menu will only play videos from your device that have
been imported into iTunes. To play other videos, you need to use the
controls on your device. See "Troubleshooting" for instructions.
Inicie um show de slides • Start a slideshow
Aperte o botão
no controle remoto para passar o controle para o seu aparelho. A tela projetada fi ca escura.
1
Press the
button on the remote control to switch control to your device. The projected screen turns black.
Use os controles no seu aparelho para encontrar fotos que deseja projetar e inicie um
2
show de slides.
Use the controls on your device to fi nd the photos you wish to project and start a
slideshow.
Veja o Manual do usuário eletrônico para detalhes adicionais.
See the on-screen User's Guide for additional details.
de energia parar
5
Ajuste a imagem • Adjust the image
Para levantar a imagem, pressione a alavanca de liberação do pé e levante a
1
frente do projetor. Solte o botão para travar o pé na posição desejada.
To raise the image, press the foot release button and lift the front of the
projector. Release the button to lock the foot in position.
Para ajustar uma inclinação horizontal, estenda ou retraia o pé
2
traseiro ajustável.
To adjust horizontal tilt, extend or retract the rear adjustable feet.
Gire o anel de foco para ajustar a nitidez da imagem.
3
Turn the focus ring to sharpen the image.
Presenter i+: Gire o anel de zoom para reduzir ou amentar o tamanho
4
da imagem.
Presenter i+: Turn the zoom ring to reduce or enlarge the image.
Presenter i: Para ajustar o zoom, aperte o botão Menu no controle
remoto e use os botões
,
Defi nição. Aperte o botão enter e selecione Zoom.
Presenter i: To ajust the zoom, press the Menu button on the remote
control and use the
,
,
Press the enter button and selct Zoom.
Se a sua imagem tiver uma aparência assim
5
projetor foi colocado para o lado da tela, em ângulo. Use o controle
deslizante de correção de efeito trapézio horizontal no projetor para
corrigi-la ou coloque o projetor no centro e diretamente de frente
para a tela.
If the image looks like
or
one side of the screen at an angle. Use the horizontal keystone slider
on the projector to correct it, or place the projector directly in front
of the center of the screen, facing the screen squarely.
Menu anterior
Previous menu
para tocar o
to start your
Menu anterior
Previous menu
Pausar/Retomar
Pause/Resume
Anterior/Voltar
Back/Rewind
,
ou
para navegar pelo ajuste
, or
buttons to navigate to Settings.
ou assim
, o
, you've placed the projector off to
Para cima
Scroll up
Selecionar/Próximo
Select/Next
Para baixo
Scroll down
Selecionar/Cancelar shuffl e
Select/Cancel shuffl e
Iniciar reprodução
Start playback
Selecionar/Cancelar
repetição
Select/Cancel repeat
Próximo/Avançar
Next/Fast-forward
Ajustar volume
Adjust volume
Advertisement

Subscribe to Our Youtube Channel
Related Manuals for Epson PowerLite Presenter i


Summary of Contents for Epson PowerLite Presenter i
- Page 1 Reproduza do seu iPod, iPhone ou iPad PowerLite® Presenter i/Presenter i + Play from your iPod, iPhone, or iPad Este menu aparece quando você conecta o seu dispositivo. Observação: Quando o seu iPod estiver conectado ao projetor, ele carregará sempre que o projetor estiver ligado, mesmo que o projetor esteja em Guia de instalação •...
- Page 2 EPSON e PowerLite são marcas registradas e EPSON Exceed Your Vision é uma logomarca registrada da Seiko Epson Corporation. Aviso geral: Outros nomes de produtos são aqui usados apenas com intuito de identificação e podem ser marcas comerciais dos seus respectivos donos. A Epson nega todo Silenciar A/V e qualquer direito sobre tais marcas.
Need help?
Do you have a question about the PowerLite Presenter i and is the answer not in the manual?
Questions and answers