Advertisement
Available languages
Available languages
Quick Links
WARNING Failure to read and follow the operator's
manual and all operating instructions
could result in death, serious injury, and/or
property damage.
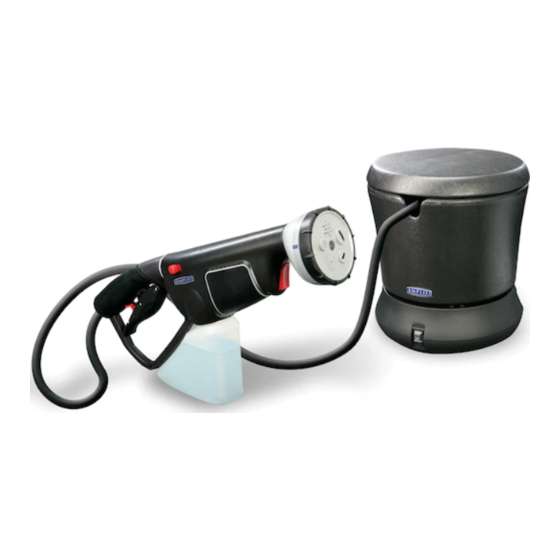
Items Included:
Operator's Manual (not shown)
Pump and Pot
Assembly (1)
Transport Handle (1)
You will need:
• Utility knife
• 4 AA batteries
• #2 Phillips screwdriver
• Amplifi brand heavy duty garden hose or equivalent with 400 psi minimum burst pressure, 75 ft. (22.86 m)
Unpack hose powering system
1.
Remove everything from carton except for the pump and hose pot
assembly.
2.
Open carton completely by cutting each corner from top to bottom to
remove the pump and hose pot assembly.
1
3.
Ensure you have all included items prior to assembly. If items are
damaged or missing, call 1-800-743-4115.
Transporting the hose powering
system
NOTICE Use handle for transporting unit over smooth level surfaces
only. For stairs and uneven surfaces, carry unit using assistance.
1. Remove cover from the Hose Powering System.
2. Slide the transport handle (A) down completely into the slot as
illustrated.
2
3. Reinstall the cover.
4. Lift handle to transfer the unit's weight to the transport wheels.
5. Using the handle, move the Hose Powering System to the desired
location.
3
6. Remove and store transport handle in hose pot.
Connect hoses and water supply
1. Attach supplied garden hose to water supply.
2. Before connecting supplied garden hose to water inlet, inspect inlet
screen (B).
4
NOTICE If inlet screen is damaged or missing, DO NOT use
Powering
System, call 1-800-743-4115.
3. Clean screen if it contains debris or have it replaced if damaged.
4. Run cold water through supplied garden hose for 30 seconds to
clean out any debris. Turn off water supply and attach garden hose
(C) to water inlet (D). Tighten by hand.
4
5. Attach
Amplifi brand heavy duty garden hose or equivalent with 400
psi minimum burst pressure
to pump outlet (E) inside hose pot.
Tighten by hand. Turn on water and run for 30 seconds to flush
system. Turn off water.
5
6. Uncoil long garden hose and attach opposite end of hose (C) to
spray gun (F). Tighten by hand.
6
Copyright © 2011. All rights reserved. No part of this material may be reproduced or transmitted in any form without the express written permission of Briggs & Stratton Power Products Group, LLC.
Every effort has been made to ensure that the information in this document is accurate and correct. However, we reserve the right to alter or otherwise improve the product and this document at any time without prior notice and without incurring obligation.
Quick Setup Guide
Hose Powering System
WARNING Risk of electrocution. Contacting both
power conductors, at the same time could
cause electric shock or burn resulting in
death or serious injury.
• Connect only to a properly grounded outlet. DO NOT
remove ground pin from plug.
• Inspect cord before each use, DO NOT use if cord is
damaged.
• Keep all connections dry and off the ground.
• DO NOT touch plug with wet hands.
Electric Cord
with GFCI (1)
15 ft Inlet
Garden
Hose (1)
Spray Gun (1)
1
2
A
3
3
4
B
Hose
C
5
E
6
F
C
Start hose powering system
NOTICE DO NOT run the pump without the water supply connected and
turned on.
1.
Turn ON water, point gun in a safe direction, disengage trigger lock
(G) and squeeze trigger (H) to purge pump system of air.
2.
Engage trigger lock. Remove any dirt or foreign matter from spray
gun outlet and rotate multi nozzle spray head to desired spray
pattern.
NOTICE For spray gun nozzle instructions, see operator's manual.
3.
Press the master ON/OFF switch (J) to the OFF position (O).
4.
Plug electrical power cord into an electrical circuit rated for 120 Volts
AC at 15 Amps that is properly installed and grounded in accordance
with all local codes and ordinances. The green indicator (N) on the
GFCI should appear.
9
10
NOTICE The green indicator must be visible for the Hose Powering
System to operate.
5.
Press TEST button (K). The green indicator (N) should
disappear.
10
6.
Press RESET button (M). The green indicator (N) should
illuminate.
10
NOTICE DO NOT use the Hose Powering System if above test fails.
7.
Press the master ON/OFF switch (J) to the ON position (I).
8.
Point gun in a safe direction, disengage trigger lock and squeeze
trigger. The Hose Powering System motor will start and stop as
spray gun trigger is depressed and released (only when power
nozzles are selected).
NOTICE A short delay for the pump to turn on after the trigger is
squeezed is normal. A longer more flexible hose will result in a longer
starting delay.
NOTICE It will take a few seconds for the water to pressurize the spray
gun.
Install batteries into spray gun
NOTICE For using pressure washer safe detergents/soaps, see
operator's manual.
1.
Remove screw (P) from battery pack (R).
2.
Remove battery pack.
3.
Open battery door (S). Be careful not to damage rubber seal.
4.
Insert 4 AA batteries (T) into battery pack EXACTLY as illustrated.
5.
Close battery door.
6.
Replace battery pack onto spray gun.
7.
Replace screw in battery pack.
Stop hose powering system
1.
Release spray gun trigger.
2.
Press the master ON/OFF switch to OFF position (O).
NOTICE Releasing the trigger will shut off the motor but does not shut
off electrical power to the unit.
3.
Turn off water supply.
4.
ALWAYS point spray gun in a safe direction and squeeze spray gun
trigger to relieve built up pressure in the unit.
NOTICE Spray gun traps high water pressure, even when motor is
stopped and water is disconnected.
5.
Engage trigger lock.
6.
Disconnect GFCI plug from outlet and coil power cord.
7.
Coil long garden hose.
8.
Store long garden hose, power cord, spray gun and transfer handle
in hose pot.
9.
Install cover on unit.
10.
For long term storage instructions, see operator's manual.
D
To protect the pump from damage caused by freezing, read
the operator's manual for winter or long term storage.
Have Questions?
Do not return to store. We can help.
Call Customer Service Toll-Free 1-800-743-4115
Or visit our website www.amplificleaning.com
7
7
G
8
8
J
8
9
10
K
11
11
12
12
12
T
H
N
M
P
R
R
S
Advertisement

Related Manuals for Briggs & Stratton Amplifi Hose Powering System


Summary of Contents for Briggs & Stratton Amplifi Hose Powering System
- Page 1 Have Questions? Quick Setup Guide Do not return to store. We can help. Call Customer Service Toll-Free 1-800-743-4115 Hose Powering System Or visit our website www.amplificleaning.com Start hose powering system WARNING Failure to read and follow the operator’s WARNING Risk of electrocution. Contacting both manual and all operating instructions power conductors, at the same time could NOTICE DO NOT run the pump without the water supply connected and...
- Page 2 Guía de instalación rápida ¿Tiene Preguntas? No vuelva a la tienda. Podemos ayudarle. Sistema eléctrico para Llame gratuitamente al departamento de servicio al cliente, manguera de riego 1-800-743-4115 o visite nuestro sitio web, www.amplificleaning.com Puesta del sistema eléctrico para ADVERTENCIA Si no se leen y siguen las ADVERTENCIA Riesgo de electrocución.