Table of Contents
Advertisement
Available languages
Available languages
Quick Links
TEL-008BL / TEL-008N
Manual de instrucciones
TELÉFONO DE GÓNDOLA, NEGRO
V3.0
up/cid
out
back
0918m
Antes de utilizar el producto, lea cuidadosamente este instructivo para evitar cualquier mal funcionamiento.
0918m
La información presentada sirve únicamente como referencia sobre el producto. Debido a actualizaciones pueden existir diferencias.
Por favor, consulte nuestra página web www.steren.com para obtener la versión más reciente.
Advertisement
Table of Contents

Related Manuals for Steren TEL-008BL


Summary of Contents for Steren TEL-008BL
- Page 1 Antes de utilizar el producto, lea cuidadosamente este instructivo para evitar cualquier mal funcionamiento. 0918m La información presentada sirve únicamente como referencia sobre el producto. Debido a actualizaciones pueden existir diferencias. Por favor, consulte nuestra página web www.steren.com para obtener la versión más reciente.
-
Page 2: Table Of Contents
ÍNDICE DESCRIPCIÓN PARTES PANTALLA CONTROLES INSTALACIÓN CONFIGURACIONES ACCEDER AL MENÚ DE CONFIGURACIÓN AJUSTE DE FECHA Y HORA AJUSTES PARA TIEMPO DE FLASH Y TIPO DE MARCADO (POR TONO O POR PULSO) FIJAR CÓDIGO DE ÁREA Y CÓDIGO PABX (CENTRAL PRIVADA AUTOMÁTICA) AJUSTE DE CONTRASTE DE LCD CÓMO VERIFICAR LLAMADAS REMARCADO... -
Page 3: Descripción
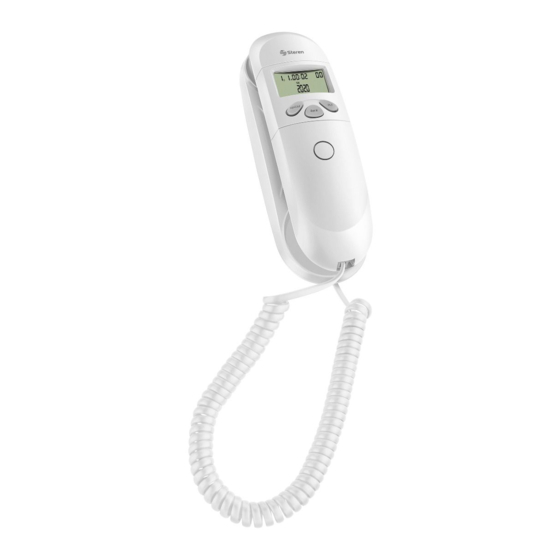
DESCRIPCIÓN PARTES 1. Pantalla 2. Controles up/cid back 3. Bocina de timbre 4. Base 5. Micrófono 6. Auricular 7. Interruptor de colgar PANTALLA 8. Día 9. Mes 10. Hora 11. Año 12. Día de la semana 13. Número de llamadas perdidas CONTROLES 14. -
Page 4: Instalación
INSTALACIÓN BATERÍAS CONEXIÓN up/cid back Inserte 2 baterías AA . CONFIGURACIONES ACCEDER AL MENÚ DE CONFIGURACIÓN Descuelgue el auricular. Presione una vez el botón Presione el “Interruptor de “set” para ingresar al menú. colgar” (debe mantenerlo La pantalla mostrará: presionado durante todo el proceso de configuración). -
Page 5: Ajuste De Fecha Y Hora
Presione la tecla correspondiente al submenú al que desea acceder. Ajuste de fecha y hora Ajustes para tiempo de Flash y tipo de marcado (por tono o por pulso) Fijar código de área y código PABX (Central Privada Automática) Ajuste de contraste de LCD AJUSTE DE FECHA Y HORA Realice los pasos 1 al 3 de la sección “Acceder al menú... -
Page 6: Ajustes Para Tiempo De Flash Y Tipo De Marcado (Por Tono O Por Pulso)
Presione “set” para guardar los cambios. Presione “up/cid” + “set” para cambiar a Ajuste de hora. Introduzca la hora actual, en formato de 24 h, iniciando por la hora y después los minutos con dos dígitos cada uno. minutos horas Presione “set”... -
Page 7: Fijar Código De Área Y Código Pabx (Central Privada Automática)
Presione “set” para guardar los cambios y suelte el “Interruptor de colgar” para salir del menú. FIJAR CÓDIGO DE ÁREA Y CÓDIGO PABX (CENTRAL PRIVADA AUTOMÁTICA) Realice los pasos 1 al 3 de la sección “Acceder al menú de configuración” de este instructivo. -
Page 8: Cómo Verificar Llamadas
Presione “up/cid” para ir cambiando entre los 3 niveles de contraste. Presione “set” para guardar los cambios y suelte el “Interruptor de colgar” para salir del menú. CÓMO VERIFICAR LLAMADAS ENTRANTES Con el auricular colgado, presione la tecla “up/cid” para verificar las llamadas entrantes. - Page 9 ESPECIFICACIONES El diseño del producto y las especificaciones pueden variar sin previo aviso. Entrada: -48 V - - - línea telefónica 3 V - - - (2 x AA) para display PRECAUCIONES • Este producto no se destina para utilizarse por personas (incluyendo niños), cuyas capacidades físicas, sensoriales o mentales sean diferentes o estén reducidas, o carezcan de experiencia o conocimiento.
- Page 10 Electrónica Steren S.A. de C.V. 2.- Electrónica Steren S.A de C.V. se compromete a reparar el producto en caso de estar defectuoso sin ningún cargo al consumidor. Los gastos de transportación serán cubiertos por el proveedor.
- Page 11 Before using the product, read this instruction carefully to avoid any malfunction. 0918m The information presented serves only as a reference for the product. Due to updates there may be differences. Please check our website www.steren.com for the most recent version.
- Page 12 INDEX DESCRIPTION PARTS DISPLAY CONTROLS INSTALLATION SETTINGS ACCESS TO THE CONFIGURATION MENU DATE AND TIME SETTING FLASH TIME AND TYPE OF DIALING SETTINGS (BY TONE OR BY PULSE) SET AREA CODE AND PABX (PRIVATE AUTOMATIC CENTRAL) CODE LCD CONTRAST ADJUSTMENT HOW TO CHECK CALLS REDIALING...
- Page 13 DESCRIPTION PARTS 1. Display 2. Controls up/cid back 3. Bell horn 4. Base 5. Microphone 6. Handset 7. Hang up switch DISPLAY 8. Day 9. Month 10. Hour 11. Year 12. Day of the week 13. Missed calls number CONTROLS 14.
- Page 14 INSTALLATION BATTERIES CONNECTION up/cid back Insert 2 AA batteries. SETTINGS ACCESS TO THE CONFIGURATION MENU Pick up the handset. Press Press the "set" button once the "Hang Up Switch" (you to enter the menu. must press and hold during The display will show: the all setting process).
- Page 15 Press the corresponding key to the submenu that you wish to access. Date and time setting Flash time and type of dialing settingS (by tone or by pulse) Set area code and PABX (Private Automatic Central) code LCD contrast adjustment DATE AND TIME SETTING Perform steps 1 to 3 of the "Access the configuration menu"...
- Page 16 Press "set" to save the changes. Press "up / cid" + "set" to change to Time setting. Enter the current time, in 24-hour format, starting with the hour and then the minutes with two digits each one . minutes hours Press “set”...
- Page 17 Press “set” to save the changes and release the "Hang up Switch" to exit the menu. SET AREA CODE AND PABX (PRIVATE AUTOMATIC CENTRAL) CODE Perform steps 1 to 3 of the "Access the configuration menu" section of this instruction manual. (In step 3 you must press the number 3 on the keyboard). The display will show: Code PABX setting Local code setting...
- Page 18 Press “up/cid” to change between the 3 levels of contrast. Pres “set” to save the changes and release the "Hang up Switch" to exit the menu. HOW TO CHECK CALLS INCOMING With the handset hung up, press the "up / cid" key to check incoming calls. OUTGOING With the handset up, press the "out"...
- Page 19 SPECIFICATIONS Product design and specifications may vary without previous notice. Input: -48 V - - - phone line 3 V - - - (2 x AA) for display CAUTIONS • This product is not intended for use by people (including children), whose physical, sensory or mental abilities are different or reduced, or lack experience or knowledge.
- Page 20 Part number: TEL-008BL / TEL-008N Brand: Steren WARRANTY This Steren product is warranted under normal usage against defects in workmans- hip and materials to the original purchaser for one year from the date of purchase. CONDITIONS 1. This warranty card with all the required information, invoice, product box or package, and product, must be presented when warranty service is required.
Need help?
Do you have a question about the TEL-008BL and is the answer not in the manual?
Questions and answers