Table of Contents
Advertisement
Quick Links
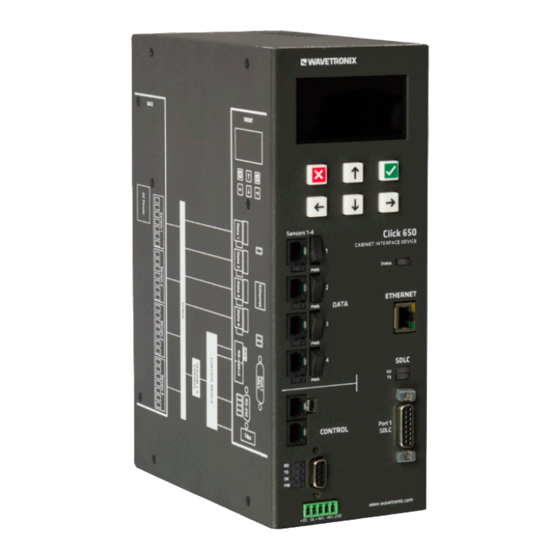
Click 65x Series
INSTALLATION QUICK START GUIDE
Note. The Click 650 and 656 are cabinet interface devices that provide power, surge protection, and communi-
cation to up to four (650) or six (656) SmartSensor Advance or Matrix sensors. They provide better functionality
than Wavetronix full and segmented backplates, and with a smaller cabinet footprint. The devices provide up
to 64 channels of sensor detection output to the traffic controller, either directly through SDLC or via contact
closure devices.
1
Place the device in the cabinet
First, connect AC power to the power port on the back of the device. Then decide how
you're going to install the Click 650/656 in the cabinet. There are a few ways you could do
this.
Place the device on a shelf.
˽
Order mounting brackets to mount the device on the side of the cabinet.
˽
2
Terminate sensor cables
The back of the Click 650/656 has plugs for SmartSensors. For each sensor you want to connect to
the device, do the following:
1
Remove one of the plugs from the back (they are numbered; you'll need to keep track of
which sensor is plugged into which port.
Terminate the conductors from the cable into the plug, following the labels on the plug (as
2
shown at left), then reconnect the plug to the Click 650/656.
Each sensor port has a corresponding RJ-11 jack, LED, and switch on the faceplate. Make
3
sure the switch is turned on and the LED is illuminated.
3
Connect the SDLC cable
On the faceplate of the device is an SDLC port; connect a cable there to connect the Click 650/656 (and its attached sensors)
to the SDLC bus and, via that bus, to the controller.
Note. If your cabinet isn't a NEMA TS-2 with SDLC, you can connect from the sensor port RJ-11 jacks to contact closure cards
and communicate with the controller that way.
4
Set up the Ethernet connection
The Click 650 and 656 are designed to be communicated with over Ethernet. Before you can connect
the device to your network, however you need to set the static IP address, subnet mask, and default
gateway (the numbers you choose for these will vary based on your network and may be assigned by
your IT personnel).
You will set these using the OLED menu (accessed via the screen and arrow buttons on the faceplate,
shown at left.).
www.wavetronix.com
801.734.7200
Advertisement
Table of Contents

Related Manuals for Wavetronix Click 65 Series


Summary of Contents for Wavetronix Click 65 Series
- Page 1 (650) or six (656) SmartSensor Advance or Matrix sensors. They provide better functionality than Wavetronix full and segmented backplates, and with a smaller cabinet footprint. The devices provide up to 64 channels of sensor detection output to the traffic controller, either directly through SDLC or via contact closure devices.
- Page 2 On the main screen, navigate down to Network Setup and click the Accept (green check mark) button to open the networking screen (shown at right). Set your desired IP address by following these steps: use the left and right arrow keys to highlight a number, then use the up and down arrow keys to change that number.
- Page 3 Discover sensors As mentioned earlier in this guide, it’s best to have the sensors entirely configured via SSM before you begin this process. Click on the Sensors tab. If you have Advance sensors connected to the Click 650.656, click Discover Advance Sensors and wait until the sensors appear.
- Page 4 © 2020 Wavetronix LLC. All rights reserved. Protected in the US by patents viewable at www.wavetronix.com/en/legal. Protected by Canadian Patent Nos. 2461411; 2434756; 2512689; and European Patent Nos. 1435036; 1438702; 1611458. Other US and international patents pending. Wavetronix, SmartSensor, Click, Command and all associated logos are trademarks of Wavetronix LLC. All other product or brand names as they appear are trademarks or registered trademarks of their respective holders.
Need help?
Do you have a question about the Click 65 Series and is the answer not in the manual?
Questions and answers