Advertisement
Available languages
Available languages
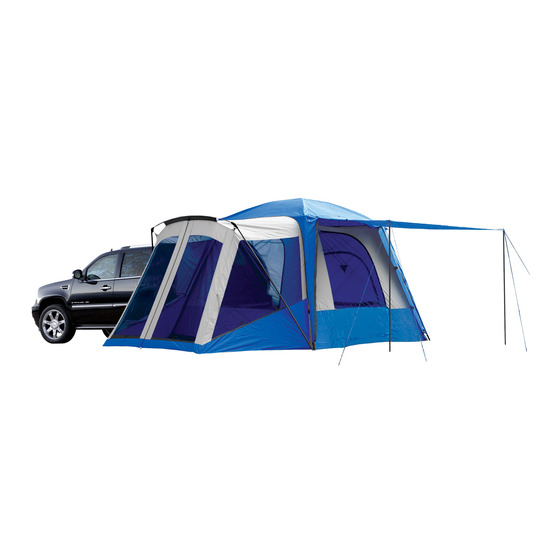
TENT
TENT BAG
RAINFLY
GEAR LOFT
GUIDE ROPES (6)
STAKES (20)
STAKE BAG
IF YOU ARE MISSING PARTS, DO NOT RETURN TO THE STORE. PLEASE CONTACT NAPIER OUTDOORS
AT 800-567-2434 | MONDAY - FRIDAY OR EMAIL CUSTOMERSERVICE@NAPIEROUTDOORS.COM
• Keep all flame and heat sources away from the tent fabric. The tent is made with flame-resistant fabric
which meets CPAI-84 specifications. This does not make it fireproof. The fabric will burn if left in contact
with any flame source. The application of any foreign substance to the tent fabric may render the
flame-resistant properties ineffective.
• To prevent carbon monoxide from entering the vehicle and tent area, do not run the engine, do not cook
inside the tent, and do not use a gas heater in the tent. Carbon monoxide is dangerous to your health.
• Engine must be off and exhaust must be fully cooled before tent installation and use.
2016 Napier Outdoors
Rev. 05 12.01.15
PACKAGE COMPONENTS
WARNING
!
SUV TENT MODEL 84000
TENT POLES (11)
6 x STEEL TENT POLES (82")
4 x SHORT FIBERGLASS (53")
1 x LONG FIBERGLASS POLE (69")
AWNING POLES
2 x STEEL AWNING POLES (71")
POLE BAG
TENT TIE STRAPS (2)
AWNING POLE CAPS (4)
1 of 10
Advertisement
Table of Contents

Related Manuals for Napier SPORTZ 84000


Summary of Contents for Napier SPORTZ 84000
- Page 1 TENT TIE STRAPS (2) AWNING POLE CAPS (4) STAKE BAG IF YOU ARE MISSING PARTS, DO NOT RETURN TO THE STORE. PLEASE CONTACT NAPIER OUTDOORS AT 800-567-2434 | MONDAY - FRIDAY OR EMAIL CUSTOMERSERVICE@NAPIEROUTDOORS.COM WARNING • Keep all flame and heat sources away from the tent fabric. The tent is made with flame-resistant fabric which meets CPAI-84 specifications.
-
Page 2: Tent Setup
At this point, do not stake the tent to the ground. 5. Once the tent is standing, attach the plastic clips to the tent poles. 2. Assemble the tent poles by unfolding each section. 2016 Napier Outdoors 2 of 10 Rev. 05 12.01.15... - Page 3 C. Ensure the exhaust pipe is outside of the sleeve WARNING: Carbon Monoxide gas is dangerous and can cause unconsciousness or death. Never start or run the vehicle’s engine when the tent is attached to the vehicle. 2016 Napier Outdoors 3 of 10 Rev. 05 12.01.15...
- Page 4 Stake the pole to the ground and adjust the length of the guide rope. Repeat on the other side. 11. Stake the screen room and tent to the ground through the corner and side webbing loops. 2016 Napier Outdoors 4 of 10 Rev. 05 12.01.15...
-
Page 5: Folding The Tent
8. To clean, hand wash with a sponge using mild soap. Never use a washing machine or detergent. WARRANTY INFORMATION Napier tents have a one (1) year warranty period from the time of purchase against defects in improper workmanship. Normal wear and tear, seam leakage through needle holes and improper use, abuse or alteration are not covered under the warranty policy. - Page 6 SAC POUR LES PIQUETS POTEAUX DE L’AUVENT (2) S’IL MANQUE DES PIÈCES, NE RETOURNEZ PAS AU MAGASIN. VEUILLEZ COMMUNIQUER AVEC NAPIER OUTDOORS PAR TÉLÉPHONE AU 800-567-2434, DU LUNDI AU VENDREDI, OU PAR COURRIEL À CUSTOMERSERVICE@NAPIEROUTDOORS.COM MISE EN GARDE • Tenir le tissu de la tente loin de toute flamme et de toute source de chaleur. Cette tente est fabriquée d'un tissu résistant au feu, répondant à...
- Page 7 5. Une fois la tente montée, fixer les crochets de plastique au poteau. 2. Assembler les poteaux de la tente (6 acier et 5 fibre de verre) en dépliant chaque section. 2016 Napier Outdoors 7 of 10 Rev. 05 12.01.15...
- Page 8 AVERTISSEMENT: Le monoxyde de carbone est dangereux et peut causer un évanouissement ou la mort. Il faut couper le moteur et ne jamais mettre le véhicule en marche lorsque la tente est attachée à celui ci. 2016 Napier Outdoors 8 of 10 Rev. 05 12.01.15...
- Page 9 Ajuster la longueur du hauban. Répéter l’opération de l’autre côté. 11. Fixer l’abri moustiquaire et la tente au sol en utilisant les piquets et les boucles de sangle. 2016 Napier Outdoors 9 of 10 Rev. 05 12.01.15...
-
Page 10: Information Sur La Garantie
5. Plier ce rectangle en trois en pliant chaque bout vers le centre. inappropriée, un usage excessif ou des modifications ne sont pas couverts dans le cadre de cette garantie. Napier remplacera ou réparera les pièces défectueuses. Les pièces de rechange peuvent être neuves ou remises en état à...
Need help?
Do you have a question about the SPORTZ 84000 and is the answer not in the manual?
Questions and answers