
Subscribe to Our Youtube Channel
Related Manuals for Casio G-Shock GSW-H1000


Summary of Contents for Casio G-Shock GSW-H1000
- Page 1 Model GSW-H1000 User’s Guide Before use, be sure to read “Safety Precautions”. Use the watch correctly. You cannot use this product inside of China if it was sold outside of China. © 2021 CASIO COMPUTER CO., LTD.
-
Page 2: Watch Features
G-SHOCK shock resistance makes it possible for your watch to withstand the rough conditions encountered in extreme sports. Your watch is also the first CASIO smartwatch to be 200-meter water resistant. This means you can wear your watch while engaging in extreme sports, marine sports, and more. - Page 3 ANALOG Analog watch face whose design you can change in accordance with your daily needs. “Using the “ANALOG” CASIO Watch Face” 2 Layers Clean, easy-to-read watch face that consumes less battery power. “Using the “2 Layers” CASIO Watch Face” EN-2...
- Page 4 Checking Exercise Results After Engaging in an Activity Data is measured and recorded by the watch’s sensors as you engage in activities. Later you can view check and analyze the data using the “G-SHOCK MOVE” phone app. This is true for a wide range of activities, from running, cycling and other outdoor activities, to weight training and more.
-
Page 5: Table Of Contents
STEP 2: Pair the Watch with Your Smartphone ......EN-28 STEP 3: Update Your Apps to Their Latest Versions ....EN-31 STEP 4: Install the CASIO “G-SHOCK MOVE” App on Your Phone ....................EN-32 Turning Power On or Off, and Restarting ........EN-33 Turning Power On or Off ............. - Page 6 Using the Display Item Selection Menu ........EN-50 Changing the DIGITAL Background ........... EN-53 DIGITAL Screen Item Example ..........EN-54 Quick Recall of Main Functions (CASIO's APPS) ......EN-58 Recalling Functions with CASIO's APPS ........EN-58 Selecting an Activity for Measurement ........EN-62 Activity Measurement (Excluding Workouts) ......
- Page 7 Reducing Power Consumption (Timepiece) ........ EN-96 Timepiece Screen Items ............. EN-97 Changing to Timepiece .............. EN-98 Reducing Timepiece Altitude and Barometric Pressure Measurement Error ................... EN-99 What you can do when not connected with a phone ....EN-100 Troubleshooting ................EN-101 Restoring Watch Operation ............
-
Page 8: Safety Precautions
Safety Precautions Before use, be sure to read these “Safety Precautions”. Use the watch correctly. Indicates information that warns against a Danger major risk of death or serious personal injury. Indicates information that warns against a Warning risk of death or serious personal injury. Indicates information that warns against a Caution risk of minor injury or material damage. - Page 9 Danger Use of the watch Be sure to observe the points below when using this watch. Failure to do so creates the risk of heat generation, fire, and explosion. Do not throw the watch into fire or expose it to heat. ●...
- Page 10 Always request rechargeable battery replacement from a CASIO Service Center or your original retailer. Use of a non-specified type of battery or improper replacement creates the risk of battery overheating, fire, and rupture.
- Page 11 Warning Use of the watch Do not use this watch while scuba diving. This watch is not a diving watch. Improper use of this watch can lead to serious accident. If radio wave interference or other problems are generated in other equipment when using this watch, enter the watch Airplane Mode or turn off the watch.
- Page 12 1. If a charging is in progress, unplug the USB cable from the watch. 2. Turn off power. 3. Contact an authorized CASIO Service Center. Regardless of the information displayed by the watch, be sure to keep aware of your physical condition and keep your exertion level within your own personal capabilities.
- Page 13 Warning Charging When charging with the USB-AC adaptor and charger cable, be sure to observe the precautions below in order to avoid the risk of heat generation, fire, explosion, and electric shock. Use only the charger cable that comes with the watch. ●...
- Page 14 Should the watch, USB-AC adaptor, or charger cable become damaged, immediately stop using them and unplug the USB-AC adaptor from the power outlet. Next, contact an authorized CASIO Service Center. Continued use of a damaged item creates the risk of fire and electric shock.
- Page 15 Warning Display Do not press on the display with undue force or subject it to strong impact. Doing so can break the display glass. Should the display glass break, do not directly touch the liquid inside it. Display liquid can cause skin irritation. Should display liquid ever get into the mouth, consult a ●...
- Page 16 Caution Use of the watch Make sure you are in a safe place before viewing the watch's display. Failure to do so creates the risk of personal injury and accident. Looking at the watch while running or jogging on the open road, while riding a bicycle, or operating a motor vehicle can lead to accidents.
- Page 17 Caution Use of the watch Remove the watch from your wrist before going to bed. Failure to do so creates the risk of unexpected personal injury, and/or allergic skin rash. Be sure to keep the case and band clean at all times. Wash the case and band with tap water or other clean water to ●...
- Page 18 Caution Use of the watch Keep the charger cable away from magnetic cards (credit cards, cash cards, prepaid cards, magnetic back tickets, etc.) The magnetic plug end tip of the charger cable can render a magnetic card or recording medium unusable if they get too close to each other.
- Page 19 Caution Charging When charging with the USB-AC adaptor and charger cable, be sure to observe the precautions below in order to avoid the risk of heat generation, fire, explosion, and electric shock. Plug the USB-AC adaptor into the power outlet as far as it will ●...
- Page 20 Caution User Maintenance Be sure to keep the case and band clean at all times. A dirty or rusty case or band can soil the sleeve of your clothing. Rust tends to form easily after the watch is exposed to seawater and then left without cleaning.
-
Page 21: Introduction
CASIO COMPUTER CO., LTD. shall not be held liable for any loss or lost ● profits due to loss of data caused by malfunction or maintenance of this product, or any other reason. -
Page 22: Powered With Wear Os By Google
™ has a large collection of standalone functions that can be used when not paired with a phone. Supported functions depend on your platform and country. For information about supported phones, visit the CASIO support site below. https://support.casio.com/gsw/en/GSW-H1000/ Wear OS by Google Functions... -
Page 23: Package Contents
Package Contents Watch Charger Cable “Read This First” Warranty EN-22... -
Page 24: Component Names
Component Names A Charger terminal E Power button B Pressure sensor F APP button (lower button) C Microphone G Touch screen D START button (display) (upper button) H Optical sensor (PPG Heart Rate) EN-23... -
Page 25: Getting Ready For First Use
“STEP 1: Charge the watch” “STEP 2: Pair the Watch with Your Smartphone” “STEP 3: Update Your Apps to Their Latest Versions” “STEP 4: Install the CASIO “G-SHOCK MOVE” App on Your Phone” EN-24... -
Page 26: Step 1: Charge The Watch
USB power supply device. Also note that use of a USB-AC adaptor may be subject to local standards imposed by the country where you are located. CASIO COMPUTER CO., LTD. shall be held in no way liable for any malfunction... - Page 27 If you cannot charge using the above procedure, try a different USB port or ● use a USB-AC adaptor. Genuine CASIO USB-AC Adaptor To obtain a genuine CASIO USB-AC adaptor, access the URL below and then contact a CASIO Service Center in the country where you live. https://s.casio.jp/w/10061en/ EN-26...
- Page 28 Charge Level Indication While Charging The charge level indicator will appear after watch charging starts. ● If the battery is dead when you start charging, the charge level indicator will ● not appear until after the charge reaches a preset level. Hold down the power button for at least two seconds to turn on the watch.
-
Page 29: Step 2: Pair The Watch With Your Smartphone
● Wear OS by Google running on your watch and phone. For the latest information on procedures, visit the website below. https://support.casio.com/gsw/en/GSW-H1000/ When configuring pairing settings, it is recommended that you have the ● phone and watch within one meter of each other. - Page 30 1. If the watch is turned off, hold down the power button for at least two seconds to turn it on. 2. Tap the watch display. On the screen that appears, select a language. 3. Swipe the screen upwards to display the watch name (GSW-H1000). 4.
- Page 31 iPhone Users With an iPhone, you can have only one watch paired per phone. Use the procedure below to unpair the currently paired watch from the iPhone so you can pair with this watch. 1. On your iPhone home screen, tap the following in sequence: “Settings”...
-
Page 32: Step 3: Update Your Apps To Their Latest Versions
STEP 3: Update Your Apps to Their Latest Versions In order to use all of the functionality provided by this watch, be sure to update all of your apps to their latest versions before using your watch. This procedure is current as of April 2021. ●... -
Page 33: Step 4: Install The Casio "G-Shock Move" App On Your Phone
App on Your Phone You can use the CASIO app to view training logs. You need to register a CASIO ID to use a CASIO app. Registering a CASIO ● ID also lets you use other online services provided by the CASIO Group. -
Page 34: Turning Power On Or Off, And Restarting
Turning Power On or Off, and Restarting Turning Power On or Off To turn power on Hold down the power button for at least two seconds. To turn power off While a watch face is displayed swipe the screen from top to bottom. - Page 35 To force a re-start Important! Try using the procedure below only in the case of operational problems ● such as watch screen freeze up. In other cases, we recommend using the procedure under “To re-start using Wear OS by Google”. Hold down the power button until the display goes white.
-
Page 36: Initial Settings And Fastening The Watch To Your Wrist
Initial Settings and Fastening the Watch to Your Wrist This section explains how to configure the initial settings of the watch, which are necessary for activity measurement. We also explain how to fasten the watch to your wrist for more accurate measurement. Configuring Initial Default Settings for Heart Rate Measurement This setting is essential for calculating performance, including your heart rate... -
Page 37: Fastening The Watch To Your Wrist
Fastening the Watch to Your Wrist How you wear the watch on your wrist affects the accuracy of heart rate monitor values. Position the watch as described below. With the watch fastened loosely on your wrist, place at least one finger to the right of the power button.* * If you wear the watch on your right wrist, place your finger(s) to the left of the pressure sensor (left side of the watch). - Page 38 Position the watch so there is at least one finger width between it and your wrist joint when you bend your hand back. After you determine the best wrist position, tighten the band snugly so the watch does not slide on your wrist. Important! A band that is snugly tightened for heart rate measurement can make it ●...
- Page 39 “OFF” for the “Detect wear on the wrist”* setting. Note, however, that if you are performing a measurement operation using a CASIO activity app, measurement is performed regardless of this setting. * To display the “Detect wear on the wrist” setting, swipe the watch face screen downwards.
-
Page 40: Basic Button And Display (Touch Screen) Operations
Basic Button and Display (Touch Screen) Operations Operations of this watch are performed using three side buttons and the screen (touch screen). Restoring the Display Screen If the screen of this watch is dark, tap the screen or press the power button. Wait until the screen lights up before performing operations. - Page 41 C APP button (lower button) Pressing this button while a watch face is displayed displays the CASIO's APPS screen, which you can use to quickly call up various CASIO original functions. For details, see “Quick Recall of Main Functions (CASIO's APPS)”.
-
Page 42: Basic Screen Operations (Swiping Up, Down, Left, And Right
Basic Screen Operations (Swiping Up, Down, Left, and Right) While a watch face is displayed, you can access various Wear OS by Google functions by swiping the screen up, down, left, and right. Note The procedure below is current as of April 2021. Note that the operations ●... - Page 43 Swipe from top to bottom This displays the Wear OS by Google setting screen. A Settings Displayed while there is a B Brightness Wi‑Fi connection. C Battery Saver Displayed D Find my phone while there is a E Theater mode Bluetooth connection F Do Not Disturb...
- Page 44 Swipe from bottom to top This displays notifications. You can display other notifications by swiping the notification screen from ● bottom to top. Swiping a notification to right or left will cause it to disappear. ● Swipe from left to right This operation displays the Google Assistant voice control buttons.
- Page 45 Swipe from right to left Each swipe displays the next Tile*. * Tiles make it easy to take quick actions and access important information at a glance. Tiles include weather forecast, news, workout tracking, guided breathing, and more. Select and edit the Tiles you want to have on your watch.
-
Page 46: Basic Functions
Wi-Fi when charging so app updating can be performed automatically. Also, if there are any CASIO apps that can be updated in MyApps on Google Play, be sure to update them. For details, visit the support site below. -
Page 47: Using The "Digital" Watch Face
Using the “DIGITAL” Watch Face “DIGITAL” is the initial default watch face of this watch. In addition to being useful for activity measurements, it is an important and essential watch face. There are two major display formats, “daily” and “activity”. When you start a measurement operation for running, skiing, strength training, or some other activity, the display changes from the daily watch face to a design that shows the optimum functions for the activity you are measuring. -
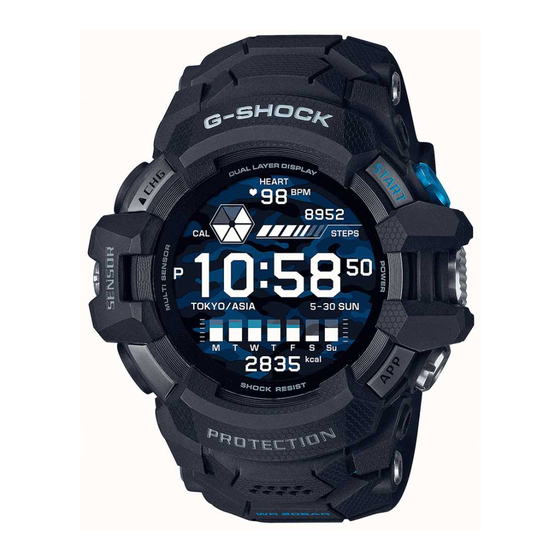
Page 48: Digital Display
DIGITAL Display Daily screen This is the normal screen for daily use when you are not performing activity measurement. A Upper display area: Calories Burned / Step Count / Heart Rate B Middle display area: Clock C Lower display area: Calories Burned / Weekly Stats D Background You can select from among various different variations for the upper, ●... - Page 49 Activity Measurement in Progress Screens This is the screen when you are performing activity measurement.* Your watch supports timing of dozens of activity and workout types, and lets you switch to the appropriate information display for each stage. For the “Running” and “Road Biking” sports activities, you can select from among various different display items (upper area, middle area, lower display areas) and background variations that are available for each of these sports activities.
-
Page 50: Changing Digital Screen Items
Changing DIGITAL Screen Items On the DIGITAL watch face, tap the display area (upper, middle, and lower) whose display item you want to change. This displays a screen for changing the contents of the display area you ● tapped. DIGITAL daily screen Display item selection screen to change the display items. -
Page 51: Using The Display Item Selection Menu
Using the Display Item Selection Menu On the display switching screen, you can display a menu of the selected display content. From there you can use functions related to the display content and change settings. On the DIGITAL watch face, tap one of the display areas (upper, middle, or lower). - Page 52 This displays a menu. ● A Menu items B Tap (or swipe the screen from right to left) to display the next menu page. C Tap (or swipe the screen from left to right) to display the previous menu page. EN-51...
- Page 53 Tap a menu item. For example, the menu items below are available on the “Calories ● Burned / Step Count / Heart Rate” menu. Menu items Description Daily calories Specifies a daily calories burned target. burned target Daily step count Specifies a daily step count target.
-
Page 54: Changing The Digital Background
Changing the DIGITAL Background Press the APP button (lower button). This displays a menu of main functions (CASIO's APPS screen). ● Run your finger around the outer periphery of the display to rotate through icons until the “Watch Face Background” icon is displayed in the center of the screen. -
Page 55: Digital Screen Item Example
DIGITAL Screen Item Example This section explains some of the display items you can select for the DIGITAL daily screen. Upper display area example This section explains “Calories Burned / Step Count / Heart Rate”. In addition, you can also select “Heart Rate”, “Barometer / Fishing Time” and “Barometer / Barometer Graph”. - Page 56 Middle display area example In this section explains about “Clock” and “Heart Rate”. Clock (Initial Default) A Current time B Current location (time zone name) C Day, day of week EN-55...
- Page 57 40 and 220 BPM. “---” is displayed in place of a value if the measurement is out of range or if measurement is not possible. * “Target Heart Rate Zone” Settings can be configured using the CASIO “G-SHOCK MOVE” app. EN-56...
- Page 58 Lower display area example This section explains “Calories Burned / Weekly Stats”. Besides this type of display, you can also select “Heart Rate”, “Schedule”, “Altitude / Compass” and “Altitude / Altitude Graph”. Calories Burned / Weekly Stats (Initial Default) A The letters indicate days of the week. This graph shows your daily energy consumption for the week that includes today.
-
Page 59: Quick Recall Of Main Functions (Casio's Apps
Quick Recall of Main Functions (CASIO's APPS) From the icon menu that appears when you press the APP (lower) button, you can quickly access the main CASIO original functions installed on this watch. Recalling Functions with CASIO's APPS While a watch face is displayed, press the APP button (lower button). - Page 60 Watch Face Background Tap to select a uniform theme color for the watch’s screen. The color you select is used for icons and cursors (CASIO apps only). Theme Color Displays a map using the full display area of the watch.
- Page 61 Function Description Displays your latest heart rate reading along with a Heart Rate Graph of the previous 24 hours. If an Activity is in progress, the display will show your current heart rate and graph of your readings during the current Activity. Heart Rate Graph Measures data during an Activity to overlay it on a movie or still image shot during the Activity.
- Page 62 Function Description Displays your current barometric pressure and a Barometric Pressure Graph of the previous 24 hours. If an Activity is in progress, the display will show your current barometric pressure and a barometric Barometer pressure graph of your readings during the Activity. Displays the compass (bearing indicator).
-
Page 63: Selecting An Activity For Measurement
Selecting an Activity for Measurement Your watch supports measurement and recording of dozens of different activities. The table below shows a partial list of supported activities. Walking Arm curls* Cycling Abdominal crunches* Skiing Shoulder presses* Sailing Squats* Trail running Treadmill* Trekking Push ups* Fishing... -
Page 64: Activity Measurement (Excluding Workouts
(lower button). On the screen that appears, tap “G-SHOCK MOVE” icon in the center of the screen. For details, see “Quick Recall of Main Functions (CASIO's APPS)”. Activity Measurement (Excluding Workouts) This section describes the measurement operations for running and other activities that are mainly performed outdoors. - Page 65 While a watch face is displayed, press the START button (upper button). This displays the activity measurement START screen, which shows ● the currently selected activity. To change the sports activity, go to step 2. To start measurement using ● the currently selected sports activity, advance to step 4 of this procedure.
- Page 66 To start measurement, press the START button. If you are using an activity that records location information, the ● message “Location info being acquired...” appears at this time. Move outdoors to a location with an unobstructed view of the sky and wait there without moving until location information can be acquired.
- Page 67 Tapping “Save (upper button)” performs the save operation and then ● displays the stats screen. You can scroll the stats screen contents by swiping up or down. To view saved statistical data later, select the CASIO's APPS option of ● “History”. Note Changing the “Location Recording Frequency”...
- Page 68 Activity Measurement in Progress Screen This section explains how to interpret the contents of the activity measurement screen. The “Running” screen is used as an example for this explanation. Example screen when “Running” is selected A The 10 segments of this ring represent 100% of your personal best pace based on your history of past runs (10% each).
-
Page 69: Activity Measurement (Workouts
Activity Measurement (Workouts) To ensure acquisition of effective Workouts measurements and recorded data, determine your own personal training amounts and the goals for each sports activity, and input the information on the watch. Example: Push ups Reps: 20 Sets: 3 Interval between sets: 1 minute Sit ups Reps: 40 Sets: 3... - Page 70 Inputting Training Amounts, Goals, and Other Data on Your Watch Note Display of the “DIGITAL” watch face is recommended when performing ● step 1 of the procedure below. Regardless of the type of watch face you have displayed, starting an ●...
- Page 71 Swipe the screen from bottom to top. On the menu that appears, tap “Settings”. This displays a setting menu in accordance with the workout activity ● you selected in step 3. Enter each of the setting items as required by the workout activity.
- Page 72 Performing Measurements According to the Workouts Type The operations you need to perform when performing Workouts measurements are slightly different depending on whether you are performing strength training, Fat Burning training, or Core training. For details about the Workouts category, see “Inputting Training Amounts, Goals, and Other Data on Your Watch”.
- Page 73 After completing the Reps setting, press the START button. This displays a confirmation screen. ● On the confirmation screen, select one of the operations described below. To save the measurement data of this set and proceed to the next set: Tap “Save Sets”.
- Page 74 On the interval screen that appears on the display, wait until the countdown time reaches zero. For example, if the Interval setting is 30 seconds, the countdown time ● is 30 seconds. Take a break until the start of the next set. To resume the Workouts without waiting for the countdown time to ●...
- Page 75 To start measurement, press the START button. If you selected the first item for the start of an indoor workout, the ● message “Obtaining sensor information” appears. Remain still, with the watch in close contact with your skin for about 15 seconds. The watch screen shows the Sets and Hold Time settings for a few ●...
- Page 76 On the interval screen that appears on the display, wait until the countdown time reaches zero. Take a break until the start of the next set. ● To resume the Workouts without waiting for the countdown time to ● reach zero, press the START button. The countdown time reaching zero or pressing of the START button ●...
- Page 77 To pause a measurement operation, display the Activity measurement in progress screen and then press the START button. This pauses measurement and displays the measurement paused ● screen. To restart measurement, press the START button. ● To quit measurement, hold down the APP button for about two seconds.
- Page 78 You can scroll the stats screen contents by swiping up or down. To return to the watch face that was displayed before you started ● Workouts, press the power button. To view saved statistical data later, select the CASIO's APPS option of ● “History”. EN-77...
-
Page 79: Activity Measurement Setting Menu
Activity Measurement Setting Menu Swiping the activity measurement START screen from bottom to top displays a setup menu for the currently displayed activity. Menu Item Description History Displays a history list of activity measurement results. The log provides a detailed, optimized view of each workout activity. -
Page 80: Changing Screen Items Displayed During Activity Measurement
Changing Screen Items Displayed During Activity Measurement Since the activity measurement in progress screen is one of the display formats of the “DIGITAL” watch face, you can use the same operations as those for the DIGITAL daily screen to change the display items for the upper, middle, and lower display areas. -
Page 81: Download Map And Import Route
Download Map and Import Route This section explains the operations below. How to download maps in advance so you can display them even when the ● watch is off-line How to import route data for display on a map during an activity ●... - Page 82 Delete map data you no longer need and try downloading the new data again. On the CASIO's APPS screen, tap “Map” to display a map. Tap the bottom of the screen. On the menu that appears, tap “Download Map”.
- Page 83 In an environment where network communication is available, you can perform the procedures in this section to download maps. On the CASIO's APPS screen, tap “Map” and display a map. Tap the bottom of the screen. On the menu that appears, tap the following items in sequence: “Map App”...
-
Page 84: Import Route
To import route data from activity history and display it on a map On the CASIO's APPS screen, tap “Map” to display a map. Tap the bottom of the screen. On the menu that appears, tap the following items in sequence: “Import Route”... - Page 85 To return from the map to the watch face display, press the power button. To import route data to a map from Google Drive On the CASIO's APPS screen, tap “Map” to display a map. Tap the bottom of the screen. On the menu that appears, tap the following items in sequence: “Import Route”...
- Page 86 ● hide the route data, if you want. Use “View Routes Display” to toggle between show and hide. On the CASIO's APPS screen, tap “Map” to display a map. Tap the bottom of the screen. On the menu that appears, tap the following items in sequence: “Settings”...
-
Page 87: Using A Different Watch Face
You can add CASIO, Google, and third-party watch faces. Important! If you are using a non-CASIO watch face, you cannot return to it ● following an activity measurement operation. If you want to return to a non-CASIO watch face, long-press the screen and then re-select the watch face . -
Page 88: Using The "Analog" Casio Watch Face
Using the “ANALOG” CASIO Watch Face The CASIO ANALOG watch face is an analog face that prioritizes readability. The information displayed by this watch face changes automatically according to your current location and activity. ANALOG Screen Items This screen enhances viewing of the current time, with the automatically changing information in the background. - Page 89 Background Information After you specify your Home Time Zone and “Daily Activity Range*”, the screen's background information automatically switches in accordance with your current location and activity. * The “Daily Activity Range” is the area where you conduct your daily life. You specify a range by setting a center point, like your home, and the radius of a circle on a map displayed by the watch.
- Page 90 Background Information Details This section explains the background information that changes automatically. The example screens shown in this section are those that appear when you tap the display to make the background information easy to view. Screen (A) This screen appears when you are not exercising and you are within your Daily Activity Range.
- Page 91 Screen (B) While Screen (A) is displayed, continuing to walk, run, ride a bicycle, or perform some other activity for some preset time causes this screen to appear. With this screen, heart rate zones and your step count are enlarged, making them easier to view.
- Page 92 Screen (C) This screen appears when you are not exercising and you are outside of the Daily Activity Range. The background of the watch face changes to a map. If you move outside of your Home Time Zone, the watch display switches ●...
- Page 93 Screen (D) While Screen (C) is displayed, continuing to walk, run, ride a bicycle, or perform some other activity for some preset time causes this screen to appear. The background of the watch face change to a map that shows more details of your current location.
-
Page 94: Using The "2 Layers" Casio Watch Face
Using the “2 Layers” CASIO Watch Face Digital watch face that combines easy-to-read monochrome LCD and a color LCD. You can customize the information that appears in the upper and lower display areas of the display. While this watch face is displayed, tapping the screen will start a manual heart rate measurement operation. - Page 95 To change the 2 Layers watch face display items While the “2 Layers” watch face is displayed, hold your finger down in the center of the touch screen for about two seconds. This shrinks the watch face and displays D below it. ●...
- Page 96 To measure your heart rate manually While the “2 Layers” watch face is displayed, tap the screen. This displays the message “Start heart rate measurement.”. Tap This starts a heart rate measurement operation. This returns to the ● watch face display, with your heart rate shown in the middle display area.
-
Page 97: Reducing Power Consumption (Timepiece
Reducing Power Consumption (Timepiece) Timepiece is a watch mode that disables smart functionality and instead displays minimal information in order to maximize the watch's battery. Only watch and sensor operations are performed. Use Timepiece to save power while sleeping, with no network connection, etc. -
Page 98: Timepiece Screen Items
Timepiece Screen Items With the Timepiece watch face, you can combine the display information below as required. Upper display area: Date, barometric pressure Lower display area: Step count, battery level, altitude Display example (Upper display area: Barometric pressure, Lower display area: Altitude) The middle display area always shows the current time and day of the week. -
Page 99: Changing To Timepiece
Changing to Timepiece On the CASIO's APPS screen, tap “Timepiece”. This displays the Timepiece start screen. ● Tap “Settings” and then configure the settings below as required. Monochrome Selects either “Bright” (black text on a white Display background) or “Dark” (white text on a black background). -
Page 100: Reducing Timepiece Altitude And Barometric Pressure Measurement Error
Reducing Timepiece Altitude and Barometric Pressure Measurement Error You need to manually correct the altitude and barometric pressure values displayed by the watch’s Timepiece watch face with accurate elevation and barometric pressure values in order to minimize reading errors. Use the operation below to input altitude values based on elevation values from other sources, and/or barometric pressure values measured using an accurate barometer. -
Page 101: What You Can Do When Not Connected With A Phone
Some of the things you will be able to do in this case are listed below. Activity Measurement ● Almost all functions that can be called up from CASIO's APPS ● Changing the display items of the “DIGITAL” watch face and using menus ●... -
Page 102: Troubleshooting
Refer to this section whenever you are experiencing problems with watch operation. If you don’t find the solution to your problem here, visit the website below. https://s.casio.jp/w/10016en/ Restoring Watch Operation If you find yourself unable to obtain proper operation from the watch for some reason, restart it and then try performing the operation again. - Page 103 iPhone Users With an iPhone, you can have only one watch paired per phone. If you want to pair this watch back with a phone or pair this watch with an iPhone that is already paired with another watch, first perform the procedure below on the phone to delete the current watch’s pairing information from the phone, and then pair with this watch.
-
Page 104: Returning The Watch To Its Initial Factory Defaults
Returning the Watch to Its Initial Factory Defaults Resetting the watch to its initial factory defaults unpairs it from its currently paired phone. It also initializes (deletes) all data (activity measurement history records, installed apps, etc.) that you have stored in watch memory, and resets any settings configured by you. -
Page 105: Error Code And Error Message List
If this message/error code keeps appearing, it servicing. could mean that the chargeable battery has deteriorated. Request servicing by your original retailer or an authorized CASIO Service Center. 1003 Charge the watch in an area where the ambient Too cold to charge. - Page 106 12 seconds until the display goes white. watch. Power will turn off shortly. 9001, 9002, 9003 Take your watch to an authorized CASIO Service Some problem Center or to your original retailer for inspection and occurred with the repair.
-
Page 107: Precautions During Use
Precautions During Use Display Information Accuracy Tide Graph Precautions For Japan area oceans, tide times and level changes are predictively calculated using harmonic constant data obtained from Bibliography 742 Tidal Harmonic Constants Tables, Japanese Coast (February 1992) published by the Hydrographic Department of the Japan Coast Guard, and from the List of Tidal Stations (2015) published by the Japan Meteorological Agency. - Page 108 Moon Age Precautions Moon ages displayed by this watch are based on the calculation described below. (1) Elongation is calculated using solar and lunar coordinates produced by functional calculus. (2) Moon age is calculated based on the correlation between the elongation and average moon age.
- Page 109 If glass fogging does not clear up or if you notice moisture inside of the glass, immediately stop using your watch and take it to an authorized CASIO Service Center or to your original retailer. EN-108...
-
Page 110: Measurement Function Precautions
Measurement Function Precautions Your watch is able to measure and display location information, barometric pressure, altitude, bearing, your heart rate, and other data. Note that this watch is not a special purpose measuring instrument. Readings produced by measurement functions are intended as general reference information only. Using GPS Your watch can use radio signals from Global Positioning System (GPS) satellites to determine your current location anywhere on the globe. - Page 111 Built-in GPS This watch has GPS* built in, and you can acquire location information without connecting with a phone. The watch alone can display a map* your current location, measure and record data for a variety of training activities, and more. *1 In addition to GPS (U.S.), your watch also supports GLONASS (Russia) and QZSS (Japan) positioning.
- Page 112 GPS Function Precautions Whenever you are in any area where radio wave reception is prohibited or ● restricted, perform the operation below to turn off the “Location” setting. 1. While a watch face is displayed, swipe the touch screen from top to bottom and then tap D.
- Page 113 Compass (Bearing Measurement) For serious mountain climbing and other activities that require accurate bearing readings, take along a highly reliable compass to use in combination with the watch’s compass. Important! Note that accurate compass readings and/or correction will not be ●...
-
Page 114: Other Product Precautions
Heart Rate Monitor The back cover of the watch has a built-in photosensor that detects your ● pulse. This is used to calculate and display an approximate heart rate value. The factors below can cause error in the displayed heart rate value. How the watch is fastened to the wrist ー... - Page 115 Charging The watch and AC adaptor may become warm to the touch during charging. ● This is normal and does not indicate malfunction. Do not charge the watch while its charge level is high enough for watch ● operation. Waiting until the charge level is low until you charge will help to extend battery life.
- Page 116 Take your watch to an authorized CASIO Service Center or to your original retailer for inspection and repair (for which you will be charged) or to have the band replaced (for which you will be charged).
- Page 117 Temperature Never leave your watch on the dashboard of a car, near a heater, or in any ● other location that is subject to very high temperatures. Do not leave your watch where it will be exposed to very low temperatures. Doing so can cause malfunction.
- Page 118 Storage If you do not plan to use your watch for a long time, thoroughly wipe it free ● of all dirt, sweat, and moisture, and store it in a cool, dry place. Disconnect the charger cable from the AC adaptor and unplug the AC ●...
- Page 119 Metal Components Failure to clean dirt from metal components can lead to formation of rust, ● even if components are stainless steel or plated. If metal components exposed to sweat or water, wipe thoroughly with a soft, absorbent cloth and then place the watch in a well-ventilated location to dry.
- Page 120 Skin Irritation Take care to avoid conditions that cause skin rash. The watch and the band come into direct contact with the skin, so certain usage conditions may cause skin rash. Metal or leather allergies ● Dirt, rust, or sweat on the watch or band ●...
-
Page 121: User Maintenance
User Maintenance Caring for Your Watch Remember that you wear your watch next to your skin, just like a piece of clothing. To ensure your watch performs at the level for which it is designed, keep it clean by frequently wiping with a soft cloth to keep your watch and band free of dirt, sweat, water and other foreign matter. - Page 122 ● pins to fly out of position or to fall out. If you ever notice any abnormality immediately stop using your watch and take it to an authorized CASIO Service Center or to your original retailer. Even if the surface of the metal appears clean, sweat and rust in crevasses ●...
-
Page 123: Other Precautions
The built-in lithium-ion battery includes valuable resources. When you are ready to discard your watch, follow proper procedures in order to recycle resources. For information about the proper procedure to follow when discarding the watch, contact an authorized CASIO Service Center or your original retailer. Personal Information Protection Precautions... -
Page 124: Important Safety Instructions
IMPORTANT SAFETY INSTRUCTIONS SAVE THESE INSTRUCTIONS DANGER TO REDUCE THE RISK OF FIRE OR ELECTRIC SHOCK, CAREFULLY FOLLOW THESE INSTRUCTIONS For connection to a supply not in the U.S.A., use an attachment plug adapter of the proper configuration for the power outlet. The socket outlet shall be installed near the equipment and easily accessible. -
Page 125: Main Specifications
Main Specifications Display: 3.05 cm (1.2-inches), Dual Layer LCD, Color TFT LCD (360 × 360 pixels) + Monochrome LCD Touch panel: Capacitive touch panel Other: Microphone, Vibration Battery: Type: Lithium-ion battery Charging time: Approximately 3 hours at room temperature (Be sure to use the special charger cable.) Bluetooth: Bluetooth... - Page 126 Auto switching by linking with smartphone Summer time: Auto switching by linking with smartphone Watch Face Types: Three CASIO watch faces: DIGITAL, ANALOG, 2 Layers Additional watch faces can be installed. Map Function: Map screen, route screen, selectable map skin, map downloading (off-line...
- Page 127 Barometer: Measurement range: 260 to 1,100 hPa (7.6 to 32.5 inHg) Measurement unit: 1 hPa (0.1 inHg) Measurement accuracy: within ±3 hPa (within ±0.1 inHg) Atmospheric pressure tendency graph: Past 24 hours Barometric pressure measurement interval: 1 minute Manual barometric pressure calibration Tide and Fishing: Tide graph: Past 12 hours + Next 12 hours Fishing time (Calculated according to current location, and moon hour...
- Page 128 Approximately 103 g (3.6 oz) Included accessories: Special Charger Cable *1 CASIO test conditions *2 GPS altitude information is used, so the indicated altitude may not exactly match the actual above sea level elevation or altitude. *3 Displaying the step count reduces the battery operating time.
-
Page 129: Supplementary Information
Supplementary Information Open Source Information CASIO uses GPL, LGPL and other source code that comes under an open source license in this product. CASIO discloses the source code in accordance with each open source license. For source codes and details about each open source license, visit the CASIO website. - Page 130 Use of this watch in areas where it does not comply with or has not been approved may be punishable under local laws. For details visit the website below. https://s.casio.jp/w/10122en/ This device complies with part 15 of FCC Rules and Industry Canada’s licence-exempt RSSs. Operation is subject to the following two...
- Page 131 Note This equipment has been tested and found to comply with the limits for a Class B digital device, pursuant to part 15 of the FCC Rules. These limits are designed to provide reasonable protection against harmful interference in a residential installation. This equipment generates, uses and can radiate radio frequency energy and, if not installed and used in accordance with the instructions, may cause harmful interference to radio communications.
- Page 132 The available scientific evidence does not show that any health problems are associated with using low power wireless devices. There is no proof, however, that these low power wireless devices are absolutely safe. Low power Wireless devices emit low levels of radio frequency energy (RF) in the microwave range while being used.
- Page 133 For more details, contact your customer service representative. Hereby, Casio Europe GmbH, Casio-Platz 1, 22848 Norderstedt, Germany, declares that this Model GSW-H1000 is in compliance with the essential requirements and other relevant provisions of Directive 1999/5/EC or 2014/53/EU.
- Page 134 Product Quality Information CASIO collects information about watch usage in a way that keeps users anonymous. This information is securely stored on CASIO servers and is not accessible by third-parties. It is used to improve product quality and functionality.
- Page 135 CASIO COMPUTER CO., LTD. 6-2, Hon-machi 1-chome Shibuya-ku, Tokyo 151-8543, Japan MA2106-B...
Need help?
Do you have a question about the G-Shock GSW-H1000 and is the answer not in the manual?
Questions and answers