Advertisement
Quick Links
INSTALLATION MANUAL
PRODUCT: HIDDEN WINCH MOUNTING BRACKET
MODEL:
ISUZU D-MAX (2017-)
PART NO: 2L.9101.1
WARNING!
In order to reduce the risk of severe injury or property damage: Before installation and use of this product read the whole
procedure, paying special attention to the safety notice and installation notice! Upon installation or maintenance of this product
it is necessary to use protective glasses. Check integrity of the design and torque settings of fasteners in each 1000km of the
vehicle usage. Do not use this product if there is any damage to the design or fasteners
www.rival4x4.com
Advertisement

Related Manuals for Isuzu D-MAX


Summary of Contents for Isuzu D-MAX
- Page 1 INSTALLATION MANUAL PRODUCT: HIDDEN WINCH MOUNTING BRACKET MODEL: ISUZU D-MAX (2017-) PART NO: 2L.9101.1 WARNING! In order to reduce the risk of severe injury or property damage: Before installation and use of this product read the whole procedure, paying special attention to the safety notice and installation notice! Upon installation or maintenance of this product it is necessary to use protective glasses.
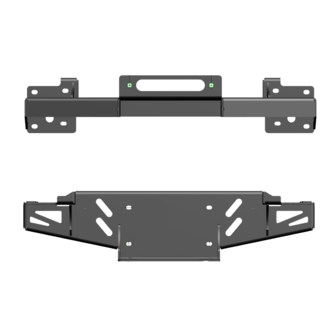
- Page 2 БАМПЕР ПЕРЕДНИЙ TOYOTA HILUX REVO HIDDEN WINCH MOUNTING BRACKET Item: 2L.9101.1 Make: ISUZU Model: D-Max Year of manufacture: 2017- Material: Steel Dimensions: 920x182x221 Weight: 20,6 kg Compatibility: RIVAL 2D.9103.1 recovery points SAFETY NOTICE * The RIVAL hidden winch mount bracket are designed to compliment the use and design of the specified vehicle under conditions specified by the car manufacturer.
- Page 3 БАМПЕР ПЕРЕДНИЙ TOYOTA HILUX REVO TECHNICAL INFORMATION WINCH INSTALLATION A winch with a pull capacity of up to 11000lb (4989 kg) can be installed with the RIVAL concealed winch mounting bracket. It is not advisable to exceed this pulling capacity since damage, injury or death may occur where the 11000lb recommended capacity is exceeded.
-
Page 4: Parts Listing
PARTS LISTING КОМПЛЕКТАЦИЯ 1. License plate......... Pressure sensitive liner..5 pc. 1 pc. 2. Winch bracket....... Tie wrap 390х4,8 mm..... 6 pc. 1 pc. 3. External left bracket....... 1 pc. 4. External right bracket....1 pc. 5. Internal left bracket......1 pc. - Page 5 INSTALLATION PROCEDURE Инструкция по установке 1. Open the bonnet. 2. Disconnect the negative battery terminal cable. 3. Remove 4 screws as shown. * Set aside for re-use later. 4. Remove radiator grill fittings (6 pc) as shown. Carefully dismantle the radiator grille. * Set aside for re-use later.
- Page 6 INSTALLATION PROCEDURE Инструкция по установке ИНСТРУКЦИЯ ПО УСТАНОВКЕ Инструкция по установке 5. Remove plastic plugs out of the bumper (4 pc) as shown. * Set aside for re-use later. 6. Unscrew 1 screw in wheel arches on the vehicle’s left and right side. * Set aside for re-use later.
- Page 7 INSTALLATION PROCEDURE Инструкция по установке 8. Remove 4 plugs in the lower part of bumper, and using torque wrench unscrew 2 nuts, as shown. * Set aside for re-use later. 9. Carefully dismantle the bumper. Pull the bumper edge by unlatching the latches, moving from the bumper edge to the center.
- Page 8 INSTALLATION PROCEDURE Инструкция по установке 11. Unscrew fitting bolts of the front beam to the chassis, as shown. Remove front bream. * Set aside for re-use later. 12. Unscrew 2 bolts of the bunoer brackets, on the left and right side of the vehicle, as shown.
- Page 9 INSTALLATION PROCEDURE Инструкция по установке 14. Install the bracket (pos.3) on the left side of the frame, as show, using bolts M10x100, bolt M12x110, adjusting washer M10 and washer M12. Make the same actions, on the right side of the frame, using right bracket (pos.
- Page 10 INSTALLATION PROCEDURE Инструкция по установке 17. Install winch bracket (pos. 2) and winch on the brackets, using 2 bolts M12x40, washers M12 and nuts M12 on the both sides. * Do not tighten yet. 18. Check if winch stuck on the center part of the bracket..
- Page 11 INSTALLATION PROCEDURE Инструкция по установке 20. Fix left side of th winch bracket, using bolts M12x40, insert nuts M12(pos.9), adjusting washers M12, as shown. Make the same actions, on the right side of the winch bracket. * Tighten all the joints. 21.
- Page 12 INSTALLATION PROCEDURE Инструкция по установке 23. Place template (attachment #1) on the bumper. Adjust it on the bumper following cutout (red dash lines) and fix it using masking tape, as shown. * Mark cut line, using template. 24. Place template (attachment #2) on the bumper.
- Page 13 INSTALLATION PROCEDURE Инструкция по установке 26. Measure width of radiator grille area to cut out, following winch dimensions, Stick masking tape on the grille, and mark cut line, as shown. 27. Carefully cut tie wraps, inside the bumper, that fixed wires with bumper fittings, as green zone shown.
- Page 14 INSTALLATION PROCEDURE Инструкция по установке 29. Make sure, that wires do not handicap to cut the bumper. Carefully cut out marked area, using angle grinder. * Polish burrs and sharp edges. 30. Try the bumper on the vehicle, and check that winch doesn’t pull out and contact the bumper.
- Page 15 INSTALLATION PROCEDURE Инструкция по установке 32. Drill 3 holes 7mm diameter, on the top part of bumper (above the grill), for license plate, as drawing shown. 33. Install license plate (pos. 1) onto the bumper using 3 screws M6x20, nuts M6 and washer 6.
- Page 16 INSTALLATION PROCEDURE Инструкция по установке 35. Install the bumper onto the vehicle and fix it, using bolts M8, adjusting washers M8 and nuts M8. 36. Install the bumper and grill in reverse order. Installation manual 2L.9101.1 www.rival4x4.com Date: 30.05.2019 < Page 15 of 16 >...
- Page 17 INSTALLATION PROCEDURE Инструкция по установке Before operating a vehicle fitted with a RIVAL hidden winch mounting bracket: - make sure that all screw joints are tightened; - check all electrical wiring attached to winch Installation manual 2L.9101.1 www.rival4x4.com Date: 30.05.2019 <...
- Page 18 Attachment #1 TEMPLATE BUMPER CUT OUT (RIGHT SIDE) Masking tape sticking area...
- Page 19 Attachment #1 TEMPLATE BUMPER CUT OUT (RIGHT SIDE) COPY Masking tape sticking area...
- Page 20 Attachment 2 TEMPLATE BUMPER CUT OUT (LEFT SIDE) Masking tape sticking area...
- Page 21 Attachment 2 TEMPLATE BUMPER CUT OUT (LEFT SIDE) COPY Masking tape sticking area...
Need help?
Do you have a question about the D-MAX and is the answer not in the manual?
Questions and answers