Table of Contents
Advertisement
Quick Links
Advertisement
Table of Contents

Subscribe to Our Youtube Channel
Related Manuals for Panduit Atlona AT-WAVE-101


Summary of Contents for Panduit Atlona AT-WAVE-101
- Page 1 WAVE Wireless Presentation Platform Atlona Manuals AT-WAVE-101 Presentation...
-
Page 2: Method
Version Information Version Release Date Notes Aug 2021 Release Sept 2021 Updated for firmware release 1.0.1 - added Miracast PIN support AT-WAVE-101... - Page 3 Welcome to Atlona! Thank you for purchasing this Atlona product. We hope you enjoy it and will take a extra few moments to register your new purchase. Registration only takes a few minutes and protects this product against theft or loss. In addition, you will receive notifications of product updates and firmware.
- Page 4 Atlona, Inc. (“Atlona”) Limited Product Warranty Coverage Atlona warrants its products will substantially perform to their published specifications and will be free from defects in materials and workmanship under normal use, conditions and service. Under its Limited Product Warranty, Atlona, at its sole discretion, will either: •...
- Page 5 Atlona, Inc. (“Atlona”) Limited Product Warranty Exclusions This Limited Product Warranty excludes: • Damage, deterioration or malfunction caused by any alteration, modification, improper use, neglect, improper packaging or shipping (such claims must be presented to the carrier), lightning, power surges, or other acts of nature.
- Page 6 Important Safety Information 9. Do not defeat the safety purpose of a polarized CAUTION or grounding-type plug. A polarized plug has two RISK OF ELECTRIC SHOCK blades with one wider than the other. A grounding DO NOT OPEN type plug has two blades and a third grounding CAUTION: TO REDUCT THE RISK OF prong.
-
Page 7: Table Of Contents
Table of Contents Introduction Features Package Contents Panel Description Installation Mounting Instructions Connection Instructions IP Modes DHCP Static Auto Connection Diagram Casting Miracast™ Method 1 Method 2 Google Cast™ Chrome Android AirPlay® OS X Devices iOS Devices Control Unit Websocket WebGUI Display RS-232... -
Page 8: Introduction
Introduction The Atlona AT-WAVE-101 is a wireless presentation and collaboration platform designed for easy content sharing with iOS , Android , Mac , Chromebook™, and Windows devices. The WAVE-101 allows up to four presenters to ® ™ ® ® share their content simultaneously on-screen, with an Instructor Mode available for managing additional presenters and selecting which to be displayed. -
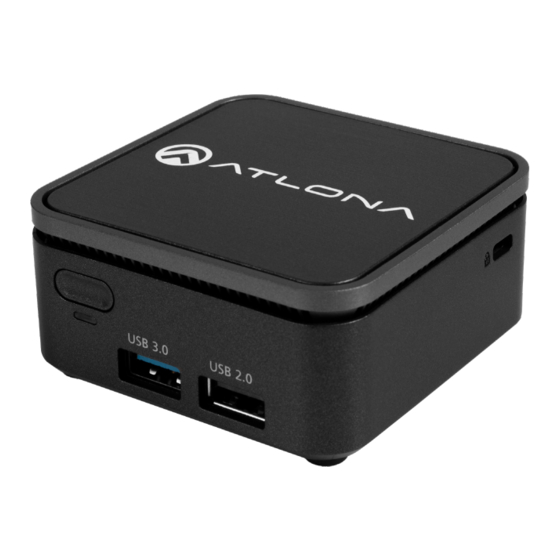
Page 9: Panel Description
Panel Description USB 3.0 USB 2.0 Power Button and LED 4. ETHERNET Use this button to power the unit off, it must be Connect to a network switch for content, control, held for 4 seconds to turn the unit off. The LED will and/or discovery. -
Page 10: Installation
Installation Mounting Instructions The AT-WAVE-101 comes with a standard VESA mount, for mounting to displays, monitors, etc. 1. Attach the VESA mount to the mounting surface using 4 screws (not included). 2. Turn the WAVE-101 upside down and attach the two included screws to the bottom of the unit. The screws will stick out a small amount. -
Page 11: Connection Instructions
Installation Connection Instructions 1. *Optional* Connect a network switch to the Ethernet port, for A/V streams, IP control, and system configuration. 2. *Optional* Connect USB Wi-Fi adapter to one of the USB ports for connecting to an existing wireless network (Connect mode) or creating a wireless network (Access Point mode). -
Page 12: Connection Diagram
Installation Connection Diagram Laptop Laptop Tablet AT-WAVE-101 Smartphone Display AT-WAVE-101... -
Page 13: Casting
Casting The AT-WAVE-101 has the ability to connect to devices on the network or through a wireless access point. Windows, Chrome OS, Android, iOS, and macOS can all cast through the WAVE-101 to the connected display. Miracast™ Miracast provides a way to wirelessly transmit content from Windows laptops and some android devices to displays. NOTE: Miracast has two casting types, Peer-to-Peer (P2P) and Miracast over Infrastructure (MICE). -
Page 14: Google Cast
Casting Google Cast™ Google Cast provides a way to send content from Google Chrome browsers and/or Android devices to the display wirelessly. Chrome 1. Make sure both the WAVE-101 and the device running the chrome browser are on the same network. 2. -
Page 15: Android
Casting Android Most Android devices have the ability to use Google Cast. The first time for casting will have different steps than future casting. 1. Open Settings on the android device. This can be found either in the App Drawer, on the home screen if the settings app has been added there, or in the top menu that can be accessed by swiping down. - Page 16 Casting 6. Press the Start now button. Once the unit is casting it will show connected on the Cast screen. To disconnect, select wave- xxxx from the cast menu, a pop up will appear. Select Disconnect and it will stop casting from the android device.
-
Page 17: Airplay
Casting AirPlay® OS X Devices AirPlay is only supported on Mountain Lion 10.8 or later. To determine if AirPlay is supported on the system being ® used, click System Preferences > Displays. If the “Show mirroring options in the menu bar when available” checkbox is not displayed, then AirPlay is not supported. -
Page 18: Control
Control WAVE-101 has the ability to be controlled and to schedule on/off commands for the display. Unit WAVE-101 can be controlled using the built in webGUI or websocket. Websocket The unit can be controlled using websocket. The commands can be found within the API at https://atlona.com/pdf/ AT-WAVE-101_API.pdf. -
Page 19: Webgui
WebGUI NOTE: If the WAVE-101 is connected to the same network via Connect Mode and Ethernet; the WebGUI will not be accessible. The WAVE-101 includes a built-in webGUI, which allows easy remote management and control of all features. Follow the instructions below to access the webGUI. 1. -
Page 20: Settings
webGUI Settings Settings provides a way to set things such as logins, network settings, customized home screens, and more. System System Factory Reset - Select this button, if wanting a clean slate after going through and changing the settings of the WAVE-101. - Page 21 webGUI Current Version The current version will display to the right of the Current Version label. To verify that the most recent version is being used, check the Firmware tab on the product page located at: https://atlona.com/product/at-wave-101/. If there is a new firmware, download it to the local computer. This file will be a .zip, it will need to be unzipped for updating.
- Page 22 webGUI Instructor Page By default, Auto Queuing Mode will be disabled. Auto Queuing Mode Enable - Select the slider to enable and disable the auto queuing mode on the instructor’s page. When enabled, new content will be added to the queue on the side of the instructor page, instead of directly to the HDMI display.
-
Page 23: Network
webGUI Network Hostname Reset - This button will reset the host name back to the default setting which is wave-xxxx (the last 4 of the MAC address of the unit). Hostname - Type in the name that will appear on the network and in casting. Once set, select the disk icon to save the change. - Page 24 webGUI Connect Mode When this mode is enabled, select the orange Wi-Fi icon, a pop up will appear that will ask for a network to be chosen. Select the correct Wi-Fi network and then enter the password when prompted. Once saved, the network information will appear below it. By default it will be set to DHCP.
-
Page 25: Display
webGUI Display Display Resolution Connect a display to be able to select the resolution to pass through. The recommended resolution will be selected by default..button - Select this button to display a list of compatible resolutions. A star will appear next to the recommended default resolution. - Page 26 webGUI IP Commands IP Address and Port - Type in the IP address and port of the display for commands to be sent to. Time Display Control Enable this section to have the Power On/Off command automatically sent to the display at a certain time of day on different days of the week.
-
Page 27: Welcome Screen
webGUI Welcome Screen Custom Messaging The options selected here will appear in the bottom left hand corner of the screen with the QR code. Title - Type in the header that will be displayed in bold in the top left of the white box. Message - The information written here will appear below the header in the white box. -
Page 28: Time
webGUI Time Timezone Timezone - Set the timezone to the current location of the WAVE-101. Select the ... button and a pop up will appear. A star will display next to the recommended time zone. Recommended time zone is based off the admin browser, not the WAVE-101 location. -
Page 29: Log
webGUI The unit logs will display on this page. Anytime a change is made, the system will record it in the logs. To download the logs, press the cloud button with a down arrow. A folder will open and an area on the local computer will be selectable to save to. -
Page 30: Instructor
webGUI Instructor The Instructor Page provides a user interface for displaying and controlling content. Layout Style Dynamic - Will adjust the screen automatically for incoming streams and select between the layout style the best suits the content. Static Full Screen - Will display only one stream of content on the display. Dual - Side by Side - Will display two streams of content in a 50/50 side by side split on the display. - Page 31 webGUI Queue Auto Queue Incoming - Enable this to place things in queue when added. When disabled, anything added or dragged into the media content will automatically display on screen. Kick All - Selecting this button will remove everything from the queue. Hide/Show All - Click Hide All to collapse this field and hide everything in queue.
- Page 32 webGUI Status Volume - The volume can be adjust here by either using the audio icons on either side of the bar or dragging the volume dot across the volume bar to the desired level. Mute - Mute and unmute audio using the audio icon on the far right. Content slots - At the bottom right corner, a message will display for how many content streams are available to be added.
-
Page 33: Appendix
Appendix Specifications System Operating System Linux Processor Intel® Celeron N4120 Memory 4 GB LPDDR4 (2400) Storage 64 GB eMMC Cooling Fan w/sink BYOD Interface Wireless LAN (optional-included), Gigabit LAN Casting Protocols Miracast, Google Cast, and AirPlay Wireless Resolution See casting protocol specification Visible wireless streams Up to 4 Video... - Page 34 Appendix Network Port 1 x RJ45, Wireless Standards and Protocols HTTPS, mDNS, SSL, HTTP/S, WS Speeds 10/100/1000 Mbps Wireless Security WPA / WPA2-PSK Internal wireless protocol 802.11 b/g/n/ac dual band Wireless LAN External wireless protocol 802.11 b/g/n/ac dual band Wireless LAN Addressing DHCP, Static –...
- Page 35 Appendix Dimensions Inches Millimeters H x W x D 1.32 x 2.76 x 2.76 33.4 x 70 x 70 Weight Pounds Kilograms Device 0.57 0.26 Certification Device CE, FCC, RCM, UKCA, China RoHS Power Supply KC, UL, ETL, RCM, CE, FCC, TUV Safety, NOM, CCC, EAC, BSMI, PSE AT-WAVE-101...
- Page 36 Toll free US International atlona.com 877.536.3976 41.43.508.4321 • • 35279-R3...
Need help?
Do you have a question about the Atlona AT-WAVE-101 and is the answer not in the manual?
Questions and answers