Advertisement
Quick Links
for installation, operation and maintenance of
Manufacture and distribution by North-Marine Handels GmbH
Papenreye 61, D 22453 Hamburg.
Contact
Web
All contents of this manual, in particular texts, photographs and graphics are subject to German
copyright law. Copyright held by North Marine Handels GmbH. Duplication, editing, distribution and any
kind of use outside the limits of copyright law require the written approval of the author.
Technical Manual
Compact KC 150 - 190 - 240
Version 58 - 04.2021
Download latest manual at:
www.aquatec-watermaker.de/downloads_E.html
In case of doubt, the German original manual applies.
AQUATEC- Water maker,
sup@aquatec-watermaker.de, Tel: +49 (0)40-36850306
www.aquatec-watermaker.de
Advertisement

Related Manuals for Aquatec Compact KC 150

Summary of Contents for Aquatec Compact KC 150
- Page 1 Technical Manual for installation, operation and maintenance of Compact KC 150 - 190 - 240 Version 58 - 04.2021 Download latest manual at: www.aquatec-watermaker.de/downloads_E.html In case of doubt, the German original manual applies. AQUATEC- Water maker, Manufacture and distribution by North-Marine Handels GmbH Papenreye 61, D 22453 Hamburg.
- Page 2 Thank you to choose an AQUATEC Watermaker for the provisioning of fresh water on your boat. AQUATEC equipment is made from high-quality components exclusively and has proven its reliability on long cruising-yachts. We are convinced that our product will serve you for many years without interferences.
-
Page 3: Table Of Contents
Specification / dimensions Scope of delivery Connection diagram membranes Recommendation for using your Aquatec reverse osmosis system. Daily use is preferable to a one-time weekly use. The system produces water with a neutral taste and very good quality. Important: The drinking water must be bottled from the test outlet of the system during operation, ideally after filling the on-board water tank. - Page 4 Introduction The principle of reverse osmosis (RO) In natural sciences and technology, osmosis is perceived as the directed migration of molecules through a semi permeable membrane. The chemical and physical structure of the membrane determines which molecules are able to pass and which are not. For this reason, it is called semi-permeable, which means as much as halfway or partial permeability.
-
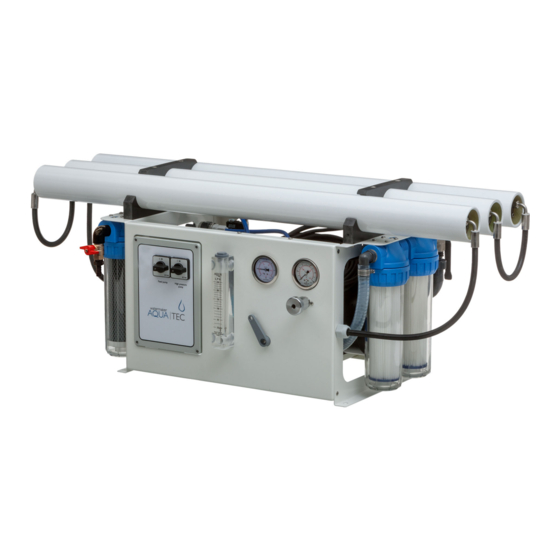
Page 5: Overview
Overview Membranes 2 up to 4 pc. depending on the plant three-way valve switchover test outlet / fresh water tank Valve fresh water flush Sediment filter (20 / 5 Micron) pre-filter sea water Pressure regulation valve Flow meter, shows liter/h. product water quantity Switch feed pump Switch high pressuer pump Gauge feed pressure... -
Page 6: Operating Instructions
1) Open the seawater intake valve (no.10). 2) The pressure control valve (no.5) in the control panel has to be fully opened by turning counter clockwise. Warning! Never start your Aquatec with closed pressure control valve! Starting with a closed valve destroys the pressure reading and possibly essential parts of the equipment. - Page 7 Flow diagram water production Valve for circulation Onboard pressure water pump three-way valve product water Feed pump Valve fresh water flush Gauge feed pressure three-way valve Sea cock Pressure regulation valve Gauge working pressure Flow meter product water High pressure pump The drinking water production changes according to the salinity, the temperature of the seawater and the age of the R.O.
- Page 8 Switch off the system, fresh water flush 1) Open the pressure control valve until the plant runs without pressure. 2) Run the Aquatec several minutes to remove the concentrated salt from the membranes. 3) Turn three-way valve (no. 2) to position test-outlet.
- Page 9 Flow diagram fresh water flush. Flushing working pressure 0 bar!!! Note! Valve for circulation Onboard pressure water pump three-way valve product water Feed pump Valve fresh water flush Gauge feed pressure three-way valve Sea cock Pressure regulation valve Gauge working pressure Flow meter product water High pressure pump...
- Page 10 Long term preservation (mothballing) of the plant (Page 1 of 2) Description: Prior to a longer period of shutdown, the Aquatec has to be preserved with chemical no. 3 (Biocide). After mothballing, the plant can be shut down for 6 months, depending on the environmental conditions.
- Page 11 Long term preservation (mothballing) of the plant. (Page 2 of 2) Hint: In order to avoid possible deposits in the pumps, it is advantageous after preserving the membranes to remove the high-pressure hose at the outlet of the HP pump and to wash out the system with fresh water again, this time without the connected membrane.
-
Page 12: Membrane Cleaning
30 minutes over the test outlet. 9) If there is no change in freshwater output, repeat the procedure 1 to 7 with chemical no. 2 (Acid). Prior to a longer period of shutdown, the Aquatec has to be preserved with Biocide after cleaning and flushing. -
Page 13: Installation Guide
Installation guide page 1 The already assembled membranes can be stored for approx. 5 months in the sealed pressure tube, preferably cool, but preferably not above 20 ° ambient temperature. However, we recommend installing and using the Watermaker as Attention! soon as possible. - Page 14 Installation guide page 2 Connection concentrate (brine) Connect the access (A4) of the plant to a thru-hull fitting on-board with a hose 1/2“=13 mm inner diameter. This on-board outlet must be above the waterline and must not be lockable. The material for the thru-hull must not be made of acetal. Warning! Product water Connect the product water-connection (A1) with the drinking water tank on-board.
- Page 15 Installation guide page 3 If the product water inlet is installed below the tank waterline chlorinated water (that possibly entered the tank at the last shore water fill up) might flow back from the tanks into the membranes. As chlorine destroys the R.O. membranes, a return flow from the tank has to be avoided.
- Page 16 Electrical circuit diagram Danger for life! It is obligatory that an electrician has to make the connection. Incorrect connection is dangerous to life. Warning! Danger for life! For all work on electrical components, the entire system must be switched off and a message must be left on the shutdown device. Warning! Connection cables, fuses and possibly necessary on-board main power switch of the distribution on board to the system are not included in the scope of delivery and have to be supplied on-board.
- Page 17 Electrical circuit diagram 3 phase 400 / 440 Volt 50/60 Hz. AC motor connections diagrams Single phase 115 or 230V 50/ 60 Hz. Run capacitor Single phase 115 or 230V 50/ 60 Hz. Run capacitor only (BK) without start capacitor. Direction of rotation (BK) and start capacitor (Ak).
-
Page 18: Important: Inspection And Maintenance
Inspection and maintenance Important: Check oil level and condition of the oil of high-pressure pump daily. due to If condensation occurs (whitish discoloration of oil, continuous operation, Attention! warm environment) change oil immediately. In operation, regularly check all hose connections and hp pump for leaks. Instructions for changing the oil of high-pressure pump: Dipstick full... - Page 19 Note! Demounting the membrane: For demounting the membranes, screw off the screws M6x20 at both ends of the AQUATEC pressure vessel. (Screw tightening torque for the holding clips 3 Nm). Then take off the stainless-steel holding clamps. Push the end caps in a little before pulling them out to loosen the possibly stuck O-rings.
-
Page 20: Troubleshooting
Troubleshooting Noisy operation, vibrations, unsteady pressure. Prolonged operation with the above error leads to failure of other components. Warning! Noisy operation, vibrations, unsteady pressure. Air in system To bleed air from the system a fresh water flush via the on-board pressurized water system is often optimal for removing existing air from the system. - Page 21 Troubleshooting Product amount of water too low. Membrane is blocked or defect. Temperature seawater lower than 25 ° Celsius. Salinity seawater higher than 35,000 ppm. Reduced sea water flow because of blocked or dirty filters. Insufficient fresh water rinsing after every use. Insufficient chlorine separation by the charcoal filter, assuming chlorine is or was present in the rinsing tank, chemicals or oil sucked in.
- Page 22 Clamping torques and spare part-numbers high-pressure pump Note: When ordering spare parts, please name the serial number of the pump head necessarily. Crankcase Nut no. 35 secure with Loctite 2701 No. 52 replaced no. 13/14 No.13 right side After year 2018/2019 for belt drive only To unscrew nut no.
- Page 23 Spare part-numbers high-pressure pump When ordering spare parts, please name the serial number of the pump head necessarily. Note! Order Order Description Description 141565 Drain plug ¼“ x 9 Pump head ss 1.4462 141410 Typ DC320-500-800, DD500, AC65-110 141483 Gib 141411 Typ AC75-135, AC/KC150-190-240 141453 Rosette 141554 Screw 8 x 60 or 8 x 55 ss...
- Page 24 Specification Aquatec Watermaker are designed for permanent installation on ships. Operation of the system is only permitted with clean seawater. Warning! Technical data – AQUATEC Watermaker KC 150 bis KC 240 Membrane type Seawater SW 2540 Working Pressure max. 55 bar...
- Page 25 Specification Feed pump Aquatec type 40 Magnetically coupled centrifugal pump, Power 140/ 200 Watt Voltage 1 ~ 220-240 Volt 50/ 60 Hz, Insulation class E, IP 44. Thermal Protected. Output 0 m= 1.320 l/h, 6 m= 1.200 l/h, 9,5 m= 600 l/h., 12,0 m= 0 l/h.
-
Page 26: Scope Of Delivery
Feedpump B-C20/A: 3~ 400/440V/50/60 Hz. Scope of delivery Aquatec Watermaker compact system (fully assembled), external feed pump (incl. 4-meter connection cable with waterproof connector). Ball valve 3/4 " and 3-way valve and tank for preserving and cleaning the membranes. Through hull fitting, seacock and connection cable are to be provided on-board. - Page 27 Dimensions...
-
Page 28: Connection Diagram Membranes
Connection diagram membranes High-pressure connection diagram of pressure vessels (membranes). KC 150 KC 190 KC 240...
Need help?
Do you have a question about the Compact KC 150 and is the answer not in the manual?
Questions and answers