Table of Contents
Advertisement
Advertisement
Table of Contents

Subscribe to Our Youtube Channel
Related Manuals for Gree Hydro Box NRQR16L/A-T


Summary of Contents for Gree Hydro Box NRQR16L/A-T
- Page 1 Owner's Manual Original Instructions Hydro Box Model: NRQR16L/A-T NRQR30L/A-T...
- Page 2 We have the right to make necessary revision to the product from time to time due to the reason of sales or production, and reserve the right to revise the contents without further notice. (7) The final right to interpret for this instruction manual belongs to Gree Electric Appliances Inc. of Zhuhai.
- Page 3 Exception Clauses Manufacturer will bear no responsibilities when personal injury or property loss is caused by the following reasons: (1) Damage the product due to improper use or misuse of the product; (2) Alter, change, maintain or use the product with other equipment without abiding by the instruction manual of manufacturer;...
-
Page 4: Table Of Contents
Contents 1 Product Description and Characteristics ··················································· 1 1.1 Instructions to Users ····················································································· 1 1.2 Safety Notices. ···························································································· 2 1.3 Product Characteristics ················································································· 3 2 Unit Structure and Performance Parameters ·············································· 4 2.1 Internal Structure of Hydro Box ······································································· 4 2.2 Parameters of Hydro Box ··············································································... -
Page 5: Product Description And Characteristics
Hydro Box 1 Product Description and Characteristics 1.1 Instructions to Users Before carrying out any maintenance or repair of the water heater, please always disconnect the power supply and have the water heater adjusted and repaired by professional technicians. Please make sure that the power socket complies with the national standard and it is ... -
Page 6: Safety Notices
Hydro Box 1.2 Safety Notices. WARNING: If not abide them strictly, it may cause severe damage to the unit or the people. NOTICE: If not abide them strictly, it may cause slight or medium damage to the unit or the people. This sign indicates that the items must be prohibited. -
Page 7: Product Characteristics
Hydro Box 1.3 Product Characteristics (1) Energy Saving and Environment Friendly The hot water is generated by using the waste heats from the air conditioner and the abundant heat source from atmosphere. Under cooling mode with hot water generation mode, we can optimize the control and realize the heat recycling. -
Page 8: Unit Structure And Performance Parameters
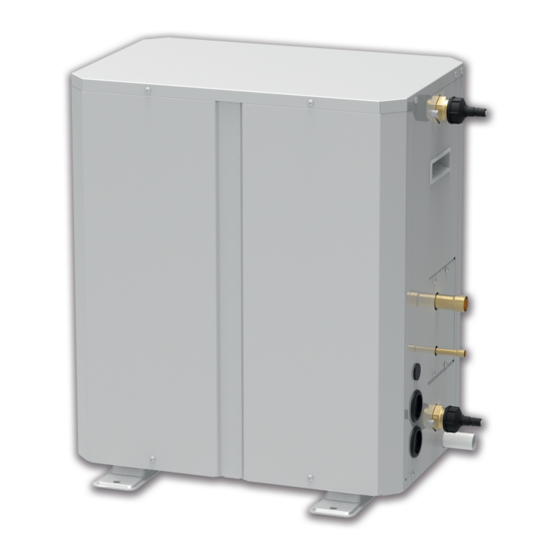
Hydro Box 2 Unit Structure and Performance Parameters 2.1 Internal Structure of Hydro Box The hydro box consists of plate heat exchanger, electronic expansion valve and electric control. The internal structure is as shown below: Fig.2.1 2.2 Parameters of Hydro Box Model NRQR16L/A-T NRQR30L/A-T... -
Page 9: Configuration Of Main Unit And Hydro Box
Hydro Box 2.3 Configuration of Main Unit and Hydro Box Limit of indoor unit ratio to outdoor unit Limit of hydro box ratio to Outdoor unit model rated capacity outdoor unit rated capacity GMV-VQ224WM/C-X~ 50%~135% ≤100% GMV-VQ2460WM/C-X Notes: ① The Hydro box must be installing with indoor units according the rule of the table above, otherwise it cannot work normally. -
Page 10: Installation Position Selection
Hydro Box 3.2 Installation Position Selection (1) The location where the Hydro box shall be installed inside. (2) The location should be able to withstand the weight of Hydro box. 3.2.1 Installation Space (1) The following values are the least space for installation. (2) If any service area is needed for service according to field circumstance, obtain enough service space. -
Page 11: Requirements For Electrical Wiring
Hydro Box 3.3.2 Selection of Communication Wire between Hydro Box and Mode exchanger Total Length L (m) of Communication Wire size Material Material Type Cable between Remarks Standard Indoor Unit and Indoor (Outdoor) Unit 1. If the wire diameter is enlarged to 2×1mm , the total communication line Light/Ordinary... -
Page 12: Unit Installation
Hydro Box ⑤ In case of any change to the site installation conditions, please appropriately reduce the capacity according to the power cables and air switch specifications provided by the manufacturer. 4 Unit Installation 4.1 Notices Please read the following notices carefully before installation and debugging! (1) The hydro box is only applicable for closed-type water system. - Page 13 Hydro Box (10) The waterway pipeline can be installed only after fixing the hydro box. Do not let duct and other foreign objects getting into the pipeline system during installing the connection pipe. (11) After connection of all water pipes, firstly check them for leakage. If ensuring no leakage, carry out thermal insulation to all pipe systems.
-
Page 14: Product Installation
Hydro Box 4.2 Product Installation 4.2.1 Installation of Hydro Box 4.2.1.1 Outline Dimension and Installation Spots Unit: mm Fig.4.1 Pipe diameter(mm) Name NRQR16L/A-T NRQR30L/A-T Gas pipe Φ15.9 Φ22.2 Liquid pipe Φ9.52 Φ9.52 Wiring passing hole Φ15 Φ15 Wiring passing hole Φ35 Φ35 Wiring passing hole... - Page 15 Hydro Box 4.2.1.2 Main body installation Screw hole drilling and bolt installation (1) First of all, select a proper installation position that complies with the installation space requirement; then drill 4 holes on the installation base according to the anchors of the hydro box, as shown below;...
- Page 16 Hydro Box 4.2.2 Refrigerant Pipe Connection 4.2.2.1 Pipeline Requirement Pipe specification is shown as follows: R410A Refrigerant System External diameter (mm) Thickness (mm) Type Φ6.35 ≥0.8 Φ9.52 ≥0.8 Φ12.7 ≥0.8 Φ15.9 ≥1.0 Φ19.05 ≥1.0 1/2H Φ22.2 ≥1.2 1/2H 4.2.2.2 Refrigerant Pipe Connection between Hydro box and Mode exchanger (1) Refrigerant Pipe Connection between 16 kW Hydro box and Mode exchanger Fig.4.5 (2) Refrigerant Pipe Connection between 30 kW Hydro box and Mode exchanger...
- Page 17 Hydro Box Notes: ① Refrigerant pipe length between mode exchanger and hydro box a≤10m. ② When 2 mode exchange branches are connected in parallel with a 30kW hydro box, two adjacent branches must be selected; ③ Please refer to the manual of mode exchange for branch linkage setting and communication line setting.
- Page 18 Hydro Box 4.2.3 Drainage Pipe Installation 4.2.3.1 Notice for Installation of Drain Pipe 1) It is not allowed to connect the condensate drain pipe into waste pipe or other pipelines which are likely to produce corrosive or peculiar smell to prevent the smell from entering indoors or corrupt the unit.
- Page 19 Hydro Box Fig.4.9 4.2.4 Connection of Hot Water System Pipes Preparation of pipe: Hot water pipe must be used for circulating water inlet and outlet pipe. The PPR pipe with a nominal outer diameter of DN25 is recommended, while S2.5 series (wall thickness of 4.2mm) shall be used.
- Page 20 Hydro Box (1) Installation diagram of hydro box connected with water tank: Fig.4.10 Notes: ① Hydro box is only equipped with lower temperature sensor and water tank is equipped with upper temperature sensor. ② Water temperature sensor is introduced to the hydro box from water tank temperature sensor port 1 to connect with the upper water temperature sensor.
- Page 21 Hydro Box (2) Installation diagram of hydro box connected with floor heating: Fig.4.11 (3) Installation diagram of connecting hydro box with water tank and floor heating simultaneously: Fig.4.12...
- Page 22 Hydro Box Part's name Photo Installation instruction Purpose Remark It should be installed at the Manual high position where is close Discharge air when Standard discharge valve to the hydro box. The debugging the water part system. discharge outlet should be upright and face upwards.
- Page 23 Hydro Box Part's name Photo Installation instruction Purpose Remark To prevent pipe cracks Install at water inlet side of Optional Expansion tank caused by water thermal the hydro box. part expansion. Circulating Install at inlet side of the For filtrating the impurities Standard water strainer water pump.
- Page 24 Hydro Box ⑧ If you put the unit out of use for a long period and cut off the power, please make sure to drain the water thoroughly out of the hydro box and floor heating pipe, in order to prevent the system from freezing.
- Page 25 Hydro Box 4.2.6 Installation of Water Tank 4.2.6.1 Installation of Water Tank (1) The thermal insulation water tank shall be installed within a horizontal distance of 5m and a vertical fall of 3m to the hydro box. It can be installed indoors or outdoors, such as balcony, rooftop or floor.
- Page 26 Hydro Box Note: To ensure safety during use of water, the inlet and outlet of water tank must be connected with a specific length of PPR pipe. The length “L” is calculated as below: L≥70×R , in which “L” refers to pipe length (unit: cm) and R refers to the inner radius of the pipe (unit: cm).
- Page 27 Hydro Box Fig.4.17 4.2.7 Anti-freezing measure In countries where the inlet water temperature can be lower than 15℃, it’s necessary to use approved antifreeze in the circulating water to protect the water pipes. Please consult your hydro box supplier for a locally approved solution. Calculate the approximate volume of circulating water in the system.
-
Page 28: Power Cord Connection
Hydro Box 4.3 Power Cord Connection 4.3.1 Electrical Wiring and Connection Fig.4.18 (1) Detach the electric box lid. (2) Let the power cord pass through the wiring through-holes. (3) Connect wires according to Fig. 4.18. (4) Fix the power cord with wiring clamp. Note: The wiring diagram above is only for reference. -
Page 29: Connection Of Communication Wire For Wired Controller
② The black part is the bar for setting DIP. 4.6.2 Function DIP(S2) of Hydro Box Function DIP switch S2 is 4 bit. “1”, “2”, and “3” stand for “Gree water tank”, “Floor heating” and “Solar power” respectively. Each function DIP is as below: Setting to “number” means this function is connected;... -
Page 30: Engineering Accessories Selection And Installation
Hydro Box Fig.4.21 Notes: ① The black part is the bar for setting DIP. ② Please set the DIP according to the actual status of project. ③ If you want to use the solar function, please consult the manufacturer. 4.7 Engineering Accessories Selection and Installation 4.7.1 Circle Pump Installation 4.7.1.1 Circle Pump Selection Select the suitable circle pump according to the pressure drop of the water way and the flow... -
Page 31: Test Run
Hydro Box 4.7.2.2 2Way Valve Wiring It needs one and more 2way valves while installing hydro box. The usage of the 2way valve is shown as the following table. Name Usage Control the waterway Vavle C on/off for domestic hot water Control the waterway Vavle D... - Page 32 Hydro Box (5) After operating for 15~20min, if the water flow discharged by exhaust valve of hydro box outlet pipe is stable and there is no airflow, it means exhausting is done. In this case, you can close the manual exhaust valve and stop the operation of hydro box. Operation method: pressing “Menu/OK”...
- Page 33 (1) Use a screwdriver to unscrew the 9 screws of the top cover of the hydro box and the 4 screws at the bottom of the rear panel (the side panel without the GREE logo), and then remove the top cover and the rear panel;...
-
Page 34: Common Malfunction And Troubleshooting
Hydro Box 5 Common Malfunction and Troubleshooting 5.1 Error Code of Hydro Box Error code Content Error code Content Power supply overcurrent protection Water flow switch protection Malfunction of solar power Freeze prevention protection temperature sensor PCB board of wired controller is Function DIP switch setting error abnormal Malfunction of upper water... -
Page 35: After-Sales Services
The first start-up of unit must be taken by the professionals of our after-sales service center or appointed company. Only the spare parts provided by Gree can be used. The unit operation and maintenance items specified in the manual shall be followed strictly.
Need help?
Do you have a question about the Hydro Box NRQR16L/A-T and is the answer not in the manual?
Questions and answers