Celestron FirstScope 60EQ Instruction Manual
Celestron firstscope 60eq: instruction manual
Hide thumbs
Also See for FirstScope 60EQ:
- Quick setup manual (21 pages) ,
- Instruction manual (17 pages) ,
- Instruction manual (31 pages)
Advertisement
F
I
R
S
T
S
C
F
I
R
S
T
S
C
F
I
R
S
T
S
C
F
I
R
S
T
S
C
F
I
R
S
T
S
C
F
I
R
S
T
S
C
I
N
S
T
R
I
N
S
T
R
O
P
E
6
0
E
O
P
E
6
0
E
MODELS #21067
O
P
E
7
0
O
P
E
7
0
MODEL #21076
O
P
E
8
0
E
O
P
E
8
0
E
MODELS #21086
U
C
T
I
O
U
C
T
I
O
Q
R
E
F
R
Q
R
E
F
R
E
Q
R
E
F
R
E
Q
R
E
F
R
Q
R
E
F
R
Q
R
E
F
R
N
M
A
N
M
A
A
C
T
O
R
S
A
C
T
O
R
S
A
C
T
O
R
A
C
T
O
R
A
C
T
O
R
S
A
C
T
O
R
S
N
U
A
L
N
U
A
L
Advertisement
Table of Contents

Related Manuals for Celestron FirstScope 60EQ


Summary of Contents for Celestron FirstScope 60EQ
- Page 1 MODELS #21067 MODEL #21076 MODELS #21086...
- Page 2 FIRSTSCOPE EQ REFRACTORS FIGURE 1...
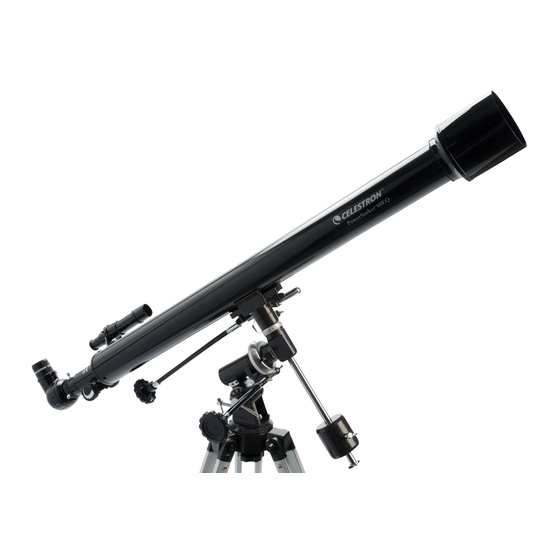
- Page 3 LIST OF PARTS: FIRSTSCOPE EQ REFRACTORS Telescope Objective (inside) Diagonal Star Pointer Finderscope Star Pointer adjustment knob (Altitude) Star Pointer bracket Star Pointer adjustment knob (Azimuth) Eyepiece Tripod leg adjusting screw Focusing knob Rack and pinion focuser Telescope optical tube...
-
Page 4: T E L E S C O P E A S S E M B Ly
The Firstscope comes packed in one box, with all the parts you need to assemble it. Unpack and lay out all of the telescope parts in a large, clear area where you’ll have room to work. Use the parts list and the telescope diagram to confirm you have, and can identify each part. -
Page 5: S E T T I N G U P T H E T E L E S C O Pe
Fine tuning of the tripod height can be done later, and the tightening screws can be adjusted to secure the telescope at the desired height NOTE: Some of the following steps may have been pre-assembled at the factory for certain models. - Page 6 The optical tube is held to the mount with two mounting rings. On the bottom of the mounting rings are square extrusions one on each ring. This portion of the ring sits on top of the mounting platform to hold the telescope in place.
- Page 7 To move the telescope in declination (north/south) there are two options. For large and quick movements, release the declination knob (22), move the telescope in the direction of the object you want to view, then tighten the knob when you’re near the object. For very small movements and fine adjustments, use the declination cable (18). The declination cable has a range of about 30°.
- Page 8 Aligning the Star Pointer Finderscope The Star Pointer is the quickest and easiest way to point your telescope exactly at a desired object in the sky. It's like having a laser pointer that you can shine directly onto the night sky. The Star Pointer is a zero magnification pointing tool that uses a coated glass window to superimpose the image of a small red dot onto the night sky.
- Page 9 The Celestial-Coordinate System The celestial-coordinate system is an imaginary projection of the earth's geographical coordinate system onto the celestial sphere, which gives the appearance of rotating overhead at night. This celestial grid is complete with equator, latitudes, longitudes and poles. The celestial equator is a full 360º circle dividing the celestial sphere into the northern celestial hemisphere and the southern celestial hemisphere.
- Page 10 Using the celestial coordinate system, it becomes possible to find celestial objects by translating their celestial coordinates, using telescope pointing positions. To do this, you use your RA and DEC setting circles to find celestial coordinates for stellar objects. These coordinates are given in star charts and reference books.
- Page 11 Choose a bright and easy to find star on a star chart, and note its right ascension and declination coordinates. Find the star and center it first with the Star Pointer finderscope, then in the telescope. Rotate the right ascension circle to match the coordinates of the star with the indicator mark.
- Page 12 The maximum usable power (with sharp images) is equal to 60 times the aperture of the telescope (in inches). So, with a 80mm telescope it has a maximum useful power of 189x (3.15" x 60) and with the 70mm the maximum is 165x (2.7559 x 60).
- Page 13 Keep in mind that the rotation of the earth will cause the moon to drift out of your field of view. You’ll have to manually adjust the telescope to keep the moon centered. This effect is more noticeable at higher power. Consult a current astronomy magazine or your local newspaper to find out the current phase of the moon.
-
Page 14: Telescope Maintenance
Milky Way. Unlike the sun, moon and our five major planets, most deep-sky objects are not visible to the naked eye. Celestron Sky Maps (#93722) can help you locate the brightest deep-sky objects. -
Page 15: Optional Accessories
Models available for all equatorial mounts. Sky Maps (#93722) - When learning the night sky, Celestron Sky Maps offer just the guidance you need. The maps show all the constellations and brighter deep-sky objects and are printed on heavy, moisture- resistant paper for durability. -
Page 16: Celestron Two Year Warranty
Celestron warrants this telescope to be free from defects in materials and workmanship for two years. thereof which, upon inspection by Celestron, is found to be defective in materials or workmanship. As a condition to the obligation of Celestron to repair or replace such product, the product must be returned to Celestron together with proof-of-purchase satisfactory to Celestron.
Need help?
Do you have a question about the FirstScope 60EQ and is the answer not in the manual?
Questions and answers