Table of Contents
Advertisement
Available languages
Available languages
Quick Links
RADIO CONTROLLED JUMBO WALL CLOCK
WITH WEATHER FORECAST
OROLOGIO JUMBO RADIOCONTROLLATO DA
PARETE CON PREVISIONI METEOROLOGICHE
JUMBO-FUNKWANDUHR MIT WETTERBERICHT
HORLOGE MURALE GÉANTE RADIOCOM-
MANDÉE AVEC PRÉVISIONS MÉTÉO
RELOJ JUMBO RADIOCONTROLADO DE
PARED CON PREDICCIÓN DEL TIEMPO
Art.No.: RDC8001
EN INSTRUCTION MANUAL ............... 2
IT
ISTRUZIONI PER L'USO .............. 14
DE BEDIENUNGSANLEITUNG .......... 26
FR MODE D'EMPLOI ....................... 38
ES MANUAL DE INSTRUCCIONES .... 50
*Radio-controlled clock function not available in every territory / Funzione di orologio radiocontrollati non disponibile in ogni territorio / Funkuhrfunktion nicht in jederm Gebiet verfügbar / La fonction
d'horloge radio-piloté n'est pas disponible dans tous les territoires / La función de reloj radiocontrolado no está disponible en todos los territorios
Advertisement
Table of Contents

Related Manuals for Explore Scientific JUMBO


Summary of Contents for Explore Scientific JUMBO
- Page 1 RADIO CONTROLLED JUMBO WALL CLOCK WITH WEATHER FORECAST OROLOGIO JUMBO RADIOCONTROLLATO DA PARETE CON PREVISIONI METEOROLOGICHE JUMBO-FUNKWANDUHR MIT WETTERBERICHT HORLOGE MURALE GÉANTE RADIOCOM- MANDÉE AVEC PRÉVISIONS MÉTÉO RELOJ JUMBO RADIOCONTROLADO DE PARED CON PREDICCIÓN DEL TIEMPO Art.No.: RDC8001 EN INSTRUCTION MANUAL ....2 ISTRUZIONI PER L’USO ....
-
Page 2: General Warnings
ABOUT THIS INSTRUCTION • Risk of chemical burn — Keep batteries out of the reach of children! Make sure you insert the bat- MANUAL teries correctly. Leaking battery acid can lead to These operating instructions are to be considered chemical burns. Avoid contact of battery acid with a component of the device. -
Page 3: Scope Of Delivery
SCOPE OF DELIVERY Clock, Outdoor sensor, Operating instructions. BEFORE YOU BEGIN • We recommend using alkaline batteries. If temper- atures regularly fall below 0°C (32°F), we recom- mend using lithium batteries. • Avoid using rechargeable batteries. (Rechargeable batteries cannot maintain correct power require- ments.) •... -
Page 4: Product Overview
PRODUCT OVERVIEW 1. Press and hold [ ] to enter time and date setting mode. 2. While in setting mode, press [ + /°C°F ] to in- crease one unit, press and hold to increase rap- idly. - Page 5 OUTDOOR SENSOR 1. Outdoor temperature & humidity LCD display 2. Battery compartment. 3. TX (Initiate main unit search). 4. Channel switch. 5. C/F switch ...
- Page 6 + /°C°F –/ MODE BUTTON Toggle between Toggle between _______ Initiate RCC receiving outdoor sensor chan- PRESS nel 1-3. Standard mode Enter into Turn RCC Initiate outdoor sensor _______ HOLD time and date setting on/off search. Confirm _______ PRESS Increase Decrease setting Time...
-
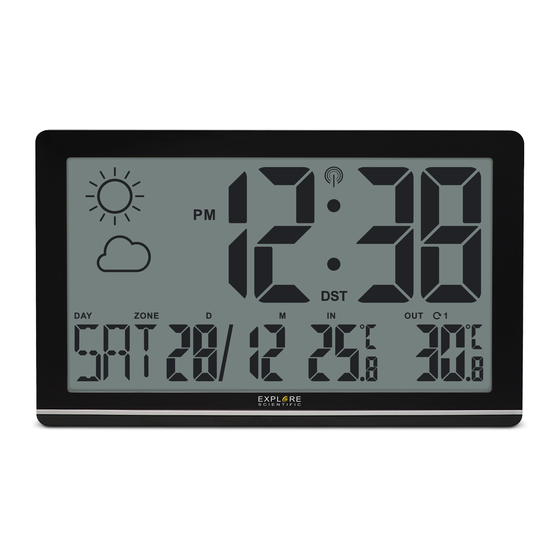
Page 7: Lcd Display
LCD DISPLAY 1. Weather Forecast symbols 2. Outdoor Temperature 3. Indoor Temperature 4. Calendar 5. Time display 6. Week display ] Ice alert indicator ] Low battery indicator [ OUT ] Outdoor channel indicator [ IN ] Indoor indicator [ ZONE ] Time zone indicator ] RCC signal indicator [ DST ] Daylight Saving Time (DST) -
Page 8: Getting Started
GETTING STARTED TO SEARCH FOR A SENSOR: The main unit will automatically search for a new sensor after the batteries are installed. To manu- INSERT BATTERIES ally initiate a outdoor sensor search, press and hold 1. Remove the battery door from the back. [SENSOR]. -
Page 9: Set The Clock Manually
button to re-initiate RCC receiving. DST ON/OFF (For US only) Exit 5. RCC receiving will automatically start at 2:03, 3:03, 7. If there is no action in 20 seconds, the setting will be 4:03, 5:03 every night. Auto receiving function will saved and you will exit the setting mode. -
Page 10: Weather Forecast
WEATHER FORECAST ICE ALERT This device forecasts the next 6-12 hours of weather If the channel 1 sensor falls between 3°C to -2°C within a 30-50 km (19-31 mile) radius with a 75% ac- (37°F to 28°F), the ice alert indicator [ ] will dis- cuarcy. - Page 11 Power: Signal frequency: 3x AA (LR6) 1.5V batteries 433 MHz TEMPERATURE: Power: 2x AAA (LR03) 1.5V batteries Indoor temperature display range: -10°C to 50°C (14°F to 122°F) Outdoor temperature display range: -20°C to +60°C (-4°F to 140°F) OUTDOOR SENSOR: Dimensions: 60 x 20 x 60 mm (L x W x H) Weight: 40 g (Exclude batteries)
-
Page 12: Ec Declaration Of Conformity
EC DECLARATION OF CONFORMITY DISPOSAL Hereby, Explore Scientific GmbH declares Dispose of the packaging materials properly, that the equipment type with part number: according to their type, such as paper or card- RDC8001 is in compliance with Directive: board. Contact your local waste-disposal ser- 2014/53/EU. -
Page 13: Manual Download
Would you like detailed instructions for this product in a particular language? Then visit our website via the link below (QR code) for available versions. Cd¹ Hg² Pb³ Alternatively you can also send an email to battery contains cadmium manuals@bresser.de or leave a message on +49 (0) battery contains mercury 28 72 –... -
Page 14: Avvertenze Generali
INFORMAZIONI SUL MANUALE DI • PERICOLO DI SOFFOCAMENTO — I bambini pos- sono utilizzare il dispositivo solo sotto la vigilanza ISTRUZIONI di un adulto. I materiali di imballaggio, i sacchetti Il presente manuale è parte integrante del prodot- di plastica e le fasce in gomma possono causare soffocamento e, pertanto, devono essere conser- Non azionare il dispositivo prima di aver letto attenta- vati in modo che i bambini non riescano a raggiun-... -
Page 15: Accessori In Dotazione
• Al primo utilizzo, avere cura di inserire le batterie in • Non smontare il dispositivo. Qualora dovesse ri- levarsi difettoso, rivolgersi al proprio rivenditore modo da rispettare la polarità indicata nel relativo vano. Sono necessarie tre batterie AA per la orolo- autorizzato. - Page 16 INFORMAZIONI GENERALI SUL PRODOTTO 1. Premere e tenere premuto [ ] per accedere all’impostazione dell’ora e della data. 2. In modalità impostazione, premere il tasto [ °C SENSOR Reset + /°C°F ] per aumentare il valore di una unità; °F tenerlo premuto per incrementare il valore rapi- ...
- Page 17 8. Supporto da tavolo. SENSORE PER ESTERNI 1. Display LED con temperatura e umidità esterne 2. Vano batterie 3. TX (avvio della ricerca dell’unità principale) 4. Interruttore per il canale 5. Interruttore C/F *Funzione di orologio radiocontrollati non disponibile in ogni territorio...
- Page 18 + /°C°F –/ MODALITÀ TASTO Avviare la Alternare i Alternare i _______ canali 1-3 PREMERE ricezione del sensore per esterni Standard Accedere alla Avviare la TENERE Accensione/ impostazione ricerca del _______ PREMUTO spegnimento dell'ora e sensore per dell'RCC della data esterni PREMERE Confermare...
-
Page 19: Display Lcd
DISPLAY LCD 1. Simboli delle previsioni meteoro- logiche 2. Temperatura esterna 3. Temperatura interna 4. Calendario 5. Visualizzazione ora 6. Giorno della settimana ] Indicatore di allerta ghiaccio ] Indicatore di batteria scarica [ OUT ] Indicatore del canale esterno [ IN ] Indicatore interno [ ZONE ] Indicatore del fuso orario ] Indicatore del segnale RCC... -
Page 20: Operazioni Preliminari
OPERAZIONI PRELIMINARI 5. Posizionare il sensore entro 30 m (98 piedi) dall’u- nità principale utilizzando il supporto da tavolo o il supporto da parete. INSTALLAZIONE DELLE BATTERIE 1. Rimuovere lo sportello dal vano batterie situato sul RICERCA DI UN SENSORE retro del dispositivo. -
Page 21: Impostazione Manuale Dell'orologio
4. Premendo il tasto [ – / ] una volta, il valore del sul display viene visualizzato il simbolo RCC [ parametro diminuisce di una unità. Se si tiene il ta- vengono impostate automaticamente la data e l’o- sto [ – / ] premuto, il valore decrementa rapida- ra. -
Page 22: Previsioni Meteo
IMPOSTAZIONE DELLA TEMPERATURA IN GRADI Da nuvoloso a pioggia Premere il pulsante [ + /°C°F ] per passare da Celsius Da nuvoloso a neve (°C) a Fahrenheit (°F) o viceversa. ALLERTA GHIACCIO PREVISIONI METEO Se il sensore associato al canale 1 rileva una tem- Questo dispositivo fornisce previsioni meteorologi- peratura compresa tra +3 °C e -2 °C (o da 37 °F a 28 che valide per 6-12 ore e per un raggio di 30-50 km... -
Page 23: Unità Principale
SPECIFICHE SENSORE PER ESTERNI: UNITÀ PRINCIPALE Dimensioni 60x20x60 mm (LxPxA) Dimensioni Peso 389x26x225 mm (LxPxA) 40 g (batterie escluse) Peso 520 g (batterie escluse) Campo di rilevamento umidità interna/esterna 20-95% RH Alimentazione Tre batterie AA (LR6) da 1,5 V Portata di trasmissione 30 m (98 piedi) TEMPERATURA Frequenza del segnale Campo di visualizzazione della temperatura interna... -
Page 24: Dichiarazione Di Conformità Ce
DICHIARAZIONE DI CONFORMITÀ CE per informazioni su come eseguire correttamente lo smaltimento. Con la presente Explore Scientific GmbH dichiara che il tipo di apparecchiatura iden- Non smaltire gli apparecchi elettronici nei rifiu- tificato con il codice RDC8001 è conforme ti domestici. Ai sensi della direttiva 2002/96/ alla direttiva 2014/53/UE. -
Page 25: Garanzia E Assistenza
Batteria contenente cadmio di telefono valido e un indirizzo e-mail, nonché il codi- Batteria contenente mercurio ce e il nome dell’articolo. Batteria contenente piombo Cd¹ Hg² Pb³ *Addebito della chiamata alle tariffe locali in vigore in Germania GARANZIA E ASSISTENZA (l’importo che verrà... -
Page 26: Zu Dieser Anleitung
ZU DIESER ANLEITUNG • VERÄTZUNGSGEFAHR! Batterien gehören nicht in Kinderhände! Achten Sie beim Einlegen der Batte- Lesen Sie vor der Benutzung des Geräts aufmerk- rie auf die richtige Polung. Ausgelaufene Batterie- sam die Sicherheitshinweise und die Bedienungs- säure kann zu Verätzungen führen! Vermeiden Sie anleitung. -
Page 27: Vor Dem Gebrauch
terschiedlicher Marken, Typen oder unterschiedlich hoher Kapazität. Entfernen Sie Batterien aus dem Gerät, wenn es längere Zeit nicht benutzt wird! LIEFERUMFANG Wanduhr, Außensensor, Bedienungsanleitung. VOR DEM GEBRAUCH • Wir empfehlen die Verwendung von Alkali-Mangan- Batterien. Bei Temperaturen, die regelmäßig unter 0°C (32°F) fallen, empfehlen wir Lithiumbatterien. - Page 28 PRODUKTÜBERSICHT 1. Die Taste [ ] gedrückt halten, um in die Zeit- und Datumseinstellung zu wechseln. 2. Im Einstellmodus [ + /°C°F ] drücken, um eine Einheit zu erhöhen, drücken und halten, um schnell zu erhöhen. °C SENSOR Reset...
- Page 29 AUßENSENSOR 1. Außentemperatur und Luftfeuchtigkeit LC-Dis- play 2. Batteriefach. 3. TX (Suche nach dem Hauptgerät einleiten). 4. Kanalumschaltung. 5. C/F-Schalter *Funkuhrfunktion nicht in jederm Gebiet verfügbar...
- Page 30 + /°C°F –/ MODUS TASTE Wechseln Sie Wechseln Sie RCCEmpfang _______ zwischen den zwischen drücken einleiten Außensensorkanälen C/F. 1-3. Standard Modus In die Suche nach gedrückt Zeit- und _______ Außensensor halten Datumseinstellung ein-/ausschalten einleiten. wechseln Bestätigen _______ drücken Erhöhen Verringern Einstellungs ZeitEinstellungs- Modus...
-
Page 31: Lcd-Anzeige
LCD-ANZEIGE 1. Symbole für die Wettervorhersage 2. Außentemperaturanzeige 3. Innentemperaturanzeige 3. Innenluftfeuchtigkeit 4. Kalender 5. Zeit-anzeige 6. Woche anzeige ] Frostwarnung ] Anzeige bei schwacher Batterie [ OUT ] Anzeige des Außensensorka- nals [ IN ] Innenraumanzeige [ ZONE ] Zeitzonenanzeige ] RCC-Signalanzeige [ DST ] Sommerzeit ... -
Page 32: Erste Schritte
ERSTE SCHRITTE 4. Schließen Sie das Batteriefach. 5. Platzieren Sie den Sensor mit Hilfe des Tischstän- ders oder der Wandhalterung innerhalb von 30 m BATTERIEN EINLEGEN (98 ft) vom Hauptgerät entfernt. 1. Entfernen Sie die Batteriefachabdeckung von der Rückseite. UM NACH EINEM SENSOR ZU SUCHEN: 2. -
Page 33: Die Uhr Manuell Einstellen
3. Während des Empfangsvorgangs blinkt das RCC- 3. Drücken Sie einmal die Taste [ + /°C°F ], die Zahl Signalsymbol erhöht sich um 1 Einheit. Halten Sie die Taste [ + 4. Wenn der Prozess erfolgreich war, wird das voll- /°C°F ] gedrückt, um die Zahl schneller zu erhöhen. - Page 34 2. Während der Einstellung blinkt der Einstellparame- ter. Bewölkt bis Regen 3. Drücken Sie die Taste [ + /°C°F ], um den Wert zu erhöhen, oder die Taste [ – / ], um den Zeitzo- Bewölkt bis Schnee nenversatz zu verringern. °C/°F-EINSTELLUNG Drücken Sie die [ + /°C°F ] Taste, um zwischen Celsius FROSTWARNUNG...
-
Page 35: Spezifikationen
SPEZIFIKATIONEN AUSSENSENSOR: HAUPTEINHEIT: Abmessungen: 60 x 20 x 60 mm (L x B x H) Abmessungen Gewicht: 389 x 26 x 225 mm (L x B x H) 40 g (ohne Batterien) Gewicht 520 g (ohne Batterien) Luftfeuchtigkeitsbereich im Innen- und Außenbereich: Energie: 20% - 95% RH... -
Page 36: Eg-Konformitätserklärung
EG-KONFORMITÄTSERKLÄRUNG ENTSORGUNG Hiermit erklärt die Explore Scientific Entsorgen Sie die Verpackungsmaterialien sor- GmbH, dass der Funkanlagentyp mit Arti- tenrein. Beachten Sie bitte bei der Entsorgung kelnummer: RDC8001 Richtlinie des Geräts die aktuellen gesetzlichen Bestim- 2014/53/EU entspricht. Der vollständige Text der EG- mungen. -
Page 37: Garantie & Service
terien und Akkus sind mit einer durchgekreuzten können Sie uns auch eine E-Mail an die Adresse Mülltonne sowie dem chemischen Symbol des Schad- manuals@bresser.de schicken oder eine Nachricht stoffes beschriftet. unter +49 (0) 28 72 – 80 74-220* hinterlassen. Bitte geben Sie stets Ihren Namen, Ihre genaue Adresse, eine gültige Telefonnummer und E-Mail-Adresse Batterie enthält Cadmium... - Page 38 A PROPOS DE CE MODE D’EMPLOI présentent un risque de suffocation. • Risque de brûlure chimique — Gardez les piles Ce mode d’emploi fait partie intégrante de hors de portée des enfants ! Veillez à insérer l’appareil. les piles correctement. Des piles qui fuient Veuillez lire les consignes de sécurité...
-
Page 39: Contenu De La Livraison
marques ou de capacités différentes. Les piles doivent être retirées de l’appareil si celui-ci n’est pas utilisé pendant une période prolongée. CONTENU DE LA LIVRAISON Horloge murale, capteur extérieur, mode d’emploi. AVANT L’UTILISATION • Nous vous recommandons d’utiliser des piles alca- lines. -
Page 40: Description Du Produit
DESCRIPTION DU PRODUIT 1. Maintenez la touche [ ] enfoncée pour en- trer l'heure et la date. 2. En mode de réglage, appuyez sur [ + /°C°F ] pour augmenter d'une unité ou maintenez cette touche enfoncée pour augmenter rapi- °C SENSOR Reset... - Page 41 CAPTEUR EXTERIEUR 1. Ecran LCD d’affichage de la température et de l’humidité extérieures. 2. Compartiment des piles. 3. TX (Lancer la recherche de l’unité principale). 4. Changement de canal. 5. Commutateur C/F *La fonction d‘horloge radio-piloté n‘est pas disponible dans tous les territoires...
- Page 42 + /°C°F –/ MODE TOUCHE Lancer la Basculer entre réception Basculer entre _______ les canaux PRESS du signal 1-3 du capteur radiopiloté extérieur. Standard mode Passer au Activer/ Lancer la réglage désactiver recherche _______ HOLD de l’heure Activer/ de capteur et de la désactiver extérieur...
-
Page 43: Écran Lcd
ÉCRAN LCD 1. Symboles de prévision météo 2. Affichage de la température exté- rieure 3. Affichage de la température inté- rieure 4. Calendrier 5. Affichage de l’heure 6. Affichage de la semaine ] Témoin d’alerte en cas de gel ] Indicateur de pile faible [ OUT ] Indicateur de canal extérieur [ IN ] Indicateur intérieur... -
Page 44: Mise En Route
MISE EN ROUTE POUR RECHERCHER UN CAPTEUR : L’unité principale va automatiquement chercher un nouveau capteur une fois les piles mises en place. INSERTION DES PILES Pour lancer manuellement la recherche d’un capteur 1. Retirez le couvercle du compartiment à piles situé extérieur, maintenez la touche [ SENSOR ]. -
Page 45: Réglage Du Fuseau Horaire
de 7 minutes, le réglage du signal radio-piloté sera glage et passer au paramètre suivant. automatiquement annulé. Dans un tel cas, mainte- 6. Séquence de réglage : Fuseau horaire Année nez la touche [ – / ] enfoncée pour relancer la Format calendrier (jour-mois/mois-jour) ... -
Page 46: Prévisions Météo
PRÉVISIONS MÉTÉO ALERTE EN CAS DE GEL Cet appareil permet de faire des prévisions météo Si le capteur du canal 1 enregistre une température pour les 6 à 12 prochaines heures dans un rayon de entre 3°C et -2°C, l’indicateur d’alerte de gel [ ] s’af- 30 à... - Page 47 Alimentation : Fréquence du signal : 3 piles AA (LR6) 1,5 V 433 MHz TEMPÉRATURE : Alimentation : 2 piles AAA (LR03) 1,5 V Plage d’affichage de la température intérieure : -10 °C à +50 °C (14 °F à 122 °F) Plage d’affichage de la température extérieure : -20 °C à...
-
Page 48: Déclaration De Conformité Ce
DÉCLARATION DE CONFORMITÉ CE nation appropriée. Par la présente, Explore Scientific GmbH Ne jetez pas les appareils électroniques avec déclare que le type d’appareil de numéro de les ordures ménagères ! pièce : RDC8001 satisfait à la Directive : Conformément à la directive 2002/96/CE du 2014/53/UE. - Page 49 pour ce produit dans une autre langue ? Rendez-vous sur notre site internet via le lien ci-dessous (code QR) pour découvrir les versions disponibles. Cd¹ Hg² Pb³ Alternativement vous pouvez également envoyer un pile contenant du cadmium email à l’adresse manuals@bresser.de ou laisser pile contenant du mercure un message au numéro +49 (0) 28 72 –...
-
Page 50: Advertencias De Carácter General
SOBRE ESTE MANUAL DE de los niños, ya que estos materiales representan un peligro potencial de asfixia. INSTRUCCIONES Este manual de instrucciones debe considerarse • Riesgo de quemaduras químicas — ¡Mantenga un componente del aparato. Por favor, lea las pilas fuera del alcance de los niños! Al colo- atentamente las instrucciones de seguridad y las carlas, preste atención a la polaridad. -
Page 51: Antes De Comenzar
ANTES DE COMENZAR bie las pilas agotadas o muy usadas por un juego completo de pilas nuevas a plena capacidad. No • Recomendamos el uso de pilas alcalinas. Si las utilice pilas de marcas o modelos distintos ni de temperaturas caen regularmente por debajo de 0°C distinto nivel de capacidad. - Page 52 RESUMEN DE PRODUCTO 1. Pulse y mantenga pulsado [ ] para entrar en el modo de ajuste de hora y fecha. 2. En el modo de ajuste, pulse [ + /°C°F ] para au- mentar una unidad, pulse y mantenga pulsado para aumentar rápidamente.
- Page 53 SENSOR DE EXTERIORES 1. Pantalla LCD de temperatura y humedad exte- rior 2. Compartimento para pilas. 3. TX (Iniciar la búsqueda de la unidad principal). 4. Interruptor de canal. 5. Interruptor C/F ...
- Page 54 + /°C°F –/ MODO BOTÓN Conmutación Iniciar la entre los canales 1-3 _______ PRENSA _______ recepción de los de RCC sensores para exteriores. Estándar Modo Entrar en Inicie la Turn RCC ajuste de búsqueda de _______ MANTENER encendido/ la hora y sensores en apagado la fecha...
-
Page 55: Pantalla Lcd
PANTALLA LCD 1. Símbolos del Pronóstico del Tiempo 2. Temperatura exterior 3. Temperatura interior 4. Calendario 5. Visualización de la hora y la alarma 6. Visualización de la semana ] Indicador de alerta de hielo ] Indicador de batería baja [ OUT ] Indicador de canal exterior [ IN ] Indicador de interior [ ZONE ] Indicador de huso horario... -
Page 56: Para Empezar
PARA EMPEZAR PARA BUSCAR UN SENSOR: La unidad principal buscará automáticamente un nuevo sensor después de instalar las baterías. Para INSERTAR BATERÍAS iniciar manualmente una búsqueda de sensores en 1. Retire la tapa de la batería de la parte posterior. exteriores, mantenga pulsada la tecla [ SENSOR ].. -
Page 57: Ajuste De La Zona Horaria
máticamente. Si falla dentro de los 7 minutos, la en el siguiente parámetro. configuración del RCC se cerrará automáticamente. 6. Secuencia de ajuste: Zona horaria Año Forma- Si esto ocurre, pulse y mantenga pulsado el botón to de calendario (día-mes/mes-día) Mes Día [ –... -
Page 58: Pronóstico Del Tiempo
PRONÓSTICO DEL TIEMPO ALERTA DE HIELO Este dispositivo pronostica las próximas 6-12 horas Si el sensor del canal 1 cae entre 3°C y -2°C (37°F y del tiempo en un radio de 30-50 km (19-31 millas) con 28°F), el indicador de alerta de hielo [ ] aparecerá, una precisión del 75%. - Page 59 SENSOR PARA EXTERIORES: Poder: 3x pilas AA (LR6) de 1,5 V Dimensiones TEMPERATURA: 60 x 20 x 60 mm (L x A x A) Rango de visualización de la temperatura interior: Peso: -10°C a 50°C (14°F a 122°F) 40 g (Excluye baterías) Rango de visualización de la temperatura exterior: Rango de humedad interior/exterior: -20°C a +60°C (-4°F a 140°F)
-
Page 60: Declaración De Conformidad Ce
RECICLAJE Elimine los materiales de embalaje separados por tipos. Póngase en contacto con su punto Explore Scientific GmbH declara que el ar- limpio más cercano o la autoridad local para tículo con número: RDC8001 está en con- saber el procedimiento a seguir si tiene dudas. -
Page 61: Garantía Y Servicio
¿Desearía recibir unas instrucciones de uso completas sobre este producto en un idioma determinado? Visite nuestra página web utilizando el siguiente enlace (código QR) para ver las versiones Cd¹ Hg² Pb³ disponibles. pila que contiene cadmio pila que contiene mercurio O envíenos un correo electrónico a servicio.iberia@ pila que contiene plomo bresser.de o llame al (+34) 916 797 269* Asegúrese... -
Page 62: Manual Download
MANUAL DOWNLOAD: www.bresser.de/download/RDC8001 SERVICE AND WARRANTY: www.bresser.de/warranty_terms... - Page 64 MANUAL DOWNLOAD: SERVICE AND WARRANTY: www.bresser.de/warranty_terms www.bresser.de/download/RDC8001 Explore Scientific GmbH Gutenbergstr. 2 · DE-46414 Rhede · Germany www.bresser.de service@bresser.de Explore Scientific, LLC 1010 S. 48th Street, Springdale, AR 72762 www.explorescientific.com...
Need help?
Do you have a question about the JUMBO and is the answer not in the manual?
Questions and answers