Table of Contents
Advertisement
Quick Links
Advertisement
Table of Contents

Related Manuals for SKY Engines SKY 110


Summary of Contents for SKY Engines SKY 110
- Page 1 SKY 110 ’ ANUAL...
-
Page 2: Table Of Contents
TABLE OF CONTENT INTRODUCTION ENERAL ARNINGS OW TO PREVENT ACCIDENTS USING DIRECTIONS NGINE REAK TARTING THE ENGINE TECHNICAL SPECIFICATIONS NGINE LLUSTRATION ECHNICAL PECIFICATIONS SSEMBLY OF SECONDARY COMPONENTS 3.3.1 PECIAL ASSEMBLY INSTRUCTIONS 3.3.2 ADIATOR 3.3.3 UFFLER 3.3.4 LUTCH 3.3.5 TARTER 3.3.6 ODS AND SILENT BLOCK 3.3.7 ILENCER... - Page 3 SPARE PARTS WARRANTY EQUIREMENTS HE WARRANTY APPLIES TO HE WARRANTY SHALL NOT APPLY TO PECIFIC INFORMATION ARRANTY CERTIFICATE...
-
Page 4: Introduction
1.0 INTRODUCTION Thank you for purchasing a SKY110 engine developed and manufactured by SkyEngines. If you require more information, have any questions or need to purchase spare parts, please contact us by phone or e-mail using the contact details printed on the cover. Thank you for selecting SkyEngines and SkyEngines USA. -
Page 5: General Warnings
1.1 GENERAL WARNINGS SkyEngines / SkyEngines USA shall not be directly or indirectly liable for the use of this engine, especially if it is altered or tampered with by third parties. To avoid severely damaging the engine, MAINTENANCE must be follow as specified in this manual. - Page 6 used.) Any alterations made to the engine by the user or third parties, are full responsibility of the user. Spare parts used for such alterations are not covered by warranty. (Be advised that any alterations or the removal of original parts may jeopardize the safety of the engine.) ...
-
Page 7: How To Prevent Accidents
1.2 HOW TO PREVENT ACCIDENTS As the use of this engine can be very dangerous, it is important to adopt all the necessary precautions during, before and after each flight in order to avoid severe accidents. We advise you to follow the general precautions below in order to avoid damages and or accidents. -
Page 8: Using Directions
2.0 USING DIRECTIONS The using directions provided in this manual refer to models available at the time of print. Although the manufacturer is not obligated to provide updates on changes, users may request specific information on any upgrades of single products. For more information visit www.skyengines.com www.skyenginesusa.com. - Page 10 Note: Although Bardahl is a company based in the United States (HQ’s in Seattle, Washington), as of July 28, 2016, they do not produce the 100% KTS Synthetic Oil in the U.S.A., it is produced in Italy and Europe and hard to find locally. Make sure you use a premium quality 100% Synthetic Oil for 2 Cycle Engines.
- Page 11 DURING BREAK-IN 3% (1:32 PERIOD AFTER BREAK-IN 2.4% (1:40 PERIOD * Based on U.S. Gallons...
-
Page 12: Engine Break-In
ENGINE BREAK-IN A good break-in ensures a long life of the engine and enhances the performance of its components. Although you may use your engine for flight during the break-in, it is suggested that you perform the break-in for the first 3 hours on the ground. -
Page 13: Starting The Engine
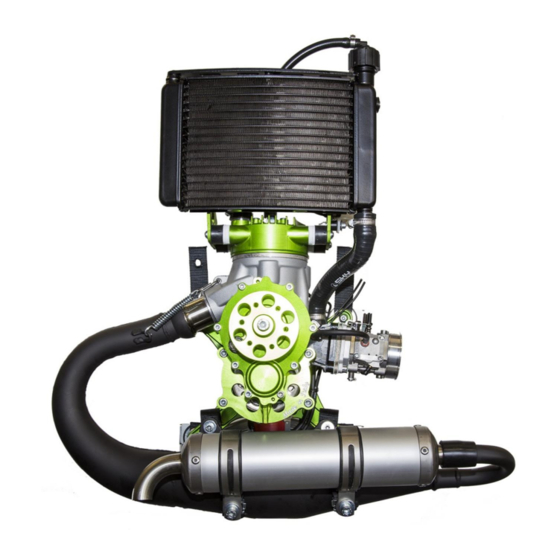
accelerator changing the RPM from low to high, again, without exceeding 5,000 RPM for the first 1.5 hours. From 1.5 hours to 3 hours, follow the same procedure but this time do not exceed 8,000 RPM. Again, do not keep the accelerator in the same position for several seconds, keep opening and closing it. - Page 15 ENGINE ILLUSTRATION AND PART NUMBERS PART NAME PART NUMBER PART NAME PART NUMBER 1: CYLINDER SK006 11: IGNITION COIL SK033 2: RADIATOR CAP SK013 12: MUFFLER SK040 3: RADIATOR SK010 13: RADIATOR HOSES SK011/012 4: LAMINAR BUNDLE SK021/024/026 14: DRAIN RESERVOIR SK014 5: MUFFLER SEAL SK043...
-
Page 16: Technical Specifications
TECHNICAL SPECIFICATIONS SINGLE-CYLINDER 2 STAGE ENGINE WITH LIQUID TYPE COOLING SWEPT VOLUME 112cc MAXIMUM POWER 26 HP @ 10900 RPM MAXIMUM RATED SPEED 26 HP @ 11300 RPM BORE 55 mm STROKE 43 mm REDUCTION MECHANICAL 1:4 OIL LUBRICATED THRUST 72 Kg WITH TWO 125cm PROPELLERS @ 10900 RPM* CARBURETOR WALBRO WG8... -
Page 18: Assembly Of Secondary Components
ASSEMBLY OF SECONDARY COMPONENTS 3.3.1 SPECIAL ASSEMBLY INSTRUCTIONS The engine SKY110 is more complex than other models and a higher level of experience is required to assemble its components, specifically its internal ones. As the engine is liquid cooled, the assembly of the components that use the radiator’s coolant requires the implementation of specific tasks that only a skilled mechanic is able to carry out. -
Page 19: Radiator
3.3.2 RADIATOR... -
Page 20: Muffler
3.3.3 MUFFLER... -
Page 22: Clutch
3.3.4 CLUTCH After reduction’s un-mounting, unscrew the center nut by a pneumatic or manual wrench (in the second case block crankshaft rotation). Remove the washer. Unscrew the nut of pad’s pin with an 8mm wrench. Remove the pin (squeeze pads to better extract it). - Page 23 In the new pad, unscrew completely the dowel and put the spring in its site (greater diameter into body clutch). SQUEEZE THE PAD (AS IN UN-MOUNTING CASE) TO CENTER HOLES (IT COULD BE USEFUL TO USE A LITTLE TUBE) AND PUT IN THE PIN.
- Page 24 Use a medium force screw blocker, replace the washer and tighten the nut. (It is normal for the washer to move a little bit.) Put some force screw blocker on the registration dowel and tighten it.
- Page 25 Adjust dowel to have a little space between pad and clutch when you try to open it. It is the same for the other. Mount clutch on crankshaft without forcing it too much. Reassemble washer and nut.
- Page 26 If you need to tune up clutch, it is possible to adjust dowels by a wench in carter’s holes without un-mounting clutch. NOTE: IGHTENING DOWELS YOU HAVE A SMALLER OPENING OF PADS RELEASING THEM A FASTER CONTACT OF PADS ON BELL HOUSING...
-
Page 27: Starter
3.3.5 STARTER Remove the cover from the manual starter losing the screws in a crossed pattern. Loosen the wire reel and remove it from the cover. Loose the dandle and remove the wire reel from the spring. - Page 28 Remove the worn wire from the side hole of the wire reel and replace it with a new one. Knot the end of the wire and firmly insert the knot into the hole. To replace the spring, insert the end side into the cover duct as shown in the photo.
- Page 29 Thoroughly lubricate the area in contact with the spring. Insert the wire reel and turn the spring by one revolution. Loosen the worn teeth of the flywheel.
- Page 30 Install the new teeth following the procedures outlined in photos 1, 2, 3...
-
Page 31: Rods And Silent Block
3.3.6 RODS AND SILENT BLOCK Install the silent blocks with the Teflon plate on the rod supports. Install the rods on the silent blocks. Install the silent blocks on the rods. - Page 32 Install the tank as shown in the photos. Slightly tightening the nut until the tip of the screw is visible. Install the radiator on the silent blocks.
-
Page 33: Silencer
3.3.7 SILENCER Loosen the small bolts that join the manifold to the base of the muffler. Remove the base of the pipe. Remove the pipe while maintaining in place the manifold muffler. - Page 34 Remove the old glass wool. Couple the new glass wool. Fold the glass wool in its original configuration, reinsert the pipe and tighten the manifold as described above.
-
Page 35: Laminar Bundle
3.3.8 LAMINAR BUNDLE Apply a minimum amount of Sili Motoron to the mouth of the laminar bundle, distribute it consistently with a finger and verify that there are not traces of material inside the bundle. Insert the Teflon plate and the laminar bundle. - Page 36 Install the ring and the Walbro carburetor on the small plate using M6X50 screws.
-
Page 37: Carburetor
3.3.9 CARBURETOR Loosen the Walbro carburetor and replace membranes 1 and 2. Screw carburetor back the same way it was removed. -
Page 38: Maintenance
MAINTENANCE THIS CHAPTER CONTAINS VERY IMPORTANT INFORMATION. IN ORDER TO ENHANCE THE LIFE OF YOUR ENGINE AND PREVENT PROBLEMS CAUSED BY WEAR, IT IS ESSENTIAL TO CAREFULLY READ ALL THE WARNINGS AND DATA ON SCHEDULES AND FOLLOW ALL THE INSTRUCTIONS PROVIDED. BE ADVISED THAT DAMAGE(S) ORIGINATING FROM LACK OF MAINTENANCE IS/ARE NOT COVERED UNDER WARRANTY. -
Page 39: Topping Up Liquids
the maintenance operations described in the chapter above with a frequency of at least 50 hours of flight for an optimum operation of the muffler. TOPPING UP LIQUIDS The only liquids that need replacing are: RADIATOR COOLANT ; the level of the radiator coolant must inspected approximately after 50 hours of flight by performing the following operations: 1. - Page 41 REDUCTION OF GEAR OIL 1. Regularly inspect the oil level in the reduction gear by bushing on the front side (with engine in vertical position, it must be at the lower level of the hole). 2. Replace the whole amount of oil after approximately100 hours or if you notice that the bushing is placed in perfect vertical position.
-
Page 42: Adjustments
ADJUSTMENTS The only adjustment that may enhance the operation of the engine is the regulation of the maximum and minimum level of the carburetor: STANDARD ADJUSTMENT: OPEN INDICATED SCREW BY ONE AND A QUARTER OF REVOLUTION SCHEDULES AND GENERAL RECOMMENDATIONS This paragraph lists a few recommendations that have been defined as a result of the tests carried out by our mechanics and on the basis of the feedback provided... - Page 43 Chapter 7.0. You can also use this space for feedback or queries, to which we will be glad to answer. Some components of the SKY110 engine are subject to wear. Therefore, to avoid damaging the engine or affecting its operation, we recommend that you perform the operations described below at the specified intervals.
- Page 44 take off during beginning practice) to check constantly the wear of the different component of the clutch. Replace the membranes of the carburetor after 100 hours of flight or one year (whichever comes first). Inspect the laminar bundle under the radiator every 50 hours of flight.
- Page 45 MAINTENANCE SCHEDULE DEADLINE CHECK CHANGE First 5 hours and after Global check tightening 15 hours bolts and screws Muffler’s silent blocks Every 25 hours conditions. Fixing wrappers. * Clutch pads wear * Reduction oil level * Spark plug Every 50 hours * Coolant level * Wool glass into * All silent blocks...
-
Page 46: Spare Parts
SPARE PARTS The manufacture always recommends the use of original SkyEngines parts only. The catalog of spare parts is available www.skyengines.com / www.skyenginesusa.com. Spare parts can be ordered by contacting us directly by phone or e- mail, or through local distributors. For information on how to replace components covered under warranty, see the following chapter. -
Page 47: The Warranty Shall Not Apply To
problem. If the product has not been purchased directly from us, please contact your distributor first. THE WARRANTY SHALL NOT APPLY TO: Failures/faults caused by an improper use or negligence. Engine modifications not specifically authorized an approved by SkyEngines S.r.l. ... -
Page 48: Specific Information
Sky Engines S.R.L C.da San Rustico Snc 63065 Ripatransone (AP) - ITALIA Phone: +39 0735 907064 Fax: +39 0735 907064 Email: info@skyengines.com Sky Engines USA 12033 NW 117 Miami, FL 33186 (USA) Phone: 1-305-367-1596 Email: skyenginesusa@gmail.com Facebook: Sky Engines USA... -
Page 49: Warranty Certificate
6.5 WARRANTY CERTIFICATE ENGINE CODE: _____________________________________________ MODEL AND COLOR:________________________________________ DISTRIBUTOR NAME:________________________________________ DATE OF PURCHASE:________________________________________ SITE OF PURCHASE:_________________________________________ THIS CERTIFICATE GUARANTEES THE ENGINE FOR ONE YEAR, STARTING FROM THE DATE OF PURCHASE. FOR DETAILED INFORMATION ON THE TERMS, CAREFULLY READ THE MANUAL.
Need help?
Do you have a question about the SKY 110 and is the answer not in the manual?
Questions and answers